|
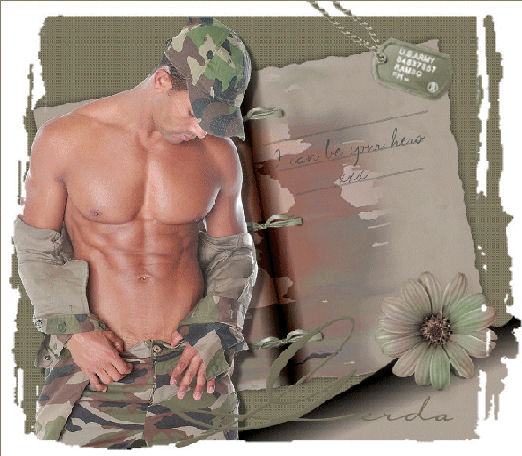
HERO
Gerda's original Dutch tutorial
here
This tutorial was done in PSP 9
but can also be done in Corel PSP 10
A intermediate knowledge of
the program is required.
FILTERS NEEDED
DC Special
Xenofex 1.0
Supplies:
A tube of Susan
A picture frame - store it in your PSP - Picture
frames folder
(of the program)
A textbrush and some tubes.
Do not dubble-click on the zip file to open it.
Right-click on the unopened file
and choose - 'extract (from) here.
Copy all the images and move them to a folder of
your choice if
you want to.
If you don't do it this way Lycos will indicate
an empty file.
Download the supplies here.
*****
METHOD
Step 1
Foreground color on #75715c.
Open a transparent canvas, size 700 x 600
pixels.
Fill with the color.
Effects - Texture Effects - Blinds 3/100 all
options checked
and color #7e7761.
Repeat the blinds effect but this time
'horizontal' should be unchecked.
Effects - Edge Effects - Enhance.
Step 2
Add a new raster layer.
Selection Tool - Rectangle:
Custom selection:
Left 60
Top76
Right 633
Bottom 519
Fill the selection with this color #aea195 .
Copy the 'gerdaeffect8' - template.
Paste it into the selection
and keep selected !!
Filter-->xenofex 1,0 -->Crumple - as seen below:

Deslect.
Filter DC Special -->book 0/70
Drop shadow: 0/0 /50/15 color black.
Open the 'strikkiesgerda55- tube.
Copy and paste as a new layer onto the canvas.
Position the bow in the center of the book.
Lock the bottom layer in the Layers palette.
Merge layers visible.
Image - Rotate - Free Rotate 10 - left
'Rotate single layer around canvas center =
checked.
Merge layers visible.
Step 3
Add a new layer - fill with color #aea195.
Layers - Arrange - Move down.
Activate the top layer.
Effects -->Image Effects --> Page Curl:
( use your green color)

Merge the layers.
Step 4
Open the 'susan t3017'- tube.
Mmmmm...yummie! :-))
Copy and paste onto the canvas.
Move it to the left.
Apply a drop shadow: 10/10/50/5 color black.
Open the 'bloemlegergerda'- tube.
Copy and paste onto the canvas.
Move it to the bottom right on the edge of the
page curl.
Add a new raster layer and set the foreground
color to #4c454d.
Activate your Brush tool and find the
'gerdawords130'- brush.
Apply the brush to the canvas.
Merge layers visible.
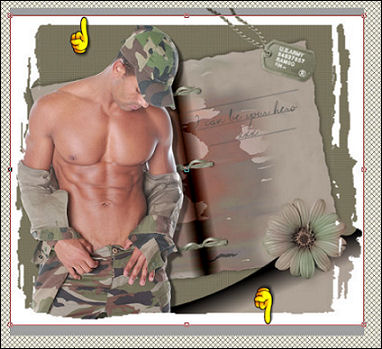
Image - Picture Frame - find 'rand76' and apply
as seen below:

Step 5
Open the 'SE44gerda'- tube.
Copy and paste as a new layer onto the canvas.
Position it on the corner edge of the book.
Merge layers.
Use the deformation tool to cut the edge a bit
so that
we can get a smaller white edge, as seen below:
Add a 1 pixel border in the green color.
Add a new raster layer.
Change the background to your green color.
Open the 'Carlotta Type - font.
Make the first letter size 150 and the rest of
your name size 48 if your name
can fit into the tag this way.
Apply an Inner Bevel
with the settings:

Step 6
Open Animation Shop.
Back to PSP.
Activate the Selection Tool with opacity on 5.
Select part of the magnificent hunk's torso - do
a slowwww selection
and enjoy yourself - it's ladies hour, girls
:-))
( Gerda makes me laugh here while I am
translating - very naughty of her! :-))

Press Shift +D on your keyboard to make a
duplicate of your canvas.
Effects - Distortion Effects - Pinch: strength
10.
Deselect.
Copy and paste into AS as a new animation.
Activate the duplicate again.
Effects - Distortion Effects - Pinch: strength
20.
Deselect.
Copy and paste in AS behind the selected frame.
Edit - Select All ( frames in AS)
and change the animation properties 150.
Save.
You're finished ! :-)))
This
tutoral can be used freely, but please don't copy.
You may use a text-link to it.
Back to Index
©Design by Gerda
Visit Gerda's Dutch
website here


This website was created in March 2005 and is owned
by
©Magstags
Home |
Filter links |
Email | Terms Of Use
|