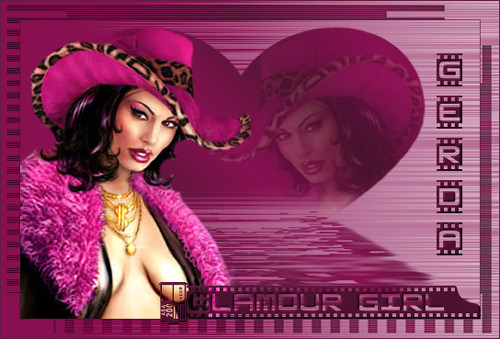
Glamour girl
***
Materials needed:
You will find the materials needed below.
A good knowledge of PSP is
required
Supplies:
A tube - tubed by me- gerglamourgirl1
2 masks: 182-kris en 122 kris
Download supplies here
Filters: VM toolbox
Download here
***
Step 1
Open a new canvas
500x325 and fill with this color #a41360
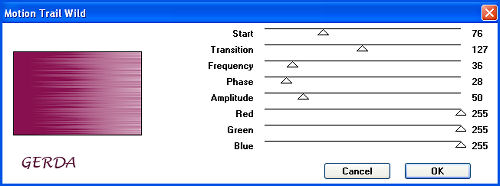
Filter VM toolbox
-->Motion Trail Wild, as seen below:
New
layer
Foreground on #a41360
Background on #561536
Gradient: Linestyle -linear
Angle
45
Repeat 5
Fill the canvas with the gradient
Load mask van disk --> mask 122-kris -->
InvertTransparency unchecked
Delete mask ( right-click on your layers palette on
this layer and reply " yes" to the question
Layers-->
Merge Group
Step 2
Open
the
gerglamourgirl1 - tube
and paste as new layer onto your canvas
Drag it to the left corner
Duplicate
this layer
Image --> Mirror
Drag the glamour girl pic into the heart.
Note that her hat is just below the edge of the
heart,
as in the screenshot.
Change the opacity of this layer to 20%.
Activate your Eraser Tool and with the
hardness set on 100, size 25,
erase the part of her body that's in the water.
If you can't see well, change the opacity back to
100% to do it, and then change it back to 20% when
you're finished.

Merge All Layers
Step 3
Add a 1 pixel border, color #561536
Add a 20 pixel border color #a41360
Filter VM toolbox
--> Motion Trail Wild -
with the same settings as in step 1.
Keep selected and add a new layer.
Fill it with the gradient:
Foreground color #a41360
Background color #561536
Linestyle -linear
Angle 45
Repeat
5
Mask -->load
from disk -->mask 182 kris
" Invert transparancy" unchecked
Delete mask
Merge Group
Deselect
Activate the group-layer
Effects -
Texture Effects
-Blinds 2/61,
all settings checked, color black
Add a 1 pixel border, color #561536
Step 4
New layer
Open the Hour Photo font
Background on
#561536
Now I must think hard how I did it.lolol. But here
goes:
Set the font size on 30 or 36, or whatever you
choose.
Type the letter " a " in lower case - to get
the film roll
Type your text " Glamour" - in UPPERCASE
Type the letter " o" in lowercase
(that is a space without a letter on your canvas ....lol )
Type " Girl" in uppercase
Then the letter " k" in lowercase -
which is the end of the film roll.
It's a very good thing I'm not working for a glamour
magazine
:-)))
Drag the text in place.
The end of the film roll should be against the edge
of the canvas
Inner Bevel soft edge 2 , 14/4/-7/8 ,315 37/42
Step 5
This is a lot simpler lol
Use the font Hour Photo - size 30 if you
have a long name, or choose whatever size fits in.
Add your text in Uppercase and place this text
vertical
Innerbevel: soft edge 2 , 14/4/-7/8 ,315 37/42
Merge all layer and reduce the size
of the image to 500 pixel in width.
Your Glamour girl is finished!
This tutorial can be used freely.
All I ask of you is to link to it only
and not copy it,
since it takes a lot of time to write a
tutorial like this.
I don't have time to respond to
emails,
however, you are welcome to
ask questions in my PSP
group
" Ger's Psp Café
"
Click here
if you're
interested.
Back to Index
Design
by Gerda
Don't
copy
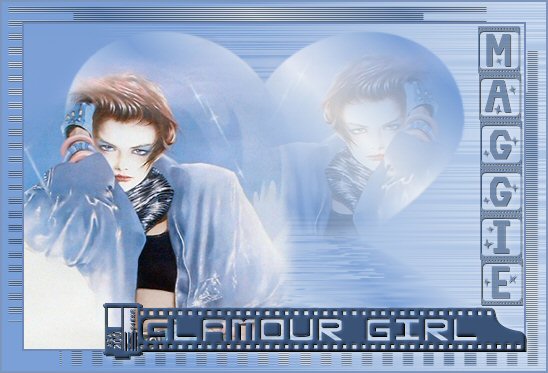
Another
example:)
translated 3 July 2005
by ©magstags
Visit Gerda's Dutch
website here


This website was created in March 2005 and is owned
by
©Magstags
Home |
Filter links |
Email | Terms Of Use
|