Gerda's original Dutch tutorial can be found
here
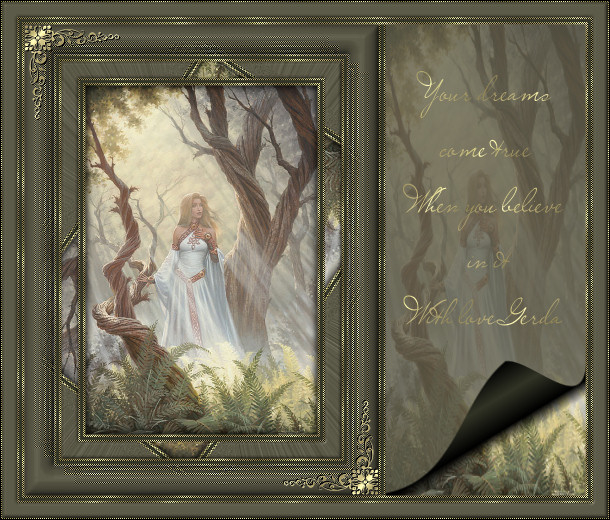
Forest
Mist
Welcome
to this tutorial which was done in
PSP 9
The tube is from Jonathan Earl Browser and is
copyrighted©
This tutorial is named after the
original painting with the same title
You will find the materials needed below.
A good knowledge of PSP is
required.
We need the following filters:
The forest image,
the corner: cornergerdaG6;
a gold pattern
and the
font- Miss le Gatees
can be downloaded
here
Store everything away and get something to eat.
Enable your answering machine;
Ok
are you ready ? Lets go and follow me :)))
Step 1
Open your tube
and resize it. The longest side should be 350 pixels
Open
the Forest image and copy it. We might need it.
Ok
back to your original image :))
Select all - floating
Effects--> 3D Effects--> Cut Out 3/3/70/9 color black
Repeat but this time horizontal and vertical should be on -3/-3
Step 2
Add a 2 pixel border and fill with the gold -->
Effects --> Filter Cybia Screenworks -->
Pixel Shade -standard settings
Add a
3 pixels border and fill with color #323426
Add a 2 pixels border and fill with gold. -->
Effects Filter --> Cybia Screenworks --> Pixel Shade
Step 3
Add a 17 pixel border
Fill with this color #5a5846
Adjust --> Add/Remove Noise --> add noise 8% -
monochrome checked
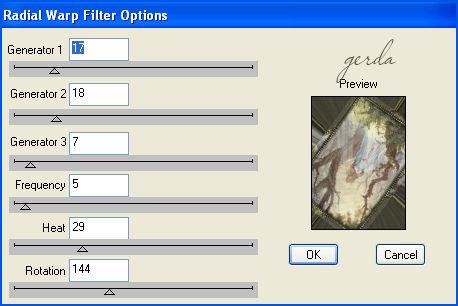
Effects --> DSB Flux - Radial warp( PLEASE NOTE
!!! NOT the RADICAL WARP :-)) - see below
Adjust--> Sharpness --> Sharpen
Add an Inner bevel : Soft edge = bevel no.5,
14/5/-30/14 ,
angle 315, 37/68 color white
Deselect
( Ctrl + D)
Step 4
Repeat step 2
Step 5
Add a 30 pixels border and fill with this color #5a5846
Filters Unlimited--> Special Effects 1 --> Shiver-->
Horizontal 30, Vertical 20.
Effects--> Edge Effects --> Enhance
Inner Bevel --> Round bevel 16, settings
15/11/0/16 ,
angle
315 , 25 / 72 color white
Deselect
Step 6
PLEASE FOLLOW THIS STEP VERY CAREFULLY !!!!!
Add a
border: but "Symmetrical" must be unchecked.
All
the settings should be on "0" - except for the Right
border setting, which should be on 2 .
Fill this border with gold.
Effects --> Filter Cybia Screenworks -->
Pixel Shade
Add a border with "Symmetrical" still unchecked. Only
the "Right" setting should be on 3, the rest on 0.
Fill
this border with #323426
Add a border, "Symmetrical" still unchecked
"Right"
border should be on 2,
the rest
on 0.
Fill
with gold
Effects --> Filter Effects-->
Cybia Screenworks --> Pixel Shade
Step
7
KEEP THE SELECTION ACTIVE UNTIL THE END
OF
THE STEP :)))
Add a border, with "Symmterical" still unchecked.
Right
border should be 200; the rest on 0
Magic Wand --> Select the border and fill with color #5a5846
While the marching ants is still marching :-), add a new
raster layer.
Copy the
Forest image and paste into the selection
Add
another raster layer and fill with color
#5a5846
Add another layer again.
and paste your copied image into the selection
Change the opacity of this layer to 26% in your Layers
Palette
NOW you can deselect!!! :-))
Step
8
If it went well you will have 4 layers now.
X-out ( lock) the two bottom layers.
Activate one of the others and merge them visible.
Unlock
the two bottom layers again.
Activate the merged layer
Effects --> Image Effects--> Page Curl, with the settings
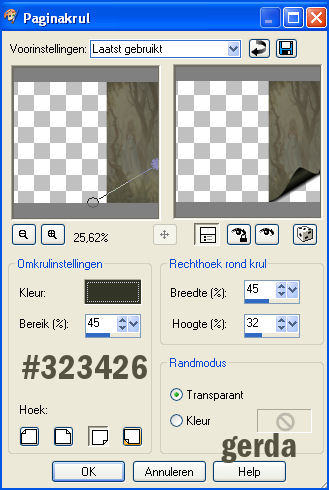
Merge
All layers
Step
9
Repeat step 2
Step 10
Add a SYMMETRICAL border of 15 pixels
Fill with the color #5a5846
Inner Bevel - soft edge = bevel 5, 14/5/-30/14 ,
angle 315, 37/68 color white.
Open
your corner cornergerdaG6
and place
it in the top left corner of the frame
Duplicate this layer.
Image --> Flip-->
and Image--> Mirror.
Place it in the bottom right corner of the frame.
Add a new layer and open the Miss le Gatees-
font
Your background should be on the gold pattern.
Add a
nice poem or proverb of your own choice
:))
Merge all layers.
Filters NVR Bordermania --> Frame 2, with all settings
on 1,
and
you're finished
:)))))
This lesson can be freely used. All I
asked is that you only link it and not copy it,
since it takes a long time and a lot of effort
to write a tutorial.
Since I am under a lot of
pressure with other work, I cannot
respond to personal emails.
However,
you are welcome to ask any questions on my
PSP
groep
" Ger's Psp Café"
.
Click here
if
you're interested.
Back to Index
Design by Gerda©

Translated 3 July 2005
by ©magstags

*** The graphics on
this page is copyrighted to ©Gerda ***
This website was created in March 2005 and is owned
by
©Magstags
Home |
Filter links
|
Email |
Terms Of Use