|

Gerda's original Dutch tutorial
can be found
here
Faye
This tutorial was done in PSP 9
but can also be done in 8 or 10.
You will need a good knowledge of PSP.
***
Filters
FM Tile Tools - Graphic Plus: download here
***
Materials needed:
gold pattern;
one psp image filled with the 'fayegerda'-selections;
4 tubes.
Download the supplies here
Right-click on the file to open it,
otherwise Lycos will open an empty file.
Save everything and let's begin.
Step 1
Open the 'fayegerda pspimage' (it
is not an empty image -
the selection is in the Alpha channel)
Foreground on #652e1f (dark color)-->
background on #cf9452(light color )
Change the foreground to gradient:
Angle
= 45,
repeat = 1,
Invert = unchecked.
Fill the canvas with the gradient.
Add a new layer.
Invert the gradient.
Selections --> Load/Save Selections
-->
Load Selections from Alpha channel -->
load selection
'fayegerda1'
Fill the selection with the gradient.
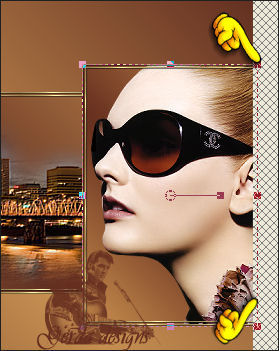
Copy the 'Lisa G seriemisted Cityscape
033 Oregon' tube
Paste it into the selection
Deselect and merge layers.
Filter Fm Tile Tools -->Blend Emboss
Step 2
Change the foreground to the gold
pattern.
Add a new layer
Load the 'fayegerda1' selection again
from the Alpha channel
and fill with the gold pattern.
Selections -->Modify --> Contract
by 1.
Press 'delete' on your keyboard.
Selections --> Modify --> Contract
by 2
Fill the selection again with the gold
pattern.
Selections --> Modify --> Contract
by 1 and press delete.
Deselect
Drop Shadow: 1/1/50/0 color black.
Activate the Deformation Tool and draw
out the gold border
so that it is
outside the canvas, as seen below.

Merge all layers
Step 3
Change the foreground back to the
gradient.
Add a new layer.
Selections --> Load/Save Selections
--> Load
selection from Alpha channel 'fayegerda2'
Fill the selection with the gradient.
Adjust --> Blur --> Gaussian Blur
= 12
Open the 'filly 793'-tube and resize to
70% - bicubic
Copy and paste the tube as a new layer
onto the canvas.
Drag the tube into the selection as seen
below.

Selections --> Invert.
Press delete.
Deselect.
New layer.
Load the 'fayegerda2'-selection again
from
the alpha channel and fill with the gold pattern.
Selections --> Modify --> Contract
by 1 and press delete.
Selections--> Modify --> Contract
by 2
Fill the selection again with the gold
pattern
Selections --> Modify -->
Contract by 1 and press delete.
Deselect
Drop shadow: 1/1/50/0 color black
Activate the Deformation Tool again
and drag the gold edge again outside the image, as seen below.
Lock the bottom layer. Activate one of
the other
layers and merge the layers visible.
Drop shadow: 0/-10/50/15 color black
Unlock the bottom layer and activate it.
Activate the Pen Tool - size 2, keep the
Shift-key pressed down and draw
a ribbon as seen in the screenshot below.

Drop shadow 1/1/50/0 color black
Step 4
Open the 'filly 794'-tube.
Copy and paste as a new layer onto the canvas and drag to the left.
Drop shadow 10/10/50/5 color black
Activate the bottom layer !!!!!
Add a new layer
Change the foreground to gradient -->
Invert = not checked.
Load 'fayegerda3'- selection from
the Alpha channel and
fill with the gradient.
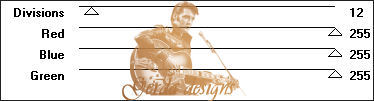
Filter Graphic Plus -->Vertical
Blinds - with these settings:
Duplicate this layer.
Layers --> Arrange --> Bring to
Top
Drag this layer to the left and
a little
out of the canvas so that you have
only 6 blinds on the canvas - as
seen in the screenshot

Duplicate this layer again
Image -->Mirror.
Drag it to the outside of the canvas again so that
only 3 blinds remain on the canvas.
Merge all layers.
Step 5
Add a 5 pixels border
Select with the Magic Wand and fill with
the gradient.
Keep selected.
Add a new layer and fill with the gradient.
Selections --> Modify --> Contract by 1 and press the delete key.
Deselect.
Drop Shadow: 1/1/50/0 Color Black
Open the 'parfum P23 dozi'- tube -->
Copy and paste onto the canvas and position it in place.
Drop Shadow: 0/10/50/5 color black
Add your name :)))
The font used by Gerda was Bickham Script
and the drop shadow applied, was:
0/1/50/0 color black
Merge all layers
Finito :)))
This
tutorial can be used freely, however,
please don't copy it. Only link
to it.
Back to Index
Design by
Gerda©
translated 12th June 2006
Visit Gerda's Dutch
website here


This website was created in March 2005 and is owned
by
©Magstags
Home |
Filter links |
Email | Terms Of Use
|