|
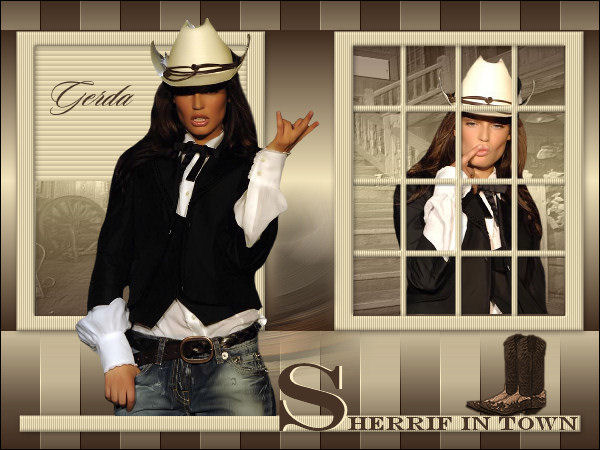
Chocske
Gerda's original Dutch tutorial can be
viewed
here
Translated 6th October 2006
This tutorial can be done
in either PSP 9 or 10.
An average to good knowledge of PSP
is required.
***
MATERIALS NEEDED:
|
Filters: |
FM Tile Tools
DSB Flux
|
Supplies: |
gerdachocske
2 tubes of Chocske
2 tubes of Gerda
Font 'Sloopscript'
gerdachocske1
western saddels image |
Filters:
download here
Supplies:
Download here
Right-click on the downloaded zip
files
and click on 'exctract to here',
otherwise Lycos will only show and empty file.
Copy everything to your files before you start
the tutorial
and restart PSP for the filters to work.
*****
Stap 1
Open the 'gerdachocske'- psp image.
( it contains the selections in the Alpha
channel and is not empty)
Foreground
color on #3e2a1c,
background on #f2e4bc
Change the
foreground color to gradient,
with these settings:
Style - Linear;
Angle - 0;
Repeats - 3;
Invert - not checked.
Fill the image with the gradient.
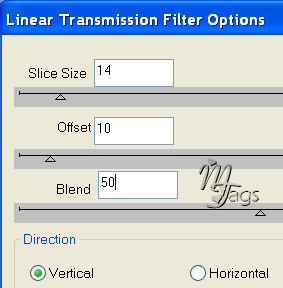
Filter DSB Flux --> Lineair Transmission.
Apply with these settings:
Filter -->FM
Tile Tools
--> Blend Emboss
Change the gradient's 'Repeats'setting now to 1.
Add a new layer.
Load the 'gerdachoc1'- selections from the Alpha
channel.
Open the 'western saddels'-
picture.
Edit --> Copy ( to get it into the memory for
now)
Add a new layer.
Selections --> Load / Save --> Load From Disk.
Find the 'gerdachoc2'selection and apply.
Edit --> Copy Into Selection.
Deselect.
Filter FM Tile Tools --> Blend Emboss
Change the blend mode of this layer to
'Luminance Old'
in your Layers palette.
Change the opacity of the layer to 40%.
Merge layers.
Stap 2
New layer.
Change the
foreground to your light color.
Load the 'gerdachoc3'- selection from the Alpha
channel.
Fill with the light color.
Effects --> Texture Effects --> Blinds:
5/20, all options checked, color - your dark
color.
Deselect.
Add a new layer.
Load the 'gerdachoc4' - selection from the Alpha
channel.
Fill with the light color.
Effects --> Texture Effects --> Blinds:
2/20 HORIZONTAL not checked.
Color = your dark color.
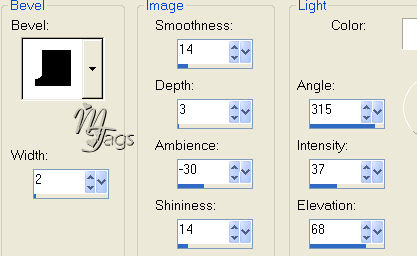
Effects --> 3D Effects --> Inner
Bevel.
Apply with these settings:
Deselect.
Drop shadow: 1/1/50/2
color black.
Stap 3
Activate the
bottom layer.
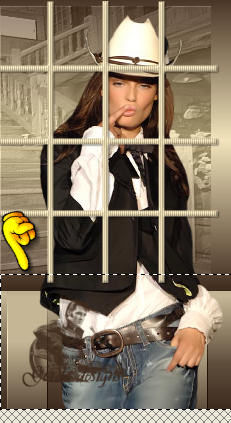
Open the 'women02chocske'-tube.
Copy and paste as a new layer onto the canvas.
Drag it behind the windows.
The jeans
will appear below the window :))
Activate the
Selection Tool --> Rectabgle.
Draw a rectangle over the part that must be
deleted.
Press 'Delete'.
Merge
layers.
stap 4
New layer.
Load the 'gerdachoc5 '- selection from the Alpha
channel.
Fill with the light color.
Effects --> Texture Effects --> Blinds
2/20 - horizontal not checked. Color = dark
color.
Repeat the inner bevel effect of step 2.
Apply a drop shadow:
1/1/50/8 color black.
Merge
layers.
Stap 5
Open the 'women01chocske'-
tube.
Copy.
New layer.
Load
the 'gerdachoc6'-
selection from the Alpha channel.
Paste the tube into the selection.
Stap 6
Activate the
bottom layer. Add a new layer.
Load the 'gerdachoc7'- selection from the Alpha
channel.
Open the 'gerdachocske1'tube.
Copy and paste into the selection.
Deselect.
Merge layers.
Stap 7
Load the 'gerdachoc8'-
selection.
Fill with black.
Add a new layer.
Open the 'gerdachocsketekst'- tube.
Edit --> Copy.
Load the 'gerdachoc9'-selection.
Paste the text tube into the selection on your
canvas.
Deselect.
Open the 'chocskelaarzengerda'- tube.
Position it at the bottom left of the canvas,
above the letters.
Change your background color to the dark color.
Open the 'Sloopscript'- font.
Activate your text tool and add your name.
Merge all layers.
You're finished ! :-)))
This
tutoral can be used freely, but please don't copy.
You may use a text-link to it.
Back to Index
©Design by Gerda
Visit Gerda's Dutch
website here


This website was created in March 2005 and is owned
by
©Magstags
Home |
Filter links |
Email | Terms Of Use
|