|
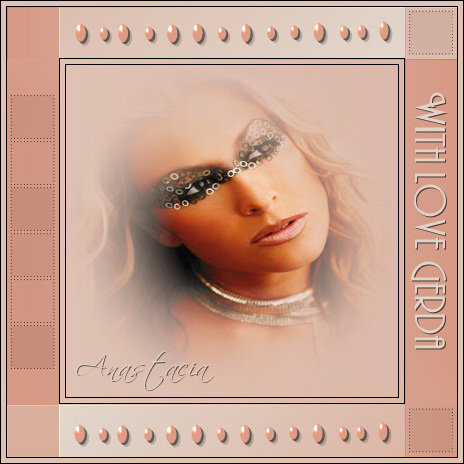
Anastacia
Gerda's original Dutch tutorial can be found
here
The tutorial is written for PSP 9
A good knowledge of PSP is required
Materials
needed:
Filters:
Supplies:
Preset
shape;
L&K bolletjeslijn 4;
Tubes Susan T 1624;
Tube geranastacia1
Brush wljsqaures 22 001,
two fonts Andes en Scriptina
Download here
Step 1
Open
a new transparant canvas 450 x450 pixels
Foreground on #ede1d6
Background on
#e09c85
Gradient:
- style linear
-
angle 90
-
repeats 0
-
invert
unchecked
Fill
your canvas with the gradient
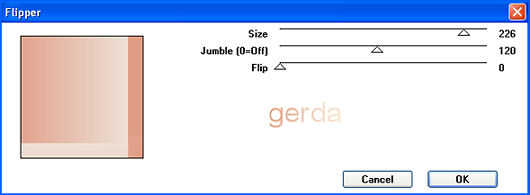
Step 2
Filter Vm Distortion -->
Flipper -
as seen below
Duplicate
this layer
Image --> Mirror
Image
--> Flip
Change the opacity of this duplicated layer to 60%
Merge all layers
Effects --> Plugins -->
Fm Tile tools -->
Blend Emboss
Step 3
Open
your tube Susan T 1624 and minimize
Change your foreground to black
Add
a new layer
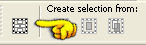
Go
to your Selection Tool --> Rectangle -->
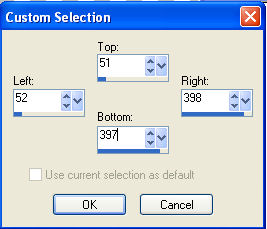
Open
the Custom Selection
and
change the settings as follows:
Fill
the canvas with black
Selections -->
Modify --> Contract with 1
and
press delete on your keyboard
Selections -->
Modify -->
Contract by 5
Fill
the canvas with black
Selections -->
Modify -->
Contract by 1 and
press delete on your keyboard
Copy
your tube and paste it into the selection
Deselect
Merge all layers
Stap 4
Add
a 1 pixel black border
Take
your color picker tool and choose
a color between the
black lines around Anastacia.
Mine
was
#dec3b3
Add
a 5 pixel border in any color not in your image
and
fill with this color
Add
a 1 pixel black border
Step 5
Lock
the foreground color and
change the background color to
#e09c85
Go
to your Preset Shape tools and choose the L&K
bolletjeslijn
-->
width on 1 --> Vector and Anti
Alias checked
Draw
a line from left to right in the top bar as seen in my
Anastacia example above
Drag
it into position
Convert the vector layer to raster layer in your layers
palette
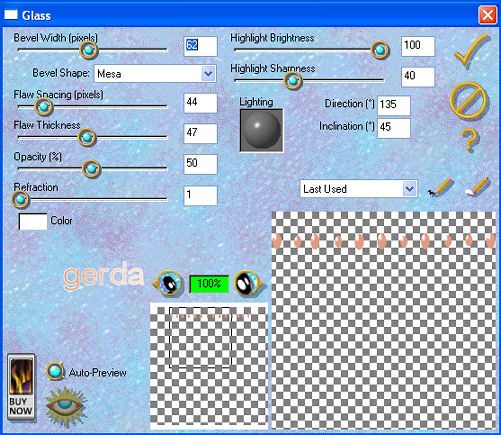
Filter Eyecandy 3.1 -->Glass -->with
these settings
(
COLOR WHITE !!!!!!)
Layers --> duplicate this layer
Use
your Mover Tool to drag it to the bottom bar
Do
you like it? You can shift it some more :)) lol
Lock
the bottom layer.
Activate one of the other layers and merge visible
Drop
Shadow 2/2/42/0 color black
Merge all layers
Step 6
Foreground color on black
New
layer
Brushes--> wljsqaures 22 001-->
size 150 -->
change the Blende Mode of this layer to Darken
in
the layers palette
Apply the brush on the left side
Go
to Image --> Rotate 90 degrees
ALL
LAYERS UNCHECKED !!!!
Move
into the bar on the left as seen
in
my example tag above
Duplicate this layer
and
move it to the bottom
Lock
the bottom layer, activate one of the others,
and
merge visible
Now
you can move this layer where you want it.
:))
Merge all layers
Step 7
Open
your tube geranastacia1
and
paste as new layer in the top right of the canvas
in
the little square
Duplicate
Image
--> Flip
Merge all layers
Step 8
I
used the fonts Andes and Scriptina
New
raster layer
Change the background color to your light color
Font Andes --> type
your text ( your name or whatever:))
Image -->
Rotate 90 degrees
Drop
Shadow 1/1/60/0 color black
New
raster layer
Font
Scriptina --> type "Anastacia"
Drop
Shadow 1/1/60/0 color black
Merge all layers
Your
tag is finished
This tutorial can be used
freely, but should not be copied.
You can link to it.
It takes a lot of time to write
a tutorial.
Since Gerda doesn't have much time,
she cannot reply to any emails.
However you are welcome
to ask questions in her PSP group
" Ger's Psp
Café" .
If you're interested,
click here
Design by Gerda©
Back to Index
Translated 8th August 2005
Visit Gerda's Dutch
website here


This website was created in March 2005 and is owned
by
©Magstags
Home |
Filter links |
Email | Terms Of Use
|