|

~*~ Sadness
~*~

Marian's original
Dutch tutorial can
be viewed
here.
This tutorial was
written for PSP 9
but can be done
in other
versions as well.
Download the
supplies
here
or
here
The tubes were made
by
MarieL
Suzi Sgai
and
*Nightangel
(*no link available
on the tube)
FILTERS NEEDED:
FM Tile Tools -
Blend Emboss
Xero - Porcelain
Step 1
Open a new
transparent canvas,
size
640x480 pixels.
The Color Palette:
Foreground color:
#3a1f16
Background color:
#ebc2a0
Make a gradient:
Style - Linear
Angle - 45
Repeats - 2
Invert - checked.
Fill the canvas with
the gradient.
Adjust - Blur -
Gaussian Blur: 20
Step 2
Layers- New raster
layer.
Selections - Select
All.
Open the background
image
"ATT666687666613".
Copy and paste into
the selection on
your canvas.
Change the layer
opacity to 16
in the Layers
palette.
Effects - Edge
Effects - Enhance
more.
Selections - Select
None (Ctrl+D).
Step 3
Open the tube
"Marif_2006_octobre_misted_paysage033".
Copy and paste as a
new layer onto the
canvas.
Move it to the
right.
Effects - FM Tools -
Blend Emboss.
Change the layer
opacity to 62
in the Layers
palette.
Layers - Duplicate.
Step 4
Change the
foreground color to
#3a1f16.
Activate the Brush
tool and find the
brush 'bg_text_6_TOMH'.
Apply the brush 1x
to the left
and 1x to the right
- on other words,
over the entire
width
of the canvas.
Step 5
Open the tube
"SS_115_AC".
Copy and paste as a
new layer onto the
canvas.
Move it to the top
left.
Change the Blend
Mode of the layer to
'Luminance(Legacy)'
in the Layers
palette.
Change the layer
opacity to 56
in the Layers
palette.
Effects - FM Tools
- Blend Emboss.
Step 6
Open the tube
"Romance_misted_na_small_1__".
Image - Resize 110%.
Copy and paste as a
new layer onto the
canvas.
Change the Blend
Mode of the layer to
'Luminance(Legacy)'
in the Layers
palette.
Effects - FM Tools
- Blend Emboss.
Layers- Duplicate.
Step 7
Activate raster 3 in
the layer palette.
Activate the Eraser
tool: size 32,
hardness 50, opacity
100.
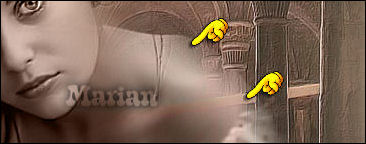
Remove the excess on
the woman's body as
seen below:
Do the same on the
copy of raster 3.
Step 8
Layers- merge -
Merge All.
Effects - Xero -
Porcelain: the
bottom 2 slidebars
on 3 and 0.
Step 9
We're going to add
the text now.
Lock the foreground
color.
Change the
background color to #ebc2a0.
Use the font 'Sloop-Script-Three'.
Type your text.
Effects - 3D Effects
- Drop Shadow
H 1
V 1
Opacity 80
Blur 5
Change the Blend
Mode of the layer to
'Luminance(Legacy)'
in the Layers
palette.
Step 10
Add a 1
pixel border - color
#3a1f16.
Add border: - not
symmetrical:
Top - 30
Left - 30
Right - 30
Bottom - 50.
Select with the
Magic Wand.
Fill with the
gradient.
Step 11
Effects -
Art media Effects -
Brush Strokes:

Effects - 3D Effects
- Drop Shadow
H 1
V 1
Opacity 50
Blur 5
Color - black.
Repeat with V & H
-1.
Selections - Invert.
Effects - 3D Effects
- Cut Out:
H & V - 5
Opacity - 80
Blur50.
Add a 1
pixel border - color #3a1f16
Step 12
Open the tube
"Marif_2006_octobre_misted_fleurs0109".
Resize to
50%.
Copy and paste as a
new layer on the
border.
Effects - FM Tools
- Blend Emboss.
Repeat the Blend
Emboss Effect.
Layers - Merge -
Merge All.
Add your name or
watermark.
Resize and save as
JPG.
You're done!! :)
©MarianOctober2006.
You may not use this
tutorial in any way
without the
written permission
of Marian.
Email
Back to Index
Visit Marian's
Dutch website here:


Magstags
|
Email |
Filter Links |
Terms Of Use |