|
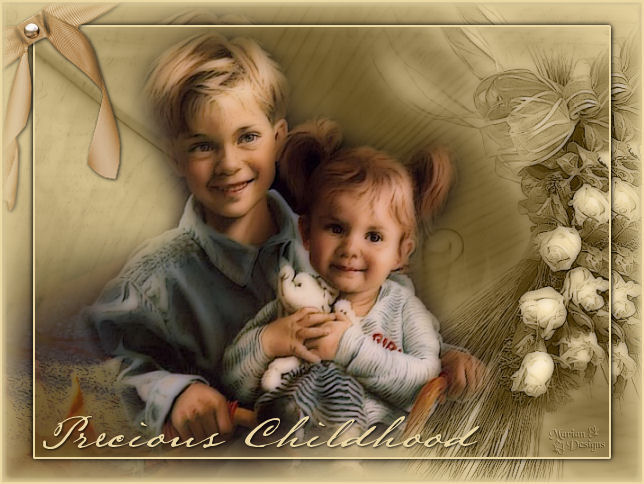
~*~ Precious
Childhood
~*~
Marian's original
Dutch tutorial can
be viewed
here.
This tutorial was
written for PSP 9
but can be done
in other
versions as well.
Download the
supplies
here.
or
here
The tubes were made
by:
Marif
MarieL,
and
Kara
Please respect the
copyright and keep
the filenames
intact.
Note: some of
the layers have been
locked to save on
bandwidth.
Remember to
unlock them in PSP
:)
FILTERS NEEDED:
FM Tile Tools -
Blend Emboss
Xero - Porcelain
Eye Candy 4000 -
Gradient Glow.
Step 1
Open a new
transparent canvas,
size
640x480 pixels.
The Color Palette:
Foreground color:
#ead7a4
Background color:
#564113
Make a gradient:
Style - Linear
Angle - 45
Repeats - 2
Invert - checked.
Fill the canvas with
the gradient.
Adjust - Blur -
Gaussian Blur: 20.
Step 2
Layers - new Raster
layer.
Selections - Select
All/
Open the image "achtergrond".
Copy and paste it
into the selection
on the canvas.
Change the Blend
Mode of the layer to
'Luminance(Legacy)'
in the Layers
palette.
Change the layer
opacity to 20
in the Layers
palette.
Selections - Select
None (Ctrl+D).
Step 3
Layers - new raster
layer.
Selections - Select
All.
Open the tube
"MarieL_2006_10Octobre_smoke01t".
Image - Mirror.
Edit - Copy.
Edit - Paste into
the selection.
Change the Blend
Mode of the layer to
'Luminance(Legacy)'
in the Layers
palette.
Change the layer
opacity to 50 in the
Layers palette.
Selections - Select
None (Ctrl+D).
Step 4
Change the
foreground color to #564113.
Layers - New Raster
layer.
Activate the Brush
Tool.
Find the 'bg_text_6_TOMH'
Apply 3x over the
entire width of the
layer.
Step 5
Open the tube
"Marif_2006_octobre_misted_fleurs0100".
Copy and paste as a
new layer onto the
canvas.
Move it to the
bottom left.
Change the Blend
Mode of the layer to
'Darken'
in the Layers
palette.
Step 6
Open the tube
"Marif_2006_octobre_misted_decor083".
Copy and paste as a
new layer onto the
canvas.
Move it to the right
against the edge.
Change the Blend
Mode of the layer to
'Luminance(Legacy)'
in the Layers
palette.
Step 7
Open the tube
"KaraT1458".
Copy and paste as a
new layer onto the
canvas.
Effects - FM Tools
- Blend Emboss.
Step 8
Layers - Merge -
Merge All.
Effects -
Xero - Porcelain.
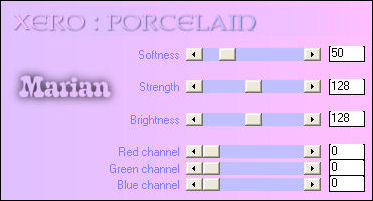
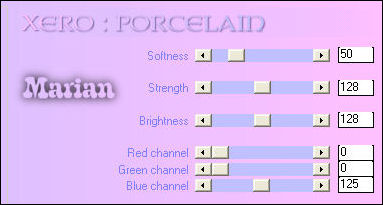
Repeat: Effects -
Xero Porcelain -
with these settings:
Step 9
Layers - Duplicate.
Activate the top
layer.
Image - Resize: 90%
('Resize All
Layers'= unchecked)
Selections - Select
All.
Selections - Float.
Selections -
Defloat.
Selections - Modify
- Expand by 1.
Step 10
Layers - new Raster
layer.
Fill this layer with
the color #ead7a4.
Selections - Modify
- Contract by 2
pixels.
Press delete.
Selections - Modify
- Expand by 2
pixels.
Effects - 3D Effects
- Drop Shadow
H 1
V 1
Opacity 80
Blur 7
Color - black.
Repeat with V & H
-1.
Selections - Select
None (Ctrl+D).
Step 11
Open the tube
"Strik".
Copy and paste as a
new layer onto the
canvas.
Move it to the top
left.
Effects - 3D Effects
- Drop Shadow
H 1
V 1
Opacity 80
Blur 5.
Step 12
Open the tube "Pearl".
Copy and paste as a
new layer onto the
canvas
and move it onto the
bow.
Step 13
Layers - Merge -
Merge All.
Add borders:
2 pixels - #ead7a4
Select the border
with the Magic Wand.
Effects - 3D Effects
- Drop Shadow
H 1 and V 1
Opacity 80
Blur 5
Color - black.
Repeat with V & H
-1.
Step 14
Keep selected.
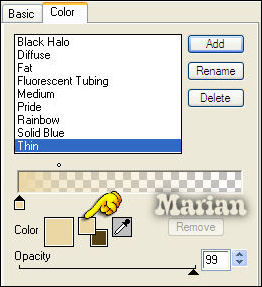
Effects - Eye Candy
4000 - Gradient
Glow.
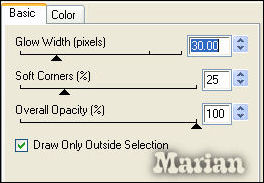
Change the color
option, indicated
below, to your light
background color.
Selections - Select
None (Ctrl+D)..
Step 15
We are going to add
the text now.
Lock the foreground
color and change the
background color to #ead7a4.
Use the font 'Lamar
Pen', size 30.
Effects - 3D Effects
- Drop Shadow
H 1
V 1
Opacity 80
Blur 3.
Step 16
Add your watermark.
Resize and save as
jpg.
Have fun! :)
©Marian.
You may not use this
tutorial in any way
without the
written permission
of Marian.
Email
Back to Index
Visit Marian's
Dutch website here:


Magstags
|
Email |
Filter Links |
Terms Of Use |