|

~*~ Memories
~*~

Marian's original
Dutch tutorial can
be viewed
here.
This tutorial was
written for PSP 9
but can be done
in other versions
as well.
Download the
supplies
here
or
here
The tubes were made
by
MarieL,
Marif, *Monique
and *Patrydesign.
(* no more info of
the tubers were
supplied on the
watermark layers)
Please respect the
copyright and keep
the filenames
intact.
Note: some of the
layers have been
locked to save on
bandwidth.
Remember to unlock
them in PSP :)
FILTERS NEEDED:
FM Tile Tools -
Blend Emboss
Xero - Porcelain
Step 1
Open a new
transparent canvas,
size 620 x 460
pixels.
The Color Palette:
Foreground color:
#f1c087
Background color:
#e9d7a4
Make a gradient:
Style - Linear
Angle - 45
Repeats - 2
Invert - unchecked
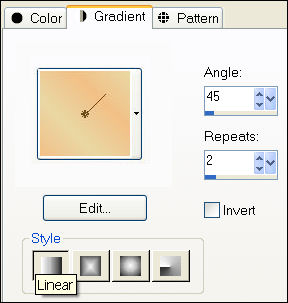
Fill the canvas with
the gradient.
Step 2
Layers - new raster
layer.
Fill with the
background color.
Change the layer
opacity to 42
in the Layers
palette.
Step 3
Open the tube "Tubed
by Monique42_965".
Copy and paste as a
new layer onto the
canvas.
Use the Deformation
tool to drag the
image out
over the entire
canvas.
Effects - FM Tools -
Blend Emboss.
Layers - Duplicate.
Change the layer
opacity to 34
in the Layers
palette.
Step 4
Open the tube
"Marif_2006_octobre_misted_paysage034".
Copy and paste as a
new layer onto the
canvas.
Move it to the
bottom, so that the
setting sun
on the layer below
it is not visible
anymore.
Step 5
Open the tube
"CatherineZetaJones-patrydesign-mist".
Copy and paste as a
new layer onto the
canvas.
Move it over the
tree stump.
Layers - Duplicate.
Effects - FM Tools -
Blend Emboss.
Step 6
Open the tube
"Vogels_tube".
Copy and paste as a
new layer onto the
canvas.
Change the Blend
Mode of the layer to
'Luminance(Legacy)'
in the Layers
palette.
Effects - FM Tools -
Blend Emboss.
Step 7
Layers - Merge -
Merge All.
Effects - Filter
Effects - Adjust
Variations.
Click 1x on '
lighter' .
Effectsn - Xero -
Porcelain:

Step 8
Duplicate the image
with Shift+D.
Step 9
Add border: 1 pixel
- color #44352f.
Add border: 40
pixels - color
white.
Select with the
Magic Wand.
Open the duplicated
image.
Edit - Copy.
On the canvas:
Edit - Paste into
the selection.
Adjust - Blur -
Gaussian Blur: 30.
Effects - penta.com
- color Dot:
standard.
Step 10
Keep selected.
Layers - New raster
layer.
Fill with your
background color:
#44352f.
Change the layer
opacity to
in the Layers
palette.54.
Effects - 3D Effects
- Drop Shadow:
H1 / V1 / Opacity
100/ Blur 10 / color
#44352f.
Step 11
Selections - Invert.
Effects - 3D
Effects- Cutout:
H 3 and V 3,
Opacity 70,
Blur 30.
Step 12
Selections - Select
None (Ctrl+D).
Add border: 1 pixel
- color #44352f.
Step 13
We're going to place
the text now.
Lock the foreground
color.
Background color on
#e9d7a4.
Font - "Ballantines
Script EF Light",
size 48.
Effects - 3D Effects
- Drop Shadow:
H1 / V1 / Opacity
100/ Blur 2 / color
#44352f.
Change the Blend
Mode of the layer to
'Luminance(Legacy)'
in the Layers
palette.
Add your name or
watermark.
Save as jpg and you'
re done! :)
©MarianNovember2006
You may not use this
tutorial in any way
without the written
permission of
Marian.
Email
Back to Index
Visit Marian's
Dutch website here:


Magstags
|
Email |
Filter Links |
Terms Of Use |