|

~*~ Eternity
~*~

Marian's original
Dutch tutorial can
be viewed
here.
MATERIALS
Download the
supplies
here
or
here
The tubes were made
by
Misteries(no
watermark info was
available),
DeniseWorisch en
Marif .
Please respect the
copyright and keep
the filenames
intact.
Note: some of the
layers have been
locked to save on
bandwidth.
Remember to unlock
them in PSP :)
FILTERS NEEDED:
Filters Unlimited2
Xero
Penta.com
This tutorial was
written for PSP 9
but can be done
in other versions
as well.
This tutorial is
dedicated to
Marian's
sister-in-law
who recently died at
the age of 46.
The most beautiful
flowers are picked
first.
Step 1
Open a new
transparent canvas,
size 640 x 470
pixels.
The Color Palette:
Foreground color:
#deb27b
Background color:
#301408
Make a gradient with
these settings:
Angle 45 / Repeats 3
/ Style - Linear /
Invert - unchecked:
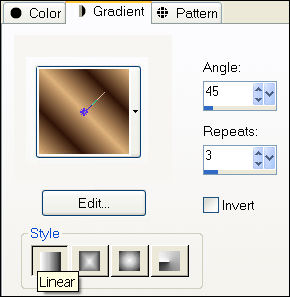
Fill the canvas with
the gradient.
Adjust - Blur -
Gaussian Blur: 30.
Step 2
Layers - New Raster
layer.
Fill this layer with
the background
color.
Step 3
Layers - Load/Save
Mask - Load Mask
From Disk:
Find the
"Saphiere_GraphicDream_Tubes_Maske_73"-mask
and apply with these
settings:

Layers - Merge -
Merge Visible.
Adjust - Sharpness -
Sharpen.
Activate the
Deformation tool
and use it to drag
the image to the top
as seen below:

Step 4
Stay on this layer.
Selections - Select
All.
Step 5
Open the tube
"01-00_sanctuary
pond1-misteries".
Edit - Copy.
On canvas: Edit -
Paste into
selection.
Reduce the opacity
of this layer to 56
in the Layers
palette.
Step 6
Open the tube
"1584dwtubes".
Copy and paste as a
new layer onto the
canvas.
Move it to the
bottom with the
Mover Tool.
Effects - FM Tile
Tools - Blend
Emboss.
Adjust - Photo Fix -
Digital Camera Noise
Removal.
Step 7
Open the tube
"Marif_2006_octobre_misted_fleurs088".
Copy and paste as a
new layer onto the
canvas.
Move it to the
bottom right, below
the women's chin.
Step 8
Layers - Merge -
Merge All.
Step 9
Effects - Xero
- Procelain -
standard.
Repeat the porcelain
effect but set the
bottom 3 slidebars
on 0.
Step 10
Change the
foreground color to
#301408.
Change the
background to
gradient.
Add a 1 pixel border
in the foreground
color.
Add border: 4 pixels
- white.
Select with the
Magic Wand
Fill with the
gradient.
Effecten - Graphic
Plus - Cross Shadow
- standard.
Step 11
Effectsn - Penta.com
- Jeans - Standard.
Step 12
Adjust - Sharpness -
Sharpen.
Step 13
Image - Add Borders:
40 pixels -
foreground color.
Select with the
Magic Wand.
Effects - Distortion
Effects - Punch.
Step 14
Selections - Select
All.
Selections - Modify
- Contract by 30
pixels.
Selections - Invert.
Effects - Texture
Effects - Blinds:

Repeat the blinds
effects but uncheck
the 'horizontal' -
option this time.
Step 15
Effects - Filter
Effects -
Adjust Variations:
click once on
'darker'.
Step 16
Open the tube
"Marif_2006_octobre_misted_fleurs088"
again.
Copy and paste as a
new layer onto the
canvas.
Drag it over the
other flower image.
Effects - FM Tile
Tools - Blend
Emboss.
Layers - Duplicate.
Step 17
Layers - Merge -
Merge All.
Selections - Select
All.
Selections - Modify
- Contract by 10
pixels.
Selections - invert.
Effects - Filters
Unlimited 2 -
Distortion filters -
Radial Waves:
Standard.
Step 18
Effects - 3D Effects
- Inner Bevel:

Step 19
Change the
background color to
#deb994.
Activate the Text
tool.
Use the font ' "AT
Citadelscript" with
these settings:

Type your text.
Step 20
Effects - Graphic
Plus - Cross Shadow:
standard.
Reduce the opacity
of this layer to 80
in the Layers
palette.
Effects - 3D Effects
- Drop Shadow:
H1 / V1 /
Opacity 80 / Blur 5.
Don't forget to add
your name :)
Save as jpg and
you're done!
©Marian April 2007
Email
Back to Index
Visit Marian's
Dutch website here:


Magstags
|
Email |
Filter Links |
Terms Of Use |