|

~*~ Caress
~*~

Marian's original
Dutch tutorial can
be viewed
here.
Download the
supplies
here
or
here
The tubes were made
by
Ametista,
Sassy
*Reformado,
and *Roxanne
(no tubers info is
available on the
watermark layers
of the images).
Please respect their
work by keeping the
filenames intact.
A mask and brush is
also included in the
zip.
FILTERS NEEDED:
Photoeffex,
Graphic Plus.
This tutorial was
written for PSP 9
but can be done
in other versions as
well.
Step 1
Open a new
transparent canvas,
size 700 x 500
pixels.
The Color Palette:
Foreground
color:#55695a
Background
color:#ddc9a9
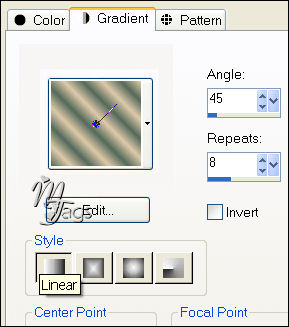
Make a gradient:
Style - Linear
Angle - 45
Repeats - 8
Invert - unchecked
Step 2
Fill the canvas with
the foreground
color.
Effects - Photoeffex
- Scanlines -
standard settings.
Step 3
Activate the
Selection tool and
draw a custom
selection:
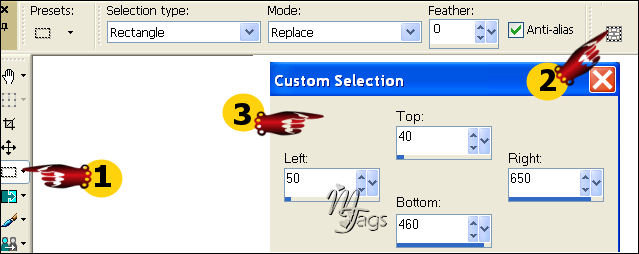
Step 4
Add a new raster
layer.
Fill with the
gradient.
Step 5
Layers - Load/Save
Mask - Load Mask
From Disk:

Layers - merge -
Merge Group.
Adjust - Sharpness -
Sharpen.
Step 6
Keep selected.
Selections - Modify
- Expand by 10
pixels.
Selections - Modify
- Select Selections
border:
10 pixels / Inside /
Anti-Alias.
Step 7
Layers - New Raster
layer.
Fill with the
gradient.
Step 8
Effects - 3D Effects
- Inner Bevel:

Step 9
Open the tube
"Misted_Grape_Flowers_RM-reformado".
Copy and paste as a
new layer onto the
canvas.
Move it to the left.
Adjust - Hue and
Saturation -
Colorize: 79 / 10.
Effects - FM Tile
Tools - Blend
Emboss.
Reduce the opacity
of this layer to 50
in the Layers
palette.
Step 10
Open the tube
"Misted_Grape_Flowers_RM".
Copy and paste as a
new layer onto the
canvas.
Move it to the
right.
Adjust - Hue and
Saturation -
Colorize: 79 / 10.
Effects - FM Tile
Tools - Blend
Emboss.
Reduce the opacity
of this layer to 50
in the Layers
palette.
Step 11
Open the tube
"sassyillusions_blonde10".
Copy and paste as a
new layer onto the
canvas.
Move it a little so
that her leg touches
the edge
as seen in the
example.
Effects - 3D Effects
- Drop Shadow:
H 2 / V 2
Opacity 80,
Blur 5.
Step 12
Add a new raster
layer.
Selections - Select
All.
Selections - Modify
- Contract by 10
pixels.
Find the gold
pattern '
CCold-effen' in the
Color palette.
Fill the selection
with it.
Selections - Modify
- Contract by 3
pixels.
Press delete on your
keyboard.
Selections - Select
None (Ctrl+D).
Step 13
Effects - 3D Effects
- Drop Shadow:
H 1 / V 1
Opacity 80,
Blur 2.
Repeat with V & H on
-1.
Step 14
Add a new raster
layer.
Change the
foreground color to
#ddc9a9.
Step 15
Activate the Brush
tool.
Find the brush
"Becky--WD--Caress".
Apply the brush now
to the top left of
the canvas.
Step 16
Effects - Graphic
Plus - Cross Shadow
- standard.
Effects - 3D Effects
- Drop Shadow:
H 1 / V 1
Opacity 80,
Blur 1.
Step 17
Reduce the opacity
of this layer to 50
in the Layers
palette.
Add your name or
watermark :-)
Step 18
Layers - Merge -
Merge All.
Add a 3 pixel white
border .
Select with the
Magic Wand: Feather
0 / Anti-Alias
checked / Inside.
Fill the selection
with the gold
pattern.
Effects - 3D Effects
- Drop Shadow:
H 1 / V 1
Opacity 80,
Blur 2.
Repeat with V & H on
-1.
Save as jpg and
you're finished !
:-))
©MarianMay2007
Email
Back to Index
Visit Marian's
Dutch website here:


Magstags
|
Email |
Filter Links |
Terms Of Use |