|

~*~ Blossom Of
Beauty
~*~
(Beautiful Blossom)
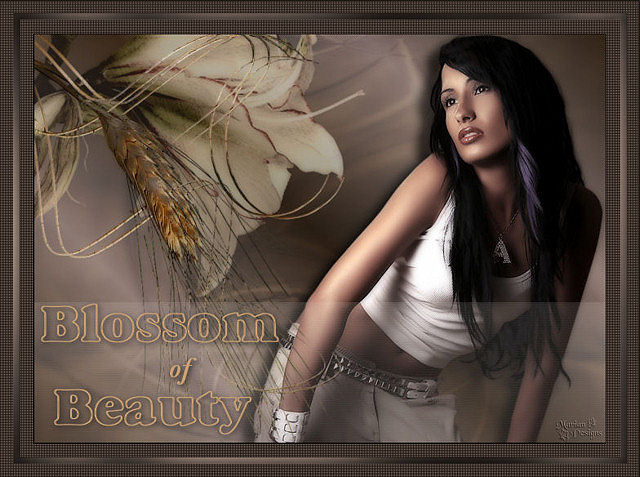
Marian's original
Dutch tutorial can
be viewed
here.
Download the
supplies
here
or
here
The tubes were made
by
Jet and
Brigitte(MTM).
Please respect the
copyright and keep
the filenames
intact.
Note: some of the
layers have been
locked to save on
bandwidth.
Remember to unlock
them in PSP :)

FILTERS NEEDED:
FM Tile Tools
Filters Unlimited 2
Xero
Graphic Plus
This tutorial was
written for PSP 9
but can be done
in other versions as
well.
Step 1
Open a new
transparent canvas,
size 700 x 500
pixels.
The Color Palette:
Foreground
color:#392a1d
Background
color:#9c8e8c
Make a gradient:
Style - Linear
Angle - 45
Repeats - 3
Invert - unchecked
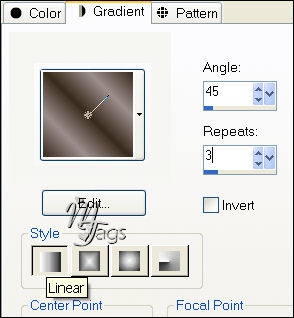
Fill the canvas with
the gradient.
Step 2
Layers - Duplicate.
Selections - Select
All.
Open the texture
"145_33.jpg".
Copy and paste into
the selection on
your canvas.
Selections - Select
None (Ctrl+D).
Change the Blend
mode of this layer
to 'Overlay'.
Reduce the opacity
of this layer to 30
in the Layers
palette.
Effects - FM Tile
Tools - Blend
Emboss.
Step 3
Open the tube
"Mtm_bloemen
230-small-2-sept
2007".
Copy and paste as a
new layer onto the
canvas.
Image - Resize 65% -
'Resize all layers'
= unchecked:)
Move to the top
left.
Reduce the opacity
of this layer to 54
in the Layers
palette.
Effects - Filters
Unlimited 2 - Color
Filters - Pseudo
Polarization,
with the standard
settings.
Step 4
Open the tube
"Jet-woman2-september-2007".
Copy and paste as a
new layer onto the
canvas.
Move it to the
right.
Effects - 3D Effects
- Drop Shadow:
H 9 / V -15
Opacity 70,
Blur 15.
Step 5
Open the tube
"Mtm_Plant011-10
Sept2007".
Copy and paste as a
new layer onto the
canvas.
Image - resize - 70%
- "Resize all
layers" = unchecked.
Effects - FM
TileTools - Blend
Emboss .
Layers - Duplicate.
Move the duplicated
layer a little to
the left.
Step 6
Open the tube
"Overlay".
Copy and paste as a
new layer onto the
canvas.
Move it to the
bottom.
Effects - Texture
Effects - Blinds:
Width 2
Opacity 40
Color. #af9388
Horizontal checked.
Step 7
Layers - Merge -
Merge All.
Effects - Xero -
Porcelain:
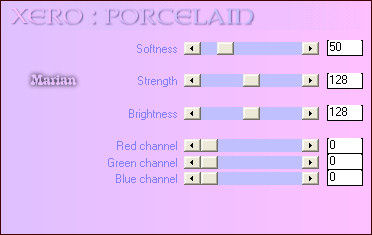
Step 8
Add a 1 pixel border
in color #241c16.
Select this border
with the Magic Wand:
Feather 0 /
Antia-alias checked
/ Inside.
Effects - 3D Effects
- Drop Shadow:
H 1 / V 1
Opacity 80,
Blur 3.
Repeat with V & H on
-1.
Step 9
Add a 40 pixels
border in color
#241c16 .
Selections - Select
All.
Selections - Modify
- Contract by 40.
Selections - Invert.
Effects - Texture
Effects - Weave:
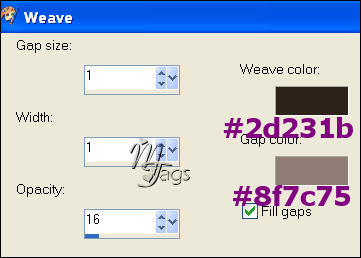
Step 10
Selections - Select
All.
Selections - modify
- Contract by 15
pixels.
Layers - new Raster
Layer.
Fill with color
#594d46.
Selections - Modify
- Contract by 8
pixels.
Press delete on the
keyboard.
Selectons - Select
None.
Effects - Graphic
Plus - Cross shadow
- standard settings.
Effects - 3D Effects
- Inner Bevel:
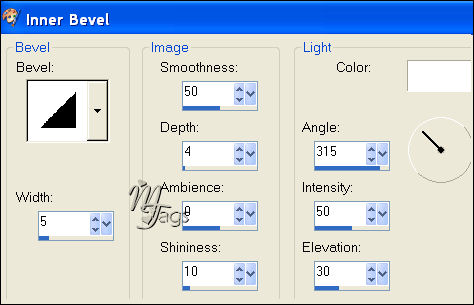
Add a 1 pixel border
in color #241c16 .
Step 11
Change the
background color to
#caa174.
Activate the Text
Tool and find a nice
font.
The font
"Alexuss Heavy
Hollow" , size 60,
was used
in the tag example.
Effects - 3D Effects
- Drop Shadow:
H 2 / V 2
Opacity 70,
Blur 10.
For the word 'of'
the font
"Baskerville Handcut
ITALIC", size 26,
was used.
Repeat the same drop
shadow as before.
Step 12
Add your name or
watermark and you're
done! :)
©MarianSeptember2007.
Email
Back to Index
Visit Marian's
Dutch website here:


Magstags
|
Email |
Filter Links |
Terms Of Use |