Simple Blue
 

The tutorial was written for PSP 8.

Materials needed

  1. A tube of your choice

  2. Simple Filters. Place in your filters directory.

  3. Basic form which is included in the materials.
    Place this from in
    PSP 7 and make sure your PSP8 program points to it.

    I received the set from Sanny's pspforum and have permission to use it. I bought it and therefore don't want to make it freely available. Use it sparingly and don't distribute it any further.

    Place it in PSP 8. If you're interested you can buy the CD
    HERE  
     Download Supplies 
     

Open your tube and minimize it for later use .
Choose two colors from the tube to work with.

  1.  Open a new transparent image 500 x 500 pixels
    Make a gradient  - Angle 0 - Repeat 0 and  Invert checked. 

  2. Fill your new image with the gradient.
    You will need the ruler on thebottom of the screen now. 
    Reverse your gradient's angle.


    Begin at the top 250-left and fill with your color by clicking on it. Then again at 250 - 380.  
    It must now look like the image below.


  3. Reverse your foreground and background colors.  


  4. Go to the Tools  palet and click on the Preset Shape Tools. Choose the standard arrow as illustrated below                                                      
    Add a new raster layer.

    Draw a figure from left to right, about 75 wide or the size you prefer.


    Selections --> Select All --> Float. Your arrow is now selected.
     

    Effects -- Texture Effects --> Blinds with these settings:
    width 76 - Opacity  38 - Horizontal clicked - Color is black.                           

    Effects --> 3D effects -- Drop Shadow with these settings:


    Deselect.


  5. Duplicate the arrow layer en mirror. Drag the arrow to the bottom.       Merge layers. 

  6. Effects --> Simple Filters --> Quick Tile.
     

  7. Activate your tube --> copy and paste as new layer. Change the Blend Mode from "Normal " to Luminance" on your layer palette.

    Add a drop shadow with the same settings as before. Merge layers. 
     

  8. Reduce the size of your image to 350 x 350 pixels
     

  9. The gradient must still be in the background color on your color palet.   
    Add a new raster layer.


  10. Click on the Preset Shape Tools and search for div32:
    It is small blocks.

    Pull them from top left to bottom.
    Then from top right to bottom.
    Go to Selections --> Select All --> Float.  
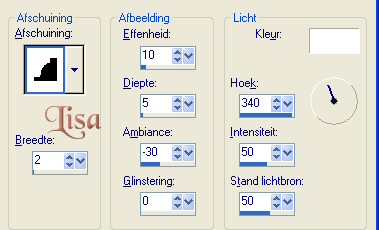
    Go to
    3D Effects --> Innerbevel with these settings:

    Go to Effects -- 3D Effects -- Drop Shadow with the top two settings on 1.


  11. Finally: Effects --> 3D Effects --> Buttonize ( but you can leave it out if you prefer )


Lisa: Email


Site was launched March 2005

Updated 30th July 2007

©Magstags


Home | Filter links | PSP Goodies

Hosted by www.Geocities.ws

1