but can also be
made in PSP 9.
Visual Manipulation
-( included in zip)
DSB Flux.
MuRa's Seamless.
Download filters here
METHOD:
Open the tube and choose 2 colors.
Foreground -
Light
Background -
Dark.
Make a gradient:
Angle - 45
Repeats - 1
Invert - checked
Style - Linear.
Open a new transparent image, size 450 x 350px.
Floodfill with
the gradient.
Effects --Filter
-- Visual Manupulation--X Mirror:
slidebars on 89-197.
Effects --Filter -- Visual Manupulation--Y Mirror:
slidebars on 79-255.
Activate your
Selection Tool and choose
the "Rectangle"-
option.
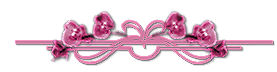
Select the area
as seen below:

Effects --
Texture Effects -- Blinds: 2-100--color light
Effects -- 3D effects--Drop shadow:
V & H
-5, 65, 19 color black
Repeat with V &
H on 5.
Deselect ( Ctrl
+D)
Activate your Selection Tool again on Rectangle.
Select the areas
as shown below now:

Effects -- Texture Effects -- Blinds: 2-100--color = light.
Effects -- 3D
Effects -- Drop Shadow.
Change the V & H
settings again to -5 color black.
Deselect (
Ctrl+D)
Effects -- DSB
Flux -- Linear Transmission
- slidebars on 25-25-50.
Activate your
tube and resize it.
Copy and paste
as a new layer.
Position it to
the left.
Apply a drop
shadow
V5-H5-65-19.
Activate the
Selection Tool again.
Select the area
at the bottom right.
See example.
Add a new raster layer.
Mirror the tube.
Copy and paste
into the selection.
Apply a drop
shadow:
5 / -5 / 65 /
19 / color black.
Reduce the
opacity of this layer to 51%.
Activate your
Pen Tool
and find the
dots preset,
with the width
on 5.
Draw a diagonal
strip from the right
into the canvas
as seen in the example.
Keep your
Shift-key in while doing it.
Repeat it another 4
times.
Convert the
vector layer to raster layer.
Effects --
Filter Effects -- Mura's Seamless --
Emboss at
Alpha - standard.
Merge All
layers.
Selections --
Select All .
Selections -- Modify -- Contract by 2px.
Go to Effects -- 3D Effects -- Chisel: 2, black.
Add your name in
a font of your choice.
Repeat the Alpha
Emboss Effect.
Your tag is finished.


