-
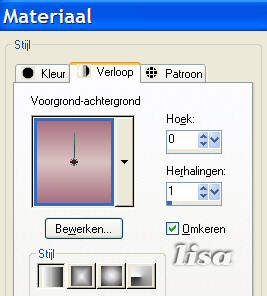
Choose 2 colors from your tube:
one light and one dark and make a gradient with the light
color with the following settings:
-
Open a new transparent image size
400-400 and fill with your
gradient.
-
Effects --> Texture Effects
-->Blinds, with the following settings:

-
Click on your Selection Tool and
look for the Arrow 2 option as illustrated
below.

With your Selection tool draw
out a figure, beginning at the bottom and pulling the arrow
to the right.
Keep selected. Don't Deselect.
Repeat the
drawing, but this time to the left.
Keep selected.
Then
from the top to bottom right and keep selected.
You must
have 3 figures now.
-
Add a
new raster layer.
Reverse your gradient's angle and fill the
layer with it.
Go to
Effects --> 3D Effects -- Inner Bevel with the
settings below:

Go to Effects --> 3D effects -- Drop Shadow with the
following settings.

Deselect.
-
Activate your tube, duplicate ( Shift + D ) and resize
the copy to fit the canvas. Copy and paste onto your
image.
On your layer palette: change the Blend Mode of this
layer to Luminance, or something else you prefer.
Add a drop
shadow with the same settings as before.
Drag your tube layer (mine is layer 3) below layer
2.
It must be below the bottom arrow layer.
-
Activate your Flower tube, resize to fit the image
and paste as a new layer where you want it
.
-
Go to your arrows - layer and activate it on the
layers
palette.
Effects --> Filter VM Natural --> Sparkle.
Change the Maximum size to 31
and the Random Seed setting to 75. Change these two settings to suit your taste.
-
Effects --> Illumination Effects
--> Sunburst with the following settings.

-
Merge all layers.
-
Go to Image --> Add Borders --> 5 pixels in
the light
color.
Effects -- 3D Effects -- Inner Bevel with the same settings as before.
Reduce the size of your image to 350
pixels wide.
Adjust --> Sharpen, add your watermark and
you're finished !