|
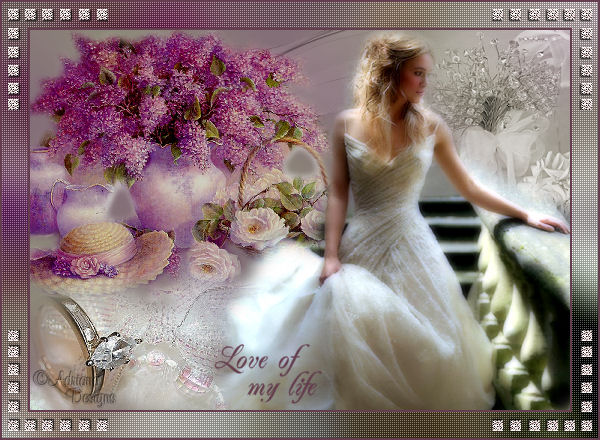
~*~ Love Of My Life ~*~
Adriana's original
Dutch tutorial can be viewed
here
This blend tutorial was
written on 12-1-2007
for Psp 9.
TERMS
OF USE
Download the
supplies
here.
If you want to share the tubes,
please keep the filenames intact
and respect their work.
FILTERS
NEEDED:
Penta.com - download
here.
METHOD
Open a new transparent canvas: 540 x
380 pixels.
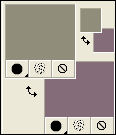
The Color Palette:
Foreground color: #908e7a
Background color: #846c78
Change the foreground color to
gradient:
Style - Linear
Angle - 45
Repeats - 5
Invert - checked.
Fill the canvas with the gradient.
Adjust - Blur - Gaussian Blur: 20.
Open the tube 'Mariel_2006_Smoke'.
Image - Resize: 70%.
Edit - Copy.
Back to your canvas.
Edit - Paste As as new layer.
Move it to the top right
as seen in the example.
Change the Blend Mode of the layer to
'Luminance (Legacy)'
in the Layers palette.
Change the layer opacity to 48%
in the Layers palette.
Open the tube
'MistedBySorensen_Designs_C2'.
Adjust - Brightness and Contrast: -22
/ 0.
Image - Resize: 75%.
Copy and paste as a new layer onto the
canvas.
Move it to the top left.
Open the tube ' Deco 1'.
Image - Mirror.
Image - Resize: 70%.
Copy and paste as a new layer.
Move it to the top right.
Blend mode: Luminance (Legacy).
Open the tube 'Amestista%SF keira'.
Image - Resize: 75%.
Copy and paste as a new layer onto the
canvas.
Move it to the right.
Duplicate this layer in the Layers
palette.
Layers - Merge - Merge Down.
Open the tube 'Lace
Ring_MistedByGini.'
Image - Resize: 45%.
Copy and paste as a new layer.
Move it to the bottom left.
Arrange the images to your taste.
Layers - Merge - Merge All.
Edit - Copy.
Image - Add Borders:
2 pixels - color #643e4f.
30 pixels - white.
Select with the Magic Wand.
Edit - Paste into Selection.
Adjust - Blur - Gaussian Blur: 20.
Adjust - Brightness and Contrast: -40
/ 0.
Image - Add borders:
30 pixels - white.
Select with the Magic Wand.
Edit - Paste - Paste into Selection.
Effects - Filter Effects - Penta.com:
Color dot standard.
Background color on #643e4f.
Selections - Select All.
Selections - Modify - Contract by 2.
Selections - Invert.
Fill with the background color.
Selections - Select None.
Open the tube' Corner 1'.
Copy and paste as a new layer.
Move it to the top left edge.
Layers - Duplicate.
Image - Mirror.
Layers - Duplicate.
Image - Flip.
Layers - Duplicate.
Image - Mirror.
Activate the Text Tool - floating.
Lock the foreground color.
Choose a font ( Jacoba was used in the
tag example, size 26.)
Type 'Love of my life'.
Promote the selection to layer in the
Layers palette.
Selections - Select None.
Effects - 3D Effects - Drop Shadow:
Vertical and horizontal: 0
Opacity: 40
Blur: 1
Color: #400a16.
Move it into position.
Add your name on a new raster layer.
Save as a optimized jog.
©Adriana Designs.
This tutorials has been registered at

Adriana:
Email


Magstags Home |
Filter Links |
Email |
Terms of Use
|