Ok, we're going to begin
Open a transparent image 400 x 400
Open your tube and copy it. Close the original
Open your transparent image
and
paste it as a new layer
Go to your Layer Palette and acticate Layer 1
Choose two nice colors from your image with your Color dropper
I used #E6D1E4 as foreground color
and #854E73 as the background color.
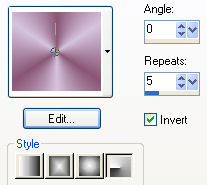
Set
your foreground on gradient, with these settings
Horizontal and Vertical 50
Repeats 5
Style
Radial
Invert
checked
Make sure Layer 1 is active, and
fill
with the gradient
Minimize this tube-canvas to your toolbar for now
Open a new transparent image of 400 x 400
and
fill it with white
Go to Effects / Plugins / DC Special / Spiro FX -
with
these settings

Change color 1 to #E6D1E4 and color 2 to #854E73
Apply.
Activate your Magic Wand and change the settings as follows
Tolerance 0 en
Feather 0
Click on the white part of the image
Go to Selections / Modify / Select Similar
and
delete
With your spiral selected, go to
Effects / Flaming Pear's Super Blade Pro / D_Pink jewel and apply
Ok,
now we apply a Drop Shadow -
with
these settings:
Vertical &
Horizontal = 2
Opacity =
100
Blur = 2,5
Color =
Black
Go to Effects / Plugins / Eye Candy 4000 / Corona -
with
these settings

Edit / Copy
Activate your tube - canvas that you have minimized earlier.
Paste
the spiral-image as a new layer onto the tube-canvas and drag this layer below
the tube layer.

Merge all layers
Add a 3 pixel border and select with your Magic Wand
Fill
with your dark color
Selections / Invert
Go to Effects / 3D/ Cut Out- with these settings:

Repeat 1x
Selections /Invert
Your border should still be selected
Go to
Effects / Plugins / Super Blade Pro - find D_Pink Ice and apply.
Effects / Inner Bevel - with these settings

Deselect ( Ctrl+D )
Set your background on the light color
and
add a 5 pixel border with it.
Select
with your Magic Wand and go to
Effects / Texture Effects / Fur -
with
these settings

Selections / Select None
Change
the colors around again to get the
dark
color as background color.
Add a
3 pixel border
Select
with your Magic Wand
Apply
the same Blade Pro effect ( Pink Ice)
Apply
the same Inner Bevel as in the first frame border
Selections / Select None
Switch the colors around again
and
add a 5 pixel border.
Apply
the same Fur effect
Selections / Select None
Switch
the colors around once more
Add a
3 pixel border
Apply the same Blade Pro - and Inner Bevel effects
Select
None
Open the corner tube, copy and paste as new layer onto the canvas
Position it in the left corner - don't let it touch the border!
Duplicate this layer
Image
/ Mirror
Layers / Duplicate
Image / Flip
Layers / Duplicate
Image / Mirror
Layers / Merge / Merge visible
You
can resize your image to 350 x 350 pixels
Add your watermark and sharpen
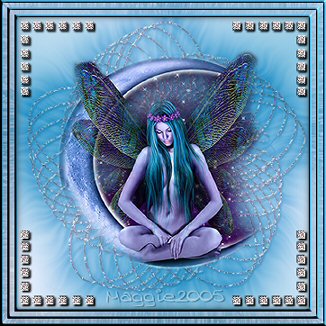
So, this was a long tutorial, but I hope you enjoyed doing it ;)
©Gerrie©