Materials
needed:
Supplies
Download here
Filters:
Filter: Graphics
Plus
Filter: Lokal Shadow Download here
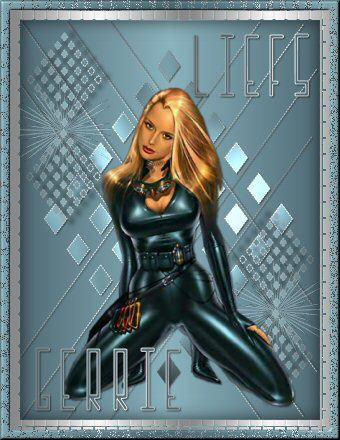
This is a tube
tutorial;)
I want to thank Susan for teaching me to make a Preset
Shape
Open transparent image
width 300 height 400
Choose 2 colors from your tube: one dark, one light.
I used #516C76 dark and #8AB2BD light
Set the colors on a gradient
with these settings:

Fill the
canvas with it
Layers / New Raster Layer
Go to your Preset Shape Tools,
find the "lijnen1a"
and use these settings ( below )
( Please note: the
Line Style should be dots )

Set your
foreground on a nice pattern.
I used
"gabriel-zilverpatroon"
Draw a shape from the top left corner
to the bottom right
corner
Convert this
vector layer to raster layer in your Layer Palette
Effects /3D Effects / Drop
Shadow with these settings:
Vertical &Horizontal = 1
Opacity = 50
Blur = 2.00
Color = black.
Duplicate this
layer in your Layer Palette
Image / Flip
Layers / News Raster
Layers
Activate your Preset Shapes Tool again
and find the
"gerruitvorm"- shape
Make sure your foreground color is on
pattern
and the background
is on gradient

Draw a shape
from the top left corner to the
bottom right
corner
and convert this
vector layer again
to a raster layer in
your Layers Palette
Effects / Plugins / Graphics Plus / Cross
Shadow - standard
Apply the same drop shadow
Open your tube.
Copy and paste it
as a new layer onto
your canvas
Apply the same drop
shadow as before
Activate your Preset Shape Tool again
Draw a small shape
with the "ruit"-preset ( stil active)
in the top left
corner of the canvas

Effects
/ Plugins / Lokal / 3D Shadow - with these settings

Layers / Duplicate
Drag this shape exactly
below the first one with your Mover Tool
Lock ( toggle the visibility off of
) all the lower layers
so that only these two layers are
visible - raster 7 and the copy of it
Make sure one of
these layers are active
Layers / Merge /
Merge Visible
Duplicate the merged
layer in your Layers Palette
Image / Flip
Image /
Mirror
Unlock your other layers
Drag the top layer below the
tube-layer. It should be layer 6
Open your "sparklepuffpurple" -
tube
Copy and paste as a
new layer on the canvas,
and reduce this
layer's size to 60%
Colorize ( Shift+L)
this layer with the
same H(hue) and
S(saturation) values
as your main tube (
click on the color swatch in your
Color Palet to view
the H & S values of your color)
Activate layer 5 in
your Color Palette
( the bigger grid
shape)
Paste as a new layer
below the small grid
Drag it into
position
Repeat this step with the grids on the other side
Layers /
Merge / Merge All
You can add your text now as you like
it
Layers / New Raster Layer
Choose a nice font.
I used "Incarnation"
- with these settings

Type your text.
I set a
space between all the letters in upper case
Effects / Drop Shadow - with the
same settings as before
Layers / Merge /
Merge All
Add a 10 pixel border and fill with your
pattern
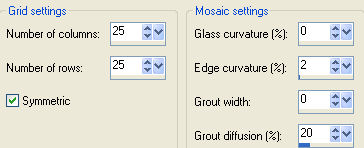
Effects / Texture Effects / Mosaic Glass - with these
settings
Selections / Invert
Effects / 3D Effects / Cut
Out -
vertical 0 horizontal 0 Opacity 65 Blur 23,59
Add a 10 pixel
border, select and fill with your gradient
Effects / Texture
Effects / Mosaic Antique - with these settings

Effects /
3D Effects / Inner Bevel - with these settings:

Reduce the
size of your image and add your watermark;)
©Gerrie©
10-08-2004