|

Gerrie's original Dutch
tutorial can be viewed
here
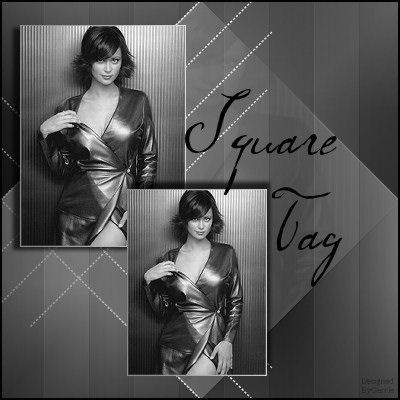
Square Tag
Supplies
download here
Open your tube and resize so that the
longest side is 400 pixels
Go to Image --> Greyscale
Go to Image -->
Increase Color Depth --> 16 million colors
If
you want to do the tutorial in normal colors
you should skip this step.
Duplicate the image twice by
pressing Shift+D 2x on your keyboard.
Resize one of the duplicates to 220px in
height.
Resize the second copy to 185px
in height.
Remember to resize gradually: for example,
resize it twice to 85%
and then resize it to the desired pixel
size.
Add a 1 pixel border to both copies and fill
with a silver or gold pattern.
Now we can begin with the tag
:)
Open a new transparent image, size 400 x 400
pixels.
Change the forground color to
#d9d9d9
and the background color to #030303.
Change the gradient settings as follows:
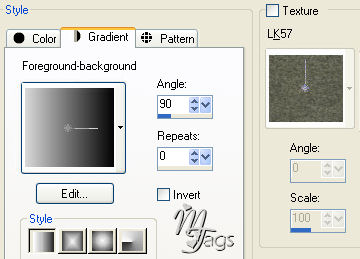
Fill the canvas with the
gradient.
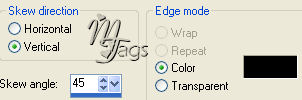
Go to Effects --> Geometric Effects -->
Skew, with these settings below:
You can use your own preferred dark color.
Effects / Filter Effects
--> FM
Tile Tools/Blend Emboss
standard
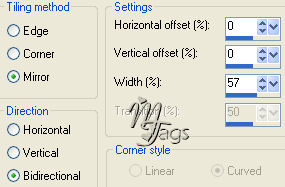
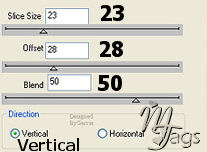
Effects / Image Effects --> Seamless Tiling, with
these settings:
Add a new raster layer.
Selections
--> Load Selection from Disk.
Find the "GDsel drop"- seleciton and
load.
Go to your image and copy it.
Activate the canvas and paste it into the
selection.
Deselect.
Reduce the
opacity of this layer to 10% in the
Layers Palette.
Add a new
raster layer.
Change the gradient to 220/0
Fill
the layer with the gradient.
Effects --> Filter Effects
--> DSB
Flux --> Linair transmission,
with these settings:
Effects --> / Filter
effects --> FM
Tile Tools --> Blend Emboss standard.
Reduce the opacity of this
layer to 30% in your Layers palette, or
choose
whatever opacity you prefer.
Add a new raster layer.
Selections -->
Load Selection From Disk.
Find the "GDsel lijnen"- seleciton and
load.
Fill this selection with your gold
or silver pattern.
Deselect.
Activate your
image that is 220 pixels in height.
Copy.
Activate your canvas again and paste it as a
new layer.
Effects --> 3D Effects --> Drop Shadow,
with these settings:
Vertical = 3
Horizontal = -7
Opacity = 70
Blur
= 5.80
Color
= Black
Activate the image that
is 185 pixels in height.
Copy and paste as a new layer onto the
canvas.
Apply the same drop shadow as before, but
change the horizontal setting to minus 3
and the vertical to minus 7
Arrange it where you like it.
Add yout text on a new layer.
The font used in this tag was "CKmaternal",
size 72.
Merge all layer.
Selections --> Select All/
Selections --> Modify --> Contract by 2.
Selections --> Invert.
Fill with your dark color.
Deselect and save as a jpg/
Translated
by Maggie 16th January 2006

The
graphic design of this page is copyrighted to ©Magstags2005-2006
Home | Filter Links |
PSP
Goodies |
|