|
Naomi

Gerrie's
original Dutch tutorial can be
viewed
here
~*~
FILTERS NEEDED:
Andrew's Filter 4
Greg's Factory II
Toadies
~*~
Open an image of your choice and
resize it to 350 pixels -
longest side.
Choose two colors from your
image:
light (foreground) and dark
Background).
Colors #f1a5c1(light) and
#842140 (dark)
were used in the tutorial.
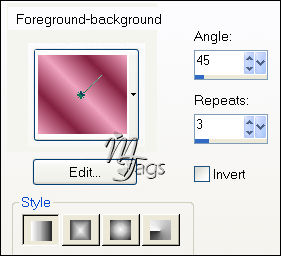
Change the background to
gradient
in the color palette,
with these settings below:
Add border: 1 px - black.
Add border: 3 px - light color.
Select with the Magic Wand.
Effects - Filter Effects -
Greg's Factory II - Pool
Schadow standard.
Add border: 1 px - black.
Selections - Select None
Add border: 4 px - dark color
Select and fill with the
gradient.
Effects - 3D Effects - Cutout
with these settings:

Deselect.
Add border: 1 px - black.
Add border: 3 px - light color.
Select.
Effects - Greg's Factory
II - Pool Schadow: standard.
Add border: 1 px - black.
Add border: 20 px - light color.
Select.
Fill with the gradient.
Effects - Texture Effects -
Weave
with these settings:

Keep selected.
Edit - Copy
Edit - Paste as New Layer
Image - Flip
Image - Mirror
Deselect.
Change the layer opacity to 50%
in
the Layers palette.
Selections - Select All.
Selections - Modify - Contract
by 20 pixels.
Selections - Invert.
Merge all layers.
Effects - Edge Effects -
Enhance.
Effects - 3D Effects - Inner
Bevel
with these settings:

Deselect.
Add border: 1 px - black.
Add border: 3 px - light color.
Select.
Effects - Filter Greg's Factory
II - Pool Shadow: standard.
Add border: 1 px - black.
Image - Resize 85%.
Add border: 30 px - light color.
Select.
Change your gradient to the
settings below
and fill the selection.

Effects - Filter
Toadies - Darwin
with these settings:

You can play around with the top
slidebar.
The idea is to get two light
corners
with a dark middle area.
Deselect.
Select the 2 light corners
(Tolerance of the
Magic Wand should be on 35)
Effects - Andrew's Filter4
- Weave
with these settings:

Click on the dark color in the
Color Palette.
Make a mental note of the Hue
and Saturation values
in the pop-up window.
Go to Adjust - Hue and
Saturation - Colorize
and fill these values in the
pop-window and click 'Ok'.
Repeat the same Cutout effects
as before.
Deselect.
Select the 2 dark corners with
the Tolerance value
of the Magic Wand on 12.
Effects - Texture Effects -
Weave
with these settings:

Repeat the same Cut out effect
as before.
Deselect.
Add border: 1 px - black.
Add border: 3 px - light color.
Select.
Apply the same Pool Shadow
effect.
Add border: 1 px - black.
Image - Resize - 85%.
Add border: 20 px - light color.
Select.
Fill with the gradient: gradient
repeats on 3.
Effects - Texture Effect -
Weave:
Keep selected.
Edit - Copy
Edit - Paste as new layer.
Image - Flip
Image - Mirror
Deselect.
Reduce the layer opacity to 50%
in the Layers palette.
Deselect.
Selections - Select All.
Selections - Modify - Contract
by 20 px.
Selections - Invert.
Layers - Merge - Merge All.
Effects - Edge Effects -
Enhance.
Effects - 3D Effects - Inner
Bevel
same settings as before.
Deselect.
Add border: 1 px - black.
Add border: 3 px - light color.
Select.
Repeat the same Pool Shadow
effect.
Add border: 1 px - black.
Have fun :)
Back to
Index
Translated
19May 2007

|