Materials:
Supplies
Download here
Filter: Gregs FactoryII
Filter: Filter FM Tile
Tools
Filter: Unlimited 2.0
Download
here
The Tube that I used in my example and tutorial is
from L&K Wondersite & Nadia's Tubes&PSP
Open a
new transparent image 285 wide and 350 high
Choose a nice light color from
your image and fill the canvas
Open the
*strepenzelf.psptube*.
Copy and paste it
onto your canvas
Selections / Select
All /
Selections / Float
Go to your Color
Palette and find the
"Line Art Pink" and
change the pattern
settings as follows

Effects / Plugins / Gregs FactoryII /
Poolshadow -
with the top setting
on 133
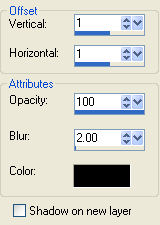
Effects / 3D Effects / Drop Shadow
with these
settings
Effects / Plugins / FM Tile Tools /
Blend emboss
Adjust / Sharpness / Sharpen
Open your tube
in psp
Copy and paste as new layer
onto the
canvas
Reduce the size
until it fit nicely onto your canvas
Go
to your Layers Palette and drag this layer below the bars-layer
Right click on this
layer and go to layer properties and change the settings as follows
Blend Mode -
Lighten
Opacity -
50
Link Set -
0
Layer is visible -
checked

Change the Opacity of this layer to
60% as seen below

Activate your background layer (
highlighted in blue, when activated)
Effects / Illumination Effects / Lights,
with these settings

Effects / 3d Effects / Inner
Bevel - with these settings

Acitvate your top layer ( the
bars-layers)
Go to your tube, copy and paste it again as a new
layer
Repeat the Drop Shadow with the same settings as before
Sharpen it if
necessary
Layers / Merge /
Merge Visible
Open the "Geometrisch 03"-pspimage and minimize on the task
bar.
Add a 2 pixel
border, select with your Magic Wand. Go to your patterns folder in your Color
Palette and look for the "Geometrisch 03" pattern. Fill the selected border with
it with these settings.
Scale100 Angle0
Effects / 3D Effects
/Inner Bevel with the Metallic preset
Add a 5 pixel border in one of your
colors
Effects / Plugins /
Gregs FactoryII / Poolshadow - with the same settings as before ( top slidebar on
133)
Add a 2
pixel border, select with your Magic Wand and
fill with the
geometric pattern as before
Repeat the Metallic Inner Bevel
effect
Add a 25 pixel border in your color
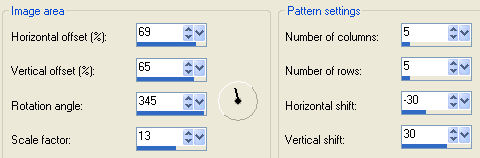
Effects / Reflection
Effects
/ Pattern with these settings
Adjust the horizontal and Vertical settings if
the pattern needs changing ;)
Effects / 3D Effects / Inner Bevel -
with these settings
Add a 2 pixel border, select,
and fill with the
geometrical pattern again
Repeat the Metallic Inner Bevel
Add a 5 pixel
border, select and fill with your color
Effects / Plugins / Gregs FactoryII /
Poolshadow
- with the same
settings
Add a 2 pixel
border, select with your Magic Wand
and fill with the
geometric pattern
Repeat the same Metallic Inner Bevel effect
Reduce your image to
85%
Add a 30 pixel border in your color and
select.
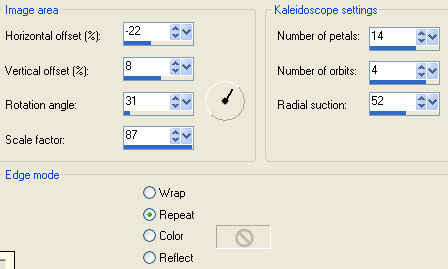
Effects / Reflection Effects / Caleidoscope - with these
settings
( Once again, you
can change the radial suction- option to find the effect you like
most.)
Effects / Plugins / Filters
Unlimited2.0/ Buttons & Frames /
3D Glass Frame 1
standard
Add a 2 pixel border, select and fill with the
geometric pattern
Repeat the Metallic Inner Bevel Effect
Add a 5 pixel
border, select and fill with your color
Effects / Plugins / Gregs FactoryII /
Poolshadow -
with the same
settings
Add a 2 pixel
border, select and fill with the geometric pattern
Repeat the Metallic Inner
Bevel Effect
Open the
corner-tube, copy and paste it as a new layer onto the canvas. Drag it in place.
Effects / Plugins /
Simple filters / Top Left Mirror
Open the smaller
corner tube, drag into position
and repeat the
last step
Here is another
example from Nadia
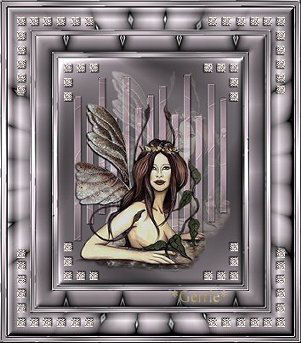
6-1-2004 ©Gerrie©
Translated
by Maggie_za 2005
I want to thank Gerrie for
allowing me to translate this tutorial