Gerrie's original Dutch tutorial can be viewed
here
Gold Jiggle
Filters needed:
Filter: Andromeda / Perspective
Filter:Eye Candy 4000
Filter:Graphics Plus
Filter:Unlimited 2.0
Download here
This lesson was written in PSP8 but can be done in 7 as well.
Supplies
Download
here
Place the corners in your tubes-folder
Nadia made the floral-corners
I want to thank Nadia for her permission to use
them in
this tutorials;-)
I colorized them by using 255 as the (H)Hue
and 32 as the (S)Saturation
values
Save the PFP-file in your Presets folder
Save the *Gerrieinstellingandro.pfp*
file in Andromedia Perspective's 22Sidewall folder
** see explanation below
|
**Explanatory Note from Maggie
It can be located in the
Andromedia-Perspective directory, where you installed the filter.
|
 |
Your file path should look something like this:
It looks difficult but it's
not, don't worry. |
Open your tube and reduce
the size so that the longest
side is 275 pixels
Choose 2 colors from your image: one light and one dark
I used #E5D5D5 and #9F8085
Set your foreground on gold pattern
Schale250
Angle0
Add a 2 pixel border, select and fill with
the gold pattern
Selections / Invert
Effects / 3D Effects / Cut Out with these settings

Repeat the Cut Out-
effect but with the H and V settings on -2
Selections / Invert again
Effects / Distortion Effects / Punch - on 50
Add a 4 pixel border, select and fill with your dark color
Select the border with your Magic Wand,
with
the Tolerance as well as the Opacity on 0
Effects / Plugins / Graphic Plus / Cross Shadow - standard
Add a 2 pixel border, select and fill with the gold pattern and repeat the Punch
effect
Add a 25 pixel border and fill with your dark color
Effects / Plugins / Andromeda/Perspective
Click on the presets in the top right corner to view them

Click on the Side Walls -option in the bottom right corner
On the bottom of this
screen you will see the little yellow folder - open it and find my preset in
there
This is how the opened folder looks like:

Open it
Now click Ok
Move your image a bit to the right so that the corners fit on each other
You can do this by placing your mouse cursor over the "x" in the middle
You can also use the arrow buttons beside the image

Click OK again
Selections / Select None
Adjust / Sharpen
Select the rest of the border on the right side with your Magic Wand and fill
with the gold pattern
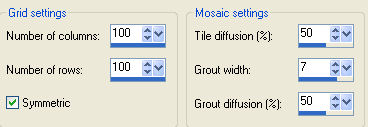
Effects / Texture Effects / Mosaic Antique
- with these settings
Selections / Select None
Add a 2 pixel border and fill the the gold pattern
Repeat the Distortion - Punch Effect
Add a 4 pixel dark color border
Repeat the Graphics Plus Cross Shadow effect
Add a 2 pixel border and fill with the gold pattern
Repeat the Distortion / Punch effect
Add a 30 pixel dark color border and select
Effects / Plugins / Graphics Plus / Cross Shadow standard
Effects / Illumination Effects / Sunburst -
with these settings and color #FED7B6

Effects / Edge Effects / Enhance
Effects / Plugins / Filters Unlimited / Buttons & Frames /
3D glass/Frame 1 with the botton slidebar on 80
Add a 2 pixel border and fill with
the gold pattern
Repeat the Distortion / Punch effect
Repeat the Punch effect again
Add a 4 pixel dark color border
Apply the Graphic Plus / Cross Shadow effect
Add a 2 pixel border and fill with gold
Repeat the Distortion / Punch effect
Add a 30 pixel dark color border and select.
Effects / Plugins / Eye candy 4000 / Jiggle-
with these settings

Effects / 3D Effects / Inner Bevel -
with these settings

Add a 2 pixel border and fill with gold
Repeat the Distortion / Punch effect
Open the corner tubes and position them
Layers / Merge / Merge All
Reduce your image and sharpen
12-10-2003
©Gerrie©

Translated by Maggie_za March 2005
I want to thank Gerrie for
allowing me to translate this tutorial