Materials
needed:
Supplies: Download
here
Filter:
Graphics Plus
Filter: Andromeda cMulti
Download
here
Open a transparent image
500X300
Choose two colors from your tube / image
I used #8F7B7D
and #E3D0CE
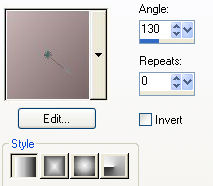
Make a gradient with these two colors with these
settings
Angle130 Repeat0 Style Linear
Fill the canvas with the
gradient
Open the image you want to use
and resize it to 300
pixels in height
Edit /
Copy
Edit / Paste as New
Layer on the canvas
Effects / Distortion
Effect / Wind with these settings
From left- checked
Wind strength -
100
Use your Deformation Tool to pull the image out a bit to
the left


(Image size reduced)
Layers / Duplicate
Image /
Mirror
Now shift them around so that they fit
together

(image size reduced)
Reduce the Opacity of this mirrored
layer ( duplicate layer) to 30%
Layers / New Raster
Layer
Selections / Load/Save Selections /
Load Selection from
disk / *blokjesgerrie*
Fill with the gradient
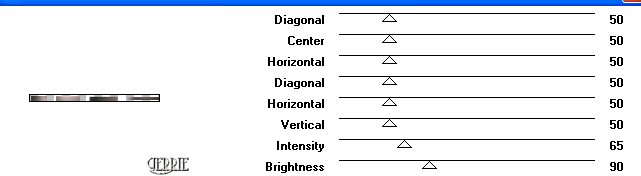
Effects /
Plugins / Graphics Plus/ Cross Shadow with these
settings
Effects / 3D Effects /Drop Shadow with
these settings:
Vertical and Horizontal = 3
Opacity = 60
Blur = 5
Color = black.
Deselect ( Ctrl +D)
Duplicate this
layer
Image /
Flip
Duplicate once more, move it to the center
and a little bit to
the right
Layers / New Raster Layer
Activate your Text
Tool and
find the Dekor01
font
with these
settings:
Create as:'
Floating'
Size 100
Stroke width
0.0
Anti-Alias
checked

Make the gradient your background
color

Type in the letter "g" ( lower
case)
Effects / 3D Effects / Drop Shadow
with the same
settings as before
Deselect
Adjust / Sharpness /
Sharpen
Duplicate this
layer
Image /
Flip
Layers / New Raster
layer
Activate your Text Tool again with the same settings
Type in the
letter "r"
Apply the same drop shadow and drag it in place
Reduce the Opacity
of this layer (in your Layers Palette) to 50%
Now you have
this:

(image size reduced)
Duplicate this layer
Image / Flip
Open your tube and paste as new layer on the canvas
Position
it so that some of the wind effects below it is still visible
Apply the same
drop shadow
Add a new Raster Layer
Acticate
your Text Tool and choose a nice font.
I used
"Incarnation"
Place the Text where you prefer it
Effects / Plugins / Graphics Plus / Cross Shadow
with
these same settings as before,
that is: the bottom
two settings should be 65 /90
Apply the same drop
shadow
Layers / Merge /
Merge All
Reduce your image to
85%
Add a 25 pixel
border and fill with your dark color
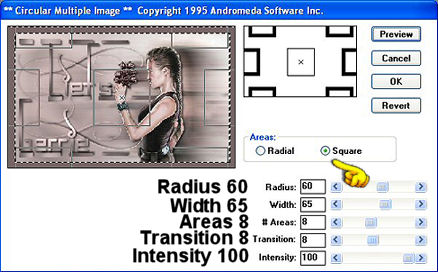
Effects / Plugins / Andromeda/cMulti
with these settings
Selections / Invert
Effects / 3D
Effects / Drop Shadow with the same settings.
Repeat the drop
shadow but this time with a -3 setting
Deselect
And you're finished
;-)
I hope you enjoyed
this tutorial
©Gerrie© 04-06-2004