|
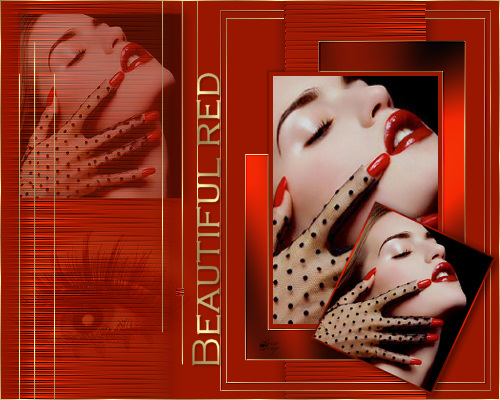
~*~ Beautiful
~*~
Gerrie's
original Dutch tutorial can be
viewed
here
Download the supplies
here
The eye-tube was made by
Jean
FILTERS NEEDED:
Filter Factory M-Motion Trail
Graphics Plus
FM Tile Tool
Find them
here
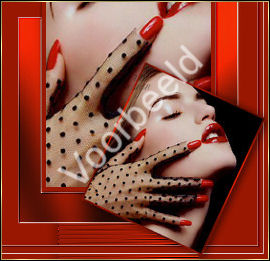
Open an image of your choice
or use the one provided by
Gerrie in the zip file.
Choose 1 color from the image
that will
combine with #991701
Resize your image so that the
longest side is 400 pixels.
Duplicate (Shift +D) the image.
Resize one of the images 3x to
85%.
It should be more or less
246/254 in height.
It should not be bigger than
that otherwise
it will distort.
Resize the other image 5x to be
± 178 pixels in height.
Add a 1 pixel border in your
chosen color
to the smallest image.
Effects - Filter Effects -
Graphic Plus - Cross Shadow:
standard.
Minimize this image for now.
Open a new transparent canvas,
size 500 x 400 pixels.
Fill with your chosen color.
Add a new raster layer.
Selections - Load/Save - Load
Selection from Disk.
Find the
"GD-selBered1"-selection and
load.
Fill the selection with your
color.
Keep selected.
Repeat the Cross Shadow effect,
but change the
settings to:
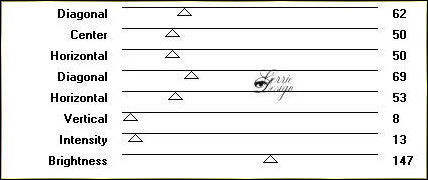
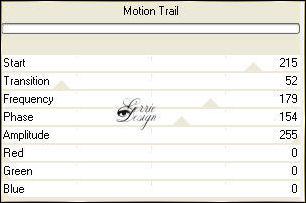
Apply Effects - Filter Factory M
- Motion Trail
with these settings:
Apply Effects - Filter FM Tile
Tools - Blend Emboss:standard.
Deselect.
Effects - 3D Effects - Drop
Shadow:
1 / 1 / 50/ 21 / color black.
Duplicate the layer in the
Layers palette.
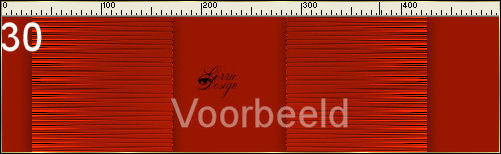
Move this layer to the left.
It should be 30 pixels away from
the edge.
You can verify the position by
activating your ruler from the
top drop-down menubar 'View'.
Make sure the duplicated
layer(copy of raster 2) is
active.
Apply Effects - Distortion
Effect - Wind:
From the right / 70.
Set the layer opacity on 80 %
in the Layers palette.
Set your color in the background
and change the foreground color
to a gold pattern.
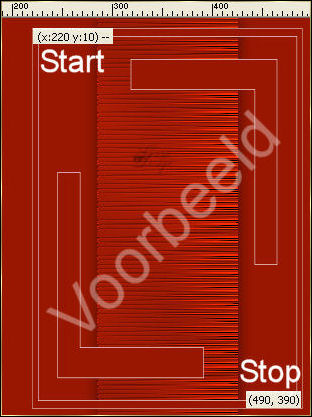
Activate the Preset Shapes Tool
and find the "karin8" - shape
with these settings:

Draw a shape, starting at 220x10
and ending at 490x390.
You can verify the position in
the bottom taskbar of
the program where it will be
indicated.
Convert the vector layer to
raster layer in the Layers
palette.
Activate the Selection Tool and
select the inside of the
two shapes, while pressing down
the Shift-key on the keyboard.
Effects - Filter Graphics Plus -
Cross Shadow: standard.
Deselect.
Effects - FM Tile Tools - Blend
Emboss: standard.
Selections - Load/Save - Load
From Disk.
Find the "GD-selBered2a" -
selection and load.
Now press the delete key on your
keyboard.
Deselect.
Load the selection
"GD-selBered2".
Add a new raster layer.
Fill with your color.
Selections - Modify - Contract
by 4 pixels.
Press the delete key on the
keyboard.
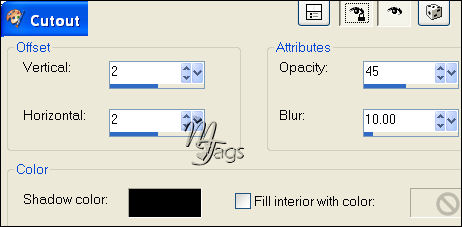
Effects - 3D Effects -
Cutout
with these settings:
Activate your bigger image
again.
Edit - Copy.
Activate the canvas.
Edit - Paste into Selection.
Deselect.
Apply a drop shadow:
2 / 2 / 24/ 3 / color black.
Repeat with V & H on minus 2.
Add a new raster layer.
Load the selection
"GD-selBered3".
Fill it either with gold or
silver.
The pattern's settings should
be:
Angle - 0
Scale - 250.
Now activate your image with the
border
(it was minimized)
Edit - Copy.
Activate the canvas.
Edit - Paste as a new layer.
Move it in between the
gold/silver edges.
Apply a drop shadow:
1 / 1 / 50 / 21/ color black.
Layers - Arrange - Move Down.
Image - Rotate - Free Rotate:
25 / Right.
Image - Resize: 80% - 'Resize
All Layers' = unchecked.
Layers - Arrange - Bring To Top.
Move the layer to the bottom
right of the canvas.
Activate layer 6 in the Layers
palette.
Set the layer opacity of this
layer on 46%.
Open the eye-tube and resize to
190 pixels in height.
Edit - Copy.
Activate the canvas.
Edit - Paste as new layer.
It should be above layer 6 in
the Layers palette.
Move it underneath the image
with the borders.
Set the layer opacity on 50%.
Change the blend mode of this
layer to 'Soft Light'
in the Layers palette.
Activate the Text Tool.
Find the font 'Copperplate
Gothic Light, size 30.
Change the rest of the settings
as follows:

Type the text 'Beautiful Red',
or anything you prefer.
Rotate the text while it is
still selected (floating)
to the left.
Promoted the selection to raster
layer in the Layers Palette.
Apply a drop shadow:
2 / 2 / 24 / 3 / color black.
Move the text into position:

Merge all layer.
Selections - Select All.
Selections - Modify - Contract
by 1 pixel.
Selection - Invert.
Fill with the gold/silver
pattern.
Add your watermark en you're
finished :)
Have fun!
Back to
Index
Translated
20th May 2007

|