|

Angelina

Gerrie's
original Dutch tutorial can be found
here
Filter: NVR
Bordermania
Filter:FM Tile Tools
Download here
Filter:L&K
Djin
Download here
Supplies
Download here
A
nice tube.
You can use the one tubed by
Nadia from
Masterkanjers
Here
Open a new
transparent image, size
500x400 pixels.
Set
your foreground on black and the background
on the
"catsgrd001"-
(included in the zip)

Fill the canvas with the gradient.
Layers / Duplicate
Highlight the duplicated
layer in the Layers Palette.
Go to Effects / Texture Effects
/ Weave
and
apply with these settings:

Change the Blend Mode of this layer to
'Soft Light'
in
your Layers Palette.
Go to
Effects / Filter Effects / L&K Dijn
and
apply with these settings:

Effects /
Edge Effects / Enhance.
Effects / Filter
Effects / FM
Tile Tools/Blend Emboss standard
Effects / Image Effects /
Seamless Tiling,
and apply with these settings:

Layers / New Raster Layer.
Selections / Load From Disk /
find the "joyce 36" -
selection and fill
with
your gradient 2x.
Effects /
Texture Effects / Blinds.
Apply
with these settings:

Selections /
Select None.
Effects / Distortion
Effects / Wind -
From
right; Wind speed = 93
Reduce
the opacity of this layer to 80% in your
Layers Palette.
Use
your Mover Tool to drag it to the right as
seen below.

Layers / New Raster Layer.
Activate your Selection Tool

In
the toolbar that opens, click on the 'Custom
Selection' option.

and fill in this values:

Keep selected.
Layers / New
Raster Layer.
Fill
with black.
Selections / Modify / Contract by 1 pixel.
Press
the 'Delete' key on your keyboard.
Selections / Select None.
Lock
the bottom 3 layers in your Layers Palette
so that
you
can move the other layers around better.
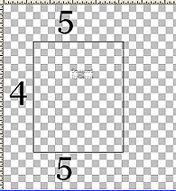
4
blocks from left and 5 from the top and 5
from the bottom.
Unlock the layers again.
Activate the top layer ( highlight in blue)
Layers / New Raster Layer.
Activate your selection Tool again.
Click on the 'Custom' option
again.
Fill
these values in:

Keep selected.
Layers /
New Raster Layer.
Fill
with black.
Selections / Modify / Contract by 1 pixel.
Press
'Delete' on your keyboard.
Selections / Select None.
Activate
Layer 4 in your Layers Palette.
Effects / Image Effects / Seamless Tiling.
Apply
with these settings:

Activate Layers 6 in your Layers Palette.
Duplicate this layer.
Highlight the duplicated layer in your
Layers Palette.
Effects / Image Effects / Offset.
Apply
with these settings:

Layers / New Raster Layer.
Selections / Load Selection from Disk.
Find
the
"GDg2" -selection and
fill with black.
Selections / Select None.
Layers
/ New Raster Layer.
Selections / Load
Selection from Disk.
Find
the
"GDg3"-selection and fill
with black as well.
Selections / Select None.
Layers / New Raster Layer.
Fill
with the gradient.
Layers / Load Mask From
Disk.
Find
the
"GDMask2".
"Invert" should not be checked.
Apply.
Delete the mask layer in your Layers Palette
and
reply 'yes' to the pop-up question.
Layers /
Merge / Merge Group.
Effects /
Edge Effects / Enhance.
Duplicate this layer.
Image
/ Mirror.
Drag
these 2 layers down to just above raster
layer 1.

Activate
the top layer in the Layers Palette again.
Open
your tube and reduce the size to 200 pixels
in width
and
228 in height.
It
won't matter if it differs with a few pixels
though.
Just make sure it fits nicely in
the center rectangle.
If you have a large tube you
can resize it 85% at a time
until
you reach your goal size.
This
way it won't damage your tube :)
Edit
and copy the tube.
Edit
/ Paste as a new layer onto the canvas.
Drag
it to the center rectangle.
Look
at the above example tag to see what is
meant.
Change the Blende Mode of this
layer to 'Overlay' in your Layers Palette.
Open your second tube.
Resize to about 325 in height.
Edit /
Copy.
Edit
/ Paste as new layer onto your canvas.
Drag
it to the right side.
Effects / 3D Effects / Drop Shadow:
Vertical
and Horizontal = 2
Opacity = 100
Blur
= 14.00
Color
= Black.
Choose a nice
color from your tube.
Colorize raster layer 4 above raster layer 1.
Make
sure not to colorize raster 1.
You
do it this way:
Click
on the color in your Color Palette.
Memorize the H & V values.
Now
press Shift + L on your keyboard
and
fill in the H and S values in the pop-up
window and press 'Ok'.
You can now add some text as
well if you like.
Use a new
raster layer for your text.
The
"BickhamScriptFancy2"-
font,
size 48, was used in this tag example.
Your one color should
be black and the other one this color you
have used to colorize the layer.
Make
a gradient with the Style = Linear
Angle
= 45
Repeats = 0.
Apply this drop shadow if you want:
Vertical = 5
Horizontal = 3
Opacity = 51
Blur
= 9.00
Color
= Black
Layers / Merge / Merge All.
Selections / Select All.
Effects / Filter Effects /
Bordermania
/ #Frame2;
the
top 2 slidebars on 1.
And
that's it !! :-)
©Gerrie©
18-07-2005
Back to Index
Translated
by Maggie January 15th 2006

The
graphic design of this page is copyrighted to ©Magstags2005
Home |
Filter Links |
PSP
Goodies |
|