Background
Tutorial

Gerrie's orignal Dutch tutorial can be viewed
here
Materials needed
Filters:L&K Site of Wonders/Trix
Download it here
Visit site to view
their wonderful tutorials ;-)
Filters:FM Tile Tools
BlendEmboss
Download here
Materials:
Download
here
Save this
in your PSP Selections folder
Open a new transparent image of
1024x350
Fill it with a light color. I used #CDCFC4
I chose #BFA479 for
the background color
But you can also use two complimentary
colors
Layers / New raster layer
Fill it with the same
color
Change the Blend Mode in the layers palette to
"Overlay"

Add a new raster layer and set the
color to a gradient with these settings:
Angle 45; Repeat 0; Invert Unchecked;
Style Linear
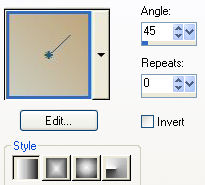
Fill the layer with this
gradient
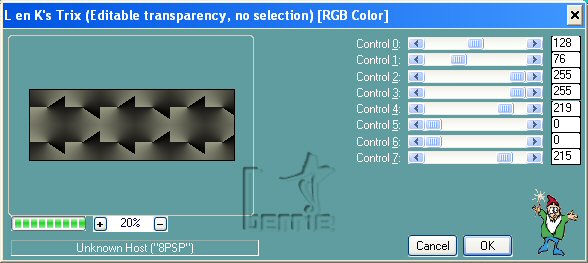
Effects /Plugins/L&K wondersite/Trix
with
these settings
Now go to your layer palette and
change the settings of the layers to look like this
|
 |
Raster 3 Opacity 32%
Blend Mode Normal
Raster 2 Opacity
100% Blend Mode Overlay
Raster 1 Opacity
100% Blend Mode Soft Light |
Make sure to
activate the layer to change its settings -
it will be highlighted in
blue;)
Layers / Merge / Merge All
Effects/
Plugins /FM Tile Tools/Blend Emboss
Layers / New raster
layer
Selections/ Load/Save selection / lLoad Selection from disk
Find the
"backlest" selection
Open the tube you want to use in
the selection
Choose a color with your dropper tool from it
Click on the color
with your mouse pointer to view the H (hue) and
S (
saturation) values

Press
Shift +L on your keyboard to open the Colorize-
option window and
type the top two values into the
"Hue" and
"Saturation" options
Change the width
of your tube to 355
Or if you use a horizontal image change the height
to 355
Edit / Copy
Activate your canvas and paste your
image as a new layer.
Place the image with
your Mover Tool in the selection where
you want
it.

(image reduced)
Selections / Invert
Press DELETE
on your keyboard once
Go to your Layers palette and change
the Blend Mode of this layer to Soft Light
This will blend the
image nicely into the background;)
Play with the Opacity settings on the
Layers palette.
I changed mine to
60%
Selections / Select None (or Deselect Ctrl
+D)
Edit / Copy
Edit / Paste as new
layer
Move it into place
next to the first one. Change the Blend Mode of this layer to Soft Light as
well.
Repeat this step
to fill up the third
space.
Your Layer palette should look like this
 |
Raster 4 Opacity 60% Blend Mode Soft light
Raster 3 Opacity 60% Blend Mode Soft Light
Raster 2 Opacity 60% Blend Mode Soft light
Raster 1 Opacity
100% Blend Mode Normal |
Layers / Merge /
Merge Visible
Your background is finished
I wrote this
tutorial by request and hope you enjoyed it too.
©Gerrie©
28-4-2004