|

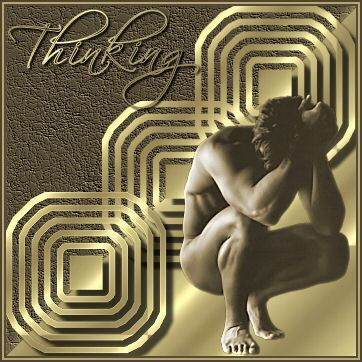
Thinking
A translated tutorial
of Noëlla's
***
Materials needed:
A tube of your choice, or use the one supplied.
Font “Scriptina”.
Download supplies
here
******
Open a new transparent image,
size 550 x
550 pixels.
Go to View -- Change Grid...
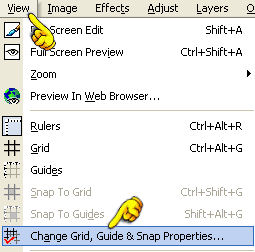
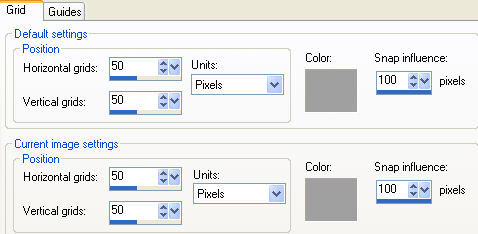
Change the settings, as seen below:
Go to View -- click on Grid ( to activate the grid).
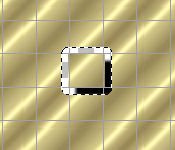
Find the center raster block while moving over your
canvas with the selection tool...

and
draw a rectangle around this center block
Set your foreground to pattern and find a gold pattern.
Change the background color to black.
Fill the selection with the gold pattern.
Go to Effects -- 3D Effects -- Drop Shadow,
with these settings:
Horizontal & Vertical on 11 - Opacity 100 - Blur
6 - color black.
Keep selected.
Selections -- Modify -- Expand by 10.
Selections -- Invert.
Fill with the gold pattern( on the outside of your gold
block).
Selections -- Invert.
Selections -- Modify -- Expand by 10.
Selections -- Invert
Press delete and your first shape is finished:)
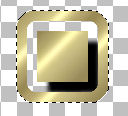
Go to Selections -- Invert
Repeat the same drop shadow as before
and still keep it selected.
|
#
Selections -- Modify
Selections -- Expand by 10 pixels
Selections --
Invert - fill with the gold on the outside again.
Selections -- Invert
Selections -- Modify -- Expand
by 10,
Selections -- Invert - press
delete.
Selections -- Invert -- apply
same drop shadow
# |
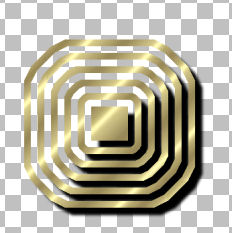
Now repeat the steps framed above
for another 3 times!
You will now have 5 rings.
Deselect now !! :)
Go to View -- click on Grid ( to remove
it this time)
Go to Image -- Resize to 350x350
pixels.
Go to Adjust -- Sharpness -- Sharpen.
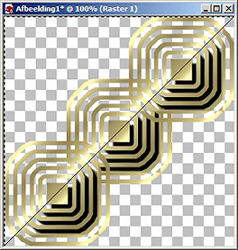
Go to your Layers
palette and duplicate this layer 2x.
Click on the second copy.
Use your Mover Tool and shift it to top
right corner of the canvas.
Click on the first copy in your Layers palette
and drag it to the bottom left.
Go to Layers -- Merge -- Merge Visible.
Go to Layers -- New Raster layer.
Go to your Selection
Tool and choose the Freehand selection tool,
with these settings:
Selection type: Point to Point;
Mode: Add (Shift); Feather: 0;
Smoothing: 0
Anti-alias: checked, as seen below:

Now draw a triangle from point to point.
It should look like this:
Double-click where you end to get the ants marching :)
Fill this with a color from your tube.
Go to Selections -- Invert,
and fill with the gold pattern.
Selections -- Invert.
Go to Effects -- Texture Effects -- Fine Leather
with these settings:
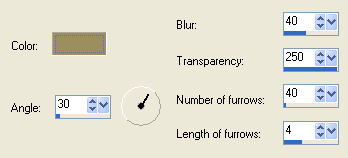
Color: choose a color from your gold pattern - I chose
9C8ESD.
Deselect.
Go to your Layers palette and drag this layer to the
bottom.
Open your tube : copy and paste as a new layer onto the
canvas.
If you use my tube you will have to colorize it first:
go to Adjust -- Hue/Saturation -- Colorize
( or use the shortcut on your keyboard: Shift+L)
Hue: 28 Saturation: 58
Reduce the size of the tube to fit nicely onto your
canvas.
Drag it where you like it.
Go to Layers -- Merge -- Merge All.
Go to Image -- Add Borders -- 2 pixels in your color.
Add a 2 pixel white border.
Select with your Magic Wand and fill with the gold
pattern.
Add another 2 pixel border in your own color.
Activate your font tool and choose a nice font.
Use these settings:
I used the Scriptina font, create as vector,
size 36, stroke width 1, Anti_alias checked.
Go to your Layers palette and promote
the vector layer to raster layer.
Place your text where you like it.
Apply a drop shadow,
with these settings:
Horizontal & Vertical on 2 - Opacity 100 - Blur
5.00 - color black.
Go to Layers -- New Raster Layers
and apply your watermark or name.
Layers -- Merge -- Merge All
and your tag is finished.
Have fun! :-)
Liefs
No.

Translated on the 2nd
September 2005.

©Magstags2005
|