|

Noëlla's
Magic Man
***
Materials needed:
A tube of your choice, or
use this one: download
here.
Filter Greg’s factory, Pool
Shadow, download
here.
Preset Shape Square and
Triangle - standard in PSP
A Gold pattern.
***
Let's begin :)
Open a
new canvas 400 x 400
Choose a dark foreground
color and
set the background color on your
gold pattern,
with these settings:
Fill the canvas with the dark
color.
Add a new Raster Layer.
Activate your Pen Tool, with
these settings:

Go to
the new raster layer and draw a
line
from the top left to the bottom
right corner of the canvas.
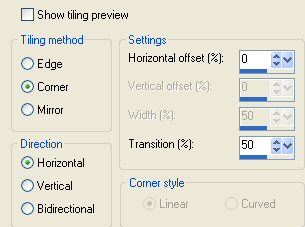
Go to Effects--> Image
Effects--> Seamless Tiling,
with these settings:
Go to
your Layers Palette and
duplicate this layer.
Go to Image--> Mirror.
Go to Layers--> New Raster
Layer.
Go to the Preset Shapes Tool-->
Triangle,
with these settings:

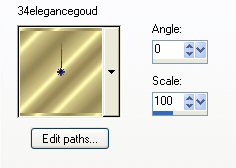
Change your foreground to the gold
pattern.
Draw a triangle in the center
of your image, as seen below:

Drag it so that it is right in the
middle.
You can change the form of the triangle
with
the deformation option to fit nicely.
Go to your Layers Palette and duplicate
this layer.
Go to Image-->Mirror.
Duplicate--> Flip.
Duplicate-->Mirror.
Open your Layers Palette and find your
bottom-left triangle.
Go to Effects--> Texture Effects-->
Mosaic Antique,
with these settings:

Reply Ok on the pop-up question that the
vector layer should be
converted into a raster layer before you
can proceed.
Find the top-right triangle in your image
in the Layers Palette.
Repeat the same Mosaic effect.
Activate your tube and paste it as a new
layer onto the canvas.
Drag it to the left.
Go to Effects-->
Distortion Effects-->Wind:
Windstrength:100 from Left.
Repeat the Effect.
Your tube is still in the memory.
Paste it again as new layer.
Position it where you want it.
Go to Effects--> Filter Effects-->Greg's
Factory Output, Vol2-->
Pool Shadow, with these settings:
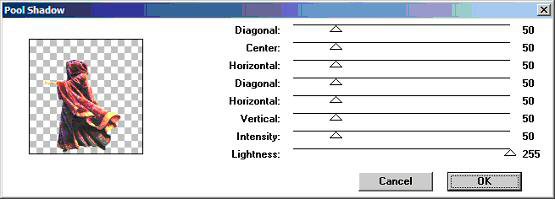
It all depends on the tube you have used.
Go to Layers--> Merge--> Merge All.
Go to Image--> Add a 2 pixel white
symmetrical border.
Select it with your Magic Wand and fill
with the gold pattern.
Add a 6 pixel border in your dark color.
Add a 2 pixel white border and fill with
the gold pattern.
Add a 30 pixel border in your dark color.
Add a 2 pixel white border and fill with
the gold pattern.
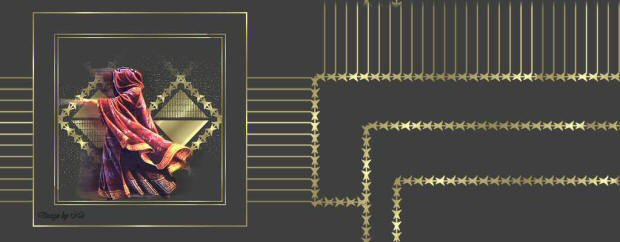
Reduce the image size to 350 pixels.
Add a new raster layer and apply your
text or watermark.
So, this was the frame part of the
tutorial.
Would you like to continue?
Let's do the background.
Open a new canvas size1024x400.
Fill it with your dark color.
Add a new raster layer.
Activate your Preset Shape Tool:
Rectangle,
with these settings:

Draw three rectangles on your canvas.
It should not be perfect.
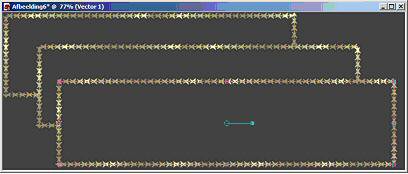
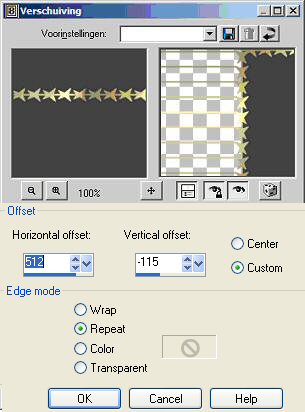
Go to Effects-->Image Effects--> Offset,
with these settings:
Go to
Effects--> Image Effects-->Seamless Tiling,
with these settings:

Activate your tube.
Copy and Paste as new layer.
Position it where you want it.
Go to Layers-->Merge-->Merge All.
I'm finished, and you? :-)
Good.
I hope you enjoyed the tutorial!
©No2005.


©Magstags2005
|