|

No's
Bliss
***
Materials needed:
Supplies: download
here
***
Ok, let's begin! :-)
Open your tube, copy (Shift+D) and close the
original
Go to Layers -->
New Raster layer,
and drag this
layer
below the tube
layer
Set your foreground on a light color,
the background on a
dark color
from the image.
Change the foreground
to gradient,
with these settings:
**note: the Style is
Radial**
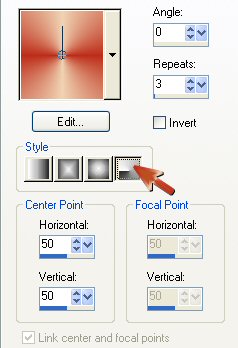
Fill the background with the gradient.
Duplicate the tube
layer in your Layers Palette.
Go to Effects -->
Filter Effects-->Frischluft:Volumemetrics,
with these settings:

Drag the copy layer
below the tube layer and change the
Blende Mode of the
copy layer to Hard Light in the Layer's
Palette.
Activate the tube
layer again (it should be the top layer now)
and apply a drop
shadow, with these settings:

Go to Adjust -->
Hue and Saturation-->Colorize
(or Shift+L) and
apply with all the settings on "0".
Duplicate this
tube layer.
Duplicate this
copied layer again.
Go to Image -->
Mirror.
Go to Effects
--> Texture Effects -->
Fine Leather -
with the "Small Cracks" preset
and change the
settings to this:

Add a new Raster
Layer and paste the
planets tube
onto it.
Shift the
planets to the top left corner of the image.
Drag this layer
down below the tube layer.
Change the
Blende Mode of the planets layer to
"Luminance(0)".
Activate the
background layer ( bottom layer)
Go to
Effects-->Illumination Effects-->Sunburst,
with these
settings:

Dutch screenshot
looks like this:

Repeat the
effect.
Go to Layers-->
Merge--> Merge All (Flatten)
Go to
Adjust-->Sharpen-->Sharpen More.
Add 3 borders of
2 pixels each.
One dark, one
light, one dark border.
Go to
Effects-->Filter Effects-->
I.C.NET
Software's Filters Unlimited-->
Lens
Flares-->Flare10,
and apply the
standard setting: Intensity on 83.
Add another
border of 2 pixels and fill
with a gold
pattern.
Add a 1 pixel
black border.
Add a raster
layer and apply your name or watermark.
Enjoy!
©No2005


©Magstags2005
|