|

Anita

Thanks No!
******
Materials needed:
Supplies: Download
here.
A tube of your choice.
Presets: Save in your presets folder of PSP
Selections: save in your PSP Selection folder.
Script
******
Open a
new canvas, size 500/500 pixels.
Change your foreground to a dark - ,
and your Background color to
a
light color from your image.
Set your background on gradient, with these settings:
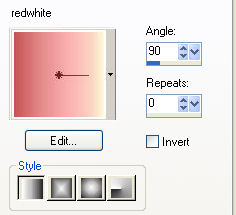
Fill
the canvas with the gradient.
Open your tube, copy and close the original.
Resize to 450 pixels in height.
Copy and paste as new layer onto the canvas.
Layers - New Raster layer.
Go to Selections -- Load/ Save
Selections -- Load Selections from Disk
and find the
“selno10”
Change
the gradient angle to 270.
1. Fill the selection with the gradient.
2. Go to Effects -- 3D Effects -- Inner Bevel
and find your preset
“vno1”.
3 Apply a
Drop Shadow with these settings:

Selections -- Select None
Add a new Raster layer.
Go to Selections -- Load/Save Selections -- Load
Selection from Disk,
and find the “selno11”
Repeat step 1, 2 and 3.
Selections -- Select None.
Add a new raster layer.
Go to Selections -- Load/Save Selections from Disk,
and find the
“selno12”.
Repeat step 1, 2 and 3.
Selections -- Select None.
Go to your Layers palette and duplicate this layer.
Drag this balls neatly into the selection 11 - area.
Add a 1 pixel black border.
Add a new raster layer.
Add your name or watermark.
Go to Layers -- Merge -- Merge All.
Resize your image to 400 pixels high.
Go to Adjust -- Sharpness -- Sharpen.
Minimize for now.
Open a
new canvas, size 1024/450 pixels
Fill with the gradient.
New
Raster layer.
Go to Selections -- Load/Save Selections --
Load Selection from Disk, and find “selno13”.
Change the gradient angle to 90.
Repeat steps 1 and 2.
Selections -- Select None.
New Raster layer.
Go to
Selections -- Load/Save Selections --
Load Selection from Disk, and find ” selno11".
Repeat steps 1 and 2.
Selections -- Select None.
Now do the same with “selno 12”
Selections -- Select None.
Drag the little balls again into selectie 11.
Go to your Layers palette and lock raster 1 and 2.
Activate one of the other layers.
Go to Layers -- Merge -- Merge Visible.
Unlock
the layer 2 again.
Layer 1 should remain locked.
Drag the little sqaures onto the top line.
Duplicate this layer in your Layers palette.
Shift it on the center line somewhat to the left.
It should still be
on the right side though -
See my example
Duplicate again
and drag it to the center between the other two.
Go to Layers -- Merge -- Merge Visible.
Duplicate this layer.
Go to Image -- Mirror
Go to Image -- Flip.
Go to Layers -- Merge -- Merge
Visible.
Apply a drop shadow with the same settings as before.
Unlock raster 1.
Go to
Layers -- Merge -- Merge All.
Maximize your image that you have made previously.
Copy and paste as new layer onto the canvas.
Go to Layers -- Merge -- Merge All.
Your tag is finished.
You can add it to this nice script of Jetty
“Molehofje”
You can find the script
Here .
Enjoy!!
No.


©Magstags2005
|