~*~ Army Girl ~*~
Karins's original Dutch
tutorial can be viewed
here
Materials Needed:
Download the supplies
here.
The tube was made by Lynsey.
Save the selections in your PSP-selections
folder.
Open the tubes in PSP.
FILTERS NEEDED:
Flaming Pear - Organic Edges
VM Distortion.
Open a new transparent canvas, size 400 x
400 pixels.
Choose a light background- and dark
foreground colors
from your tube.
Make a gradient:
Style - Radial
Angle 0
Repeats 8
Invert - not checked
Horizontal 0
Vertical 100.
Fill the canvas with the gradient.
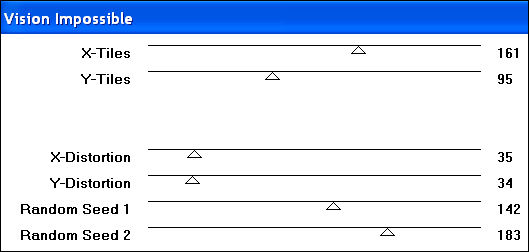
Effects - Filter Effects - VM Distortion -
Vision Impossible:
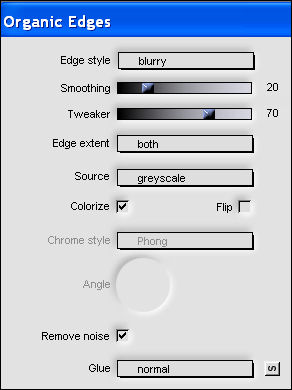
Effects - Filter Effects - Flaming Pear -
Organic Edges:
Add a new layer.
Fill with the gradient.
Effects - Filter Effects - VM Distortion -
Sausage:
Slidebars on 96, 178, 200, 29, 68, 123, 0,
34.
Change the opacity of this layer to 30% in
the Layer palette.
Layers - Duplicate.
Image - Mirror.
Merge all layers.
Add a new raster layer.
Selection - Load/Save - Load Selection from
disk:
Find the 'vlag1karin'- selection.
Apply.
Fill with white.
Deselect.
Add a new raster layer.
Selections - Load from disk:
Find the 'vlag2karin'- selection and apply.
Fill this selection with red.
Deselect.
Add a new raster layer.
Load selection - 'vlag3karin' and fill with
blue.
Keep selected.
Open the lady tube.
Activate the Selection Tool - lasso/
freehand, opacity 25.
Draw a selectioin around the lady's head.
Edit - Copy.
Back to your canvas.
Edit - Paste into selection.
Image - Mirror.
Deselect.
Lock the background layer.
Activate one of the other layers.
Merge layers visible.
Change the layer opacity to 50% in the
Layers palette.
Unlock the background layer.
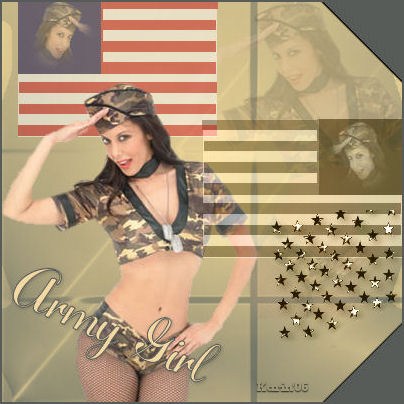
Move the flag to the top left
as seen in the tag example.
Layers - Duplicate.
Image - Mirror.
Move the second flag to the center right.
Change the Blend mode of this
layer to 'Luminance(Legacy)'.
Activate the background layer.
Effects - Image Effects - Page Curl:
Bottom right curl
Color = dark color
Radius 1
Width 20
Height 20
Repeat the page curl effect but
choose the top right page curl
with the same settings.
Go back to your tube.
Deselect.
Edit - Copy.
Back to canvas.
Edit - Paste as New layer.
Move it the bottom edge of the canas.
Layers - Arrange - Move Down.
Edit - Paste (the image is still in the
memory)
Change the layer opacity to 20%
in the Layers palette.
Move her to the top right.
Activate the star tube.
Copy and paste as a new layer onto the
canvas.
Move it onto the flag.
Change the Blend mode to
'Luminance(Legacy)'.
Merge all layers.
Add your text.
Choose colors from your tube
otherwise it will become too blue.
The Michelle- font, size 48 was used in the
tag example.
Apply a drop shadow:
1, 1, 20, 5, black.
Add a 2 pixel border in your dark color.
And that's it ! :)
Have fun!
Back to Index

Magstags |
Filter Links |
Email |