|

Daniel Topper (Script)
original tutorial:
http://www.cristaylor.com.br/free/g186/arquivo.asp
Materials:
PSP 8 or 9 - program
Plugin:
Simple
Mask: CrisTaylor_Daniel e Nevoa
download here
Script: CrisTaylor_Daniel
download here
An image of your choice
1 - Save the Script in
your PSP Scripts Restricted folder:
My PSP Files > Scripts Restricted
2 - Save the mask in
your PSP Mask folder.
3 - Open
your tube in
PSP.
3 - File > Scripts >
Run > My PSP Files > Scripts Restricted >
CrisTaylor_Daniel.PspScript
Click to open
4- The script is interactive and will ask you to
choose the colors for the foreground and background,
choose the mask,etc.
Just follow the steps.
***Note: the first mask will be the nevoa mask - applied to
the tube.
The second mask will be the "cristaylor_daniel.pspimage" -
applied to the background canvas. Make sure you choose the right mask for the
right step:-))
Happy Anniversary,
Sergio Apollinari ( My boy angel, Daniel)
Script was written by Cris Taylor
© - 2003
2005. All Rights Reserved By Cris Taylor
UNSCRIPTED TUTORIAL
(Supplied by Maggie)
(Note: open your cristaylor_daniel.pspimage
in
PSP and save as pspmask if you're going to
do the unscripted tutorial (see below)
Open your tube
resize to 204 x 394 pixels
Edit> Copy and minimize for now.
Open a new transparent image 800 x 280 pixels
Select All.
Edit > Paste Into Selection
Effects> Image Effects> Seamless tiling,
with these settings:
Corner/Bidirectional/Linear checked.

Adjust > Blur> Gaussian Blur - Radius = 31.00.
Effects> Reflection Effects> Feedback, with these
settings:
opacity - 30; Intensity - 100;
Horizontal and Vertical - 0;
Elliptical - unchecked, as seen below:

Effects> Simple Filters > Diamonds
Effects > Edge Effects > Enhance More
Save your background canvas and minimize it for
now.
Open your tube.
Layers>Load/Save Mask> Load Mask from Disk.
Find the nevoa mask and apply.
Layers> Delete Mask Layer.
Layers> Merge Group.
Open your background again.
Edit > Paste as New Layer.
Position it where you want it on the canvas.
Layers > Duplicate
Image > Mirror.
Layers > Merge Visible.
Layers> Load/Save Mask> Load Mask from Disk
Find the cristaylor_daniel.pspimage mask and apply
with "Invert"checked.
Delete Mask layer and reply "yes" to the question.
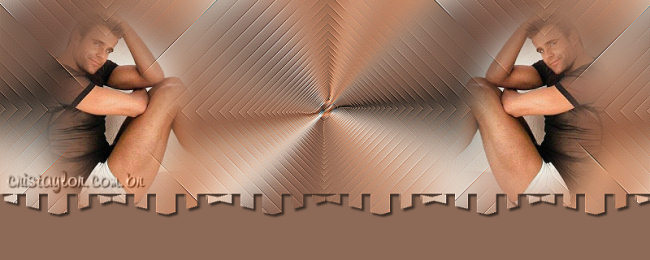
Resize your canvas to 800 x 320 pixels.
Add a new raster layer and drag it to the bottom in
the Layers Palette.
Lock this new layer and merge all the others.
Activate the bottom layer and fill with a color of
your choice.
Activate the merged topper layer and apply a drop
shadow, with these settings:
3/3/60/3 color black
Add your name or watermark on a new layer.
Layers > Merge All.
Translated by Maggie
10th July 2005.
Copyright- 2003 2005.
All Rights Reserved By Cris Taylor


Copyright - Magstags2005
Home |
Filter Links |
PSP Goodies
|