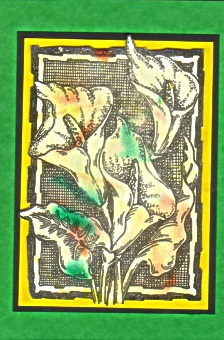
| Shaving cream backgrounds |
| Like a sample ? Then send $5 & a SAE to The Stamping Ground PO Box 385 Unanderra, NSW 2526 (Australia). |
| Michelle's Stamping Ground |
| Home Gallery Other Crafts Christmas 2000 Projects Latest Madness |
| Fast Links Home Latest Madness Projects |
 |
 |
| All you need is a tin of cheap shaving cream, some dye reinkers and some paper or card. A plate (I prefer to use the draining side of my kitchen sink) a pair of disposable gloves and a cake spatula are handy optionals. Spray out a layer of shaving cream and spread it out evenly on the plate (about 3-5cm thick is great). Place a few drops of re-inkers on top of the shaving cream, use your gloved finger or other implements eg a toothpick, a knife, a straw, a wide tooth afro comb etc to swirl it around. Once you have a pleasing pattern, press your card onto the shaving cream ensuring good contact no big bubbles of air trapped underneath. (You just need to press onto the back of the paper in a couple of places and into the cream a bit). Now lift the card off and wipe off the shaving cream with a cake spatula. (I like to do things the easy way and so I tend to scrape the cream off using the side of my gloved hand as it is quicker). TA DA you'll see a lovely pattern on the cardstock. Away you go again. You will be able to get many, many sheets inked this way before adding any extra reinkers. At any time you may change the pattern and or add more inks even different colours. You can use just one colour or 2 or 3 colours. Or even more. I like to have some of the base card colour show through however I also liked it when the entire cardstock was coloured. I tend to add the cream that I have scrapped off the cards back into the original cream and swirl it in. Experiment as you go, it depends on what you like. With each successive applications of cards you�ll notice that the inks get lighter in intensity. I like this for subtlety too. When you have had enough of the colours or they just start getting too muddied up. I either scrape the cream and start over with a new colour combination or often as not I blend all the colours together so that the cream ends up one colour and then I add new reinkers. The last time I did this I ended up with a bluish cream and Then I added yellow and green inks to it. WOW, instead of a white card it was now blue and the marbling was on top. As I said experiment. The cream is cheap enough. You could also add other colouring mediums some work better than others. Try food colouring, acrylic paints, lumeres, pearl ex..etc. |
 |
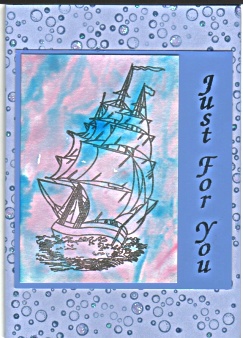 |
| When your background is completely dry and you are ready to stamp onto it, then just treat as per normal like any other lovely decorative card or paper. Looks great just stamped in Black Arhival type ink or it black pigment ink and clear embossed. Again experiment. |