

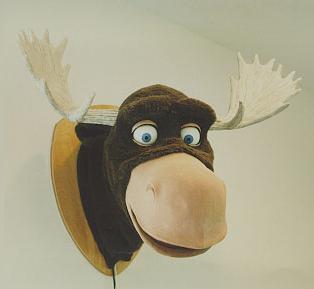
 Mack is a collection of servos, fiberglass, epoxy, fake fur, latex, and aluminum roughly arranged in the form of a mounted moose head. He has six axes of motion: eyebrows, mouth, eyes left & right, eyes up & down, neck left & right, eyelids, and mouth. There's also a speaker in his mouth for all the witty things he has to say. Each moving part is controlled by an RC servo, which in turn is driven by an RC transmitter.
When selecting RC supplies, I chose the Futaba SkySport 6 for several reasons:
Mack is a collection of servos, fiberglass, epoxy, fake fur, latex, and aluminum roughly arranged in the form of a mounted moose head. He has six axes of motion: eyebrows, mouth, eyes left & right, eyes up & down, neck left & right, eyelids, and mouth. There's also a speaker in his mouth for all the witty things he has to say. Each moving part is controlled by an RC servo, which in turn is driven by an RC transmitter.
When selecting RC supplies, I chose the Futaba SkySport 6 for several reasons: Key to making all this work was a strong neck that could support a cantalevered head but could be moved by a hobby servo. I had Hosford's (a local machine shop) make six plates from 1/2" aluminum and then mill recesses for thrust bearings. I spaced the plates about 10" apart and stacked the "vertebrae" in a stair-stepping fashion.
|
|
|
| The eye mechanism is pretty klunky, but I was able to make it in my basement with a consumer-grade drill press. The pivot point between the eyes allows them to roll up and down. The support is mounted to the bridge of the nose, and the servo is mounted on a plate attached inside the nose. | Left and right motion comes from a servo mounted to the main eye support. The eyes are cedar balls I pulled from decorative caps which are sold as trim for stair railing. |

|
These pictures were taken once the underskull was complete and half the mechanics were installed. I had to resculpt the nose because the mouth wasn't open enough in the original sculpture. It would have been workable with a foam nose skin, but the slush cast latex skin resisted too much and the servos couldn't open up the mouth. |

|

|
Fitting a speaker inside the moose was a challenge. It needed to be small so it would stay hidden and not interfere with the mechanics, but it also needed to sound good. The effect would have been ruined if Mack sounded like he was talking through a 1960's Heathkit AM radio. After a disappointing experience with a midrange speaker purchased from Radio Shack, I ended up buying a set of computer speakers. Not the little ones that are the size of your fist, but the ones that are about 8" tall. That style relies on the chamber that surrounds the rather small speaker inside to produce a full sound. The chamber beefs up the bass, which is what I needed. I only needed one, but they aren't sold individually.
Unmodified, the speaker was still too big to fit in Mack's nose. I hacked apart the primary unit and removed the amplifier board. Then I chopped off the now empty bottom portion of the case and built a new bottom for it. This shrank the unit enough that it could fit inside the moose. I installed the amplifier in a hobby case and ran wires from it to the speaker. Then I placed the amplifier unit in the base of the neck. |
 For a while I thought I would carve the antlers out of some material like dense styrofoam, and then paint on a latex or epoxy skin. I wanted to avoid sculpting, molding, and casting and just do something simple. As with everything else on the moose, the antlers needed to be lightweight, so I couldn't do something like buy a huge box
of Sculpy and bake the antlers into submission. The shape I wanted seemed too complex for an approach like casting a latex skin and then then filling it with expanding foam. There
would be lots of nooks, crannies, and points sticking in wierd directions acting as air bubble magnets for the latex. Been there, done that. I also wasn't excited about making
For a while I thought I would carve the antlers out of some material like dense styrofoam, and then paint on a latex or epoxy skin. I wanted to avoid sculpting, molding, and casting and just do something simple. As with everything else on the moose, the antlers needed to be lightweight, so I couldn't do something like buy a huge box
of Sculpy and bake the antlers into submission. The shape I wanted seemed too complex for an approach like casting a latex skin and then then filling it with expanding foam. There
would be lots of nooks, crannies, and points sticking in wierd directions acting as air bubble magnets for the latex. Been there, done that. I also wasn't excited about making  silicone molds for hard foam casts. Silicone is expen$ive and is relatively slow to cure, plus you need a mother mold. The whole process for a pair of antlers would drag out for days, especially since I was doing this in the evenings and couldn't guarantee being able to work on it every evening.
 |
RC control devices for puppets and other applications. |
 |
Among all the other interesting supplies, they carry XR1592, which is the rigid urethane foam I used for the antlers. I also used their latex for the nose. |
| Ann Arbor hobby shop | |
| Burman Industries | Lots and lots and lots of things. I ordered VRM-65, which is a brushable grade of silicone. |
| Stadium Hardware | A great source in Ann Arbor for small machine screws, aluminum stock, epoxy, and other things needed for moose construction. |
| Hosford & Company | Ann Arbor machine/blacksmith shop. Good guys, good prices. |
