
Homemade Super Soakers
 |
 |
 |
 |
|
|
|
|
In case you didn't know, there are four basic types of homemade super soakers, in my opinion, and they are pressurized reservoir, homemades with a pressure chamber, CPS homemades, and CAP homemades (please read the articles in tech I don't have the time to put the same thing in several articles).
WARNING: My knowledge of PR homemades is limited. I have never attempted to build one, there are no instructions on any well known super soaker sites for one, and they are probobly not worth building anyhow. Most of this section is guesswork but it is most likely that these statements are true, at least to a degree.
Pros:
Probably the easiest to build
Cons:
Must have a smaller reservoir than other homemades
Probably not worth the trouble
Most likely less output and range
If you plan on getting higher output and range, you'll need a ridiculous number of pumps to gain that much pressure.
See this link to find out how they work.
How they would be constructed:
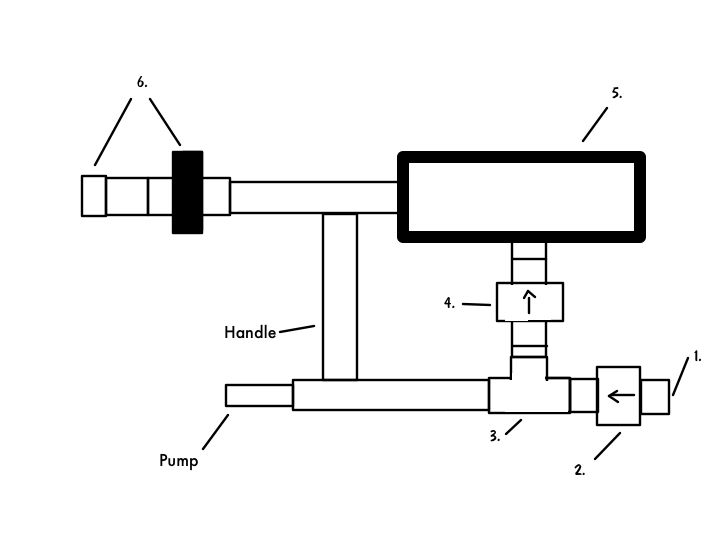
Note: I have decided to put this paragraph in this article because it is necessary to know what the diagrams mean and it is simply not worth giving this a seperate page.
Obviously, you would need an intake; a small hole in the back of the pump shaft would do (1). You would need a check valve in between the pump and the intake, so that the air can only flow in one direction (2). A tee would be necessary, between the pump and the check valve, to allow the air to travel to the reservoir (3). Another check valve to prevent pressure from escaping through the reservoir (4). Of course the reservoir, mounted above the pump, with a tube to allow the air enter in the bottom, with another pipe out the side, to the nozzle ( also needs to be air tight and have a method of filling) (5). Lastly, a ball valve (which serves as a trigger) and a nozzle at the end (for obvious reasons)(6).
Note: This is mostly referred to as an APH (air pressure homemade)
Pros:
Most well documented homemade
Extremely high output and range. The information in this article is based on this type of homemade.
Can easily attach a backpack
Less drop-off that PR
Cons:
Um... none really. Could be slightly more expensive and complicated than PR, but it is the most well documented homemade so that easily makes up for it.
See this link to find out how they work.
See this link to find out how to build one.
If you're new to homemades, this is probably the best to start with. You could go with PR, but I'm sure you will be happier with one of these, and there are also several web sites that have instructions for them, unlike PR's. My recommendation is build one of these, then try the other types (exception: PR. As I have said, I don't think PR's are worth building.)
Pros:
CPS like shot, without dropoff
Allows for EXTREMELY long shot time, in a smaller space than APH
Easily adapted for backpack reservoir, or CPS PC
High output and range (not quite sure where it stands overall)
Cons:
You'll need to buy Latex Rubber Tubing from McMaster
Instructions hard to find, if you can find any at all
See this link to find out how they work.
See this link to find out how to build one.
This one is a little more difficult than a standard APH. The main reason you might want to build one of these is to extend shot time. If you have a backpack set-up, with a CPS chamber in it, using a small nozzle, you can have shot times that are HUGE. I'm talking 5-10 minutes of constant shooting without pumping. Although the output would be very low, this would give you a huge advantage: you can soak for MINUTES while your enemies have to pump every 10 seconds or so.
Note: This section refers only to the type of homemade with a pressure tank/air compressor, and a pressure regulator.
Pros:
Constant pressure, reducing dropoff while still maintaining (or increasing) output
Can be pressurized with basically anything
Cons:
Can be quite expensive (regulator can be pricey)
Not any well documented instructions
See this link to find out how they work.
See this link to find out how to build one.
I would recommend building a CAP homemade only after you have had experience with other homemades for three reasons:
You need to be able to design one yourself and figure out how to build it.
There are no instructions available on the internet (yet).
And you want to know what you're doing before you go out and buy an air regulator, to make sure you know you actually have the ability to construct this type of homemade.
Even though it may be the most expensive, this design has major potential for future homemades and you may want to consider building one.
Overall:
(All of this is based on my opinion)
Best value for your dollar: APH
Best first homemade: APH
Longest Shot Time: CPS (this refers to the longest shot time in the smallest space)
Most potential: CAP (although they all have unlimited potential)
Most output/range: This is impossible to say, because homemades have virtually no boundaries.
![]()