Monte SS Tach
Installation
Required Parts:
SS Tach
Wire
2 Blue Spade Connectors
Steps:
1. Remove cover
2. Remove clock/logo
3. Hook up 12v terminals
4. Run tach wire
5. Reassamble
Step 1 - Remove cover
Take apart the dash down to the bare gauges. For instructions, click here.
Step 2 - Remove clock/logo
I took the motor off my junkyard clock and put on a battery
operated one so I'm not sure about the clock uninstall but I'm
sure it's pretty basic. The logo just unscrews.
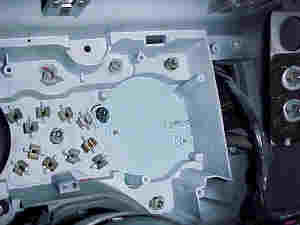
Step 3 - Hook up 12v Terminals
You should have 2 or 3 screws left from your tach donor. They
have a hex head in the middle. Put these through the back of the
gauge console and into the left 2 holes on the inside. Use the
cheap little nuts to connect them to the printed circuit.
(Show in previous picture)
Step 4 - Run tach wire

Since you didnt have a stock tach, they didnt run the wire for
you. This is simple enough though. Run a wire behind the cluster
and through the grommet into the engine compartment. Near the
brake booster will be a white wire that isnt connected to
anything. This runs the tach signal. Use a spade terminal to
connect the wires together and one to clip in the tach.
Step 5 - Reassemble
Screw the tach in and put everything back were you found it.
Time Involved: 45 minutes
Difficulty: Easy
Approx. Cost: Whatever you can get the tach for