This
tutorial is really great because
you can use this style for any
tube/color and the backgrounds
are really vast to match your
style of tag you wish to create.
Below I have listed the supplies
that you will need to create
this tag, but please feel free
to try your own tubes.
Open
your PSP and start with a new
image 500x500. Name this layer
#1. Open your Tube and minimize
it. Find your Floor Tiles
Pattern font and if you have a
font viewer you can view all the
patterns. For this tag I used
the letter “S”.
Open
your tube and use your dropper
tool and choose two colors from
your tube and choose a darker
color for your background and a
lighter for your foreground for
this tag I used the colors
#E6CC78 and #AE9157. Select your
font tool and select your Floor
tiles font and set the size to
(depending on the size of your
tube) 300, create as selection
and anti-alias checked. Type the
letter “s”, promote
selection to layer and go to
selections/select none. Use your
mover tool to position in the
middle of your image. Name this
layer #2. Open your tube and
copy and paste to your new image
as a new layer and name this
layer #3.
Go
to Resize and resize layer #3 by
80% lock aspect ratio checked
and Resize all layers unchecked.
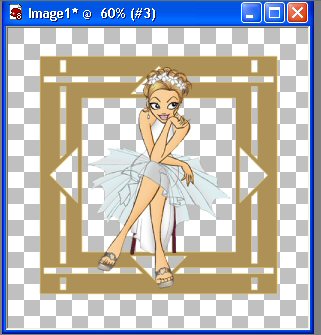
Position your tube to where you
think it looks good. So far you
should have something that looks
like this:
In
your foreground palette under
patterns, choose, Grey Molted,
angle 0, size 60. Select layer
#2 in your layer palette and
flood fill your floor tile
pattern with it. Go to layer #1
and flood fill with your light
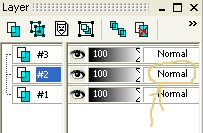
foreground color. Change your
blend mode for layer #2 to hard
light. If you are not sure where
to find your blend modes see
image below:
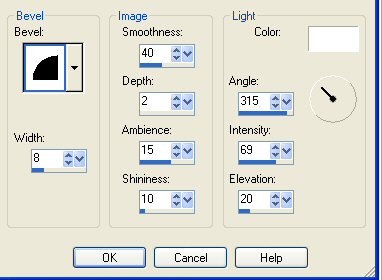
Go
to Effects /3D Effects /Inner
Bevel and apply these settings:
Go
to Effects /3D Effects and apply
drop shadow to these settings:
Vertical
–4, Horizontal –1, Opacity
24, Blur 16.82, Color black
Your
tag should look like this so
far:
Go
to image one and duplicate. Go
to Effects/Texture
Effects/Blinds and use these
settings: Width: 3, Opacity: 65,
Horizontal checked and use the
color #A99091. Hit ok. Lower the
opacity of this layer to 50%.
Hide layers #2 and #3. Click on
layer #1 and go to
layers/merge/all visible.
Click
on layer #3 and duplicate,
rename this layer #4. On layer
#4, apply the same drop shadow
as before.
Click
on layer #3 and go to
Effects
/plug ins /Toadies /Weaver and
apply these settings: Cell width
47, Cell height 23 and Cell
Edges On/Off 222. Move layer #3
down so its in-between layers 1
and 2.
Go
to layers /merge /all visible
Now
you will need to apply your
text, use your dropper tool
again and choose two colors from
your image, again you will need
a darker color for your
background and a lighter for
your foreground. For this tag I
used the colors #AD9A85 and
#73644F for background. Select
your Kayleigh font and depending
on your name you will need to
adjust the size, I have mine set
to 100. Type your name and
position it to where it looks
good. I have set my text near
the bottom. Then apply the same
inner bevel as above. Merge all
layers, and then use your crop
tool to cut away some of the
background. Resize your tag if
you wish. Add your watermark and
save as a JPG and you are done
No
direct linking to this tutorial
without permission from the
owner/writer. No copying
this tutorial without permission
from the owner/writer.
This tutorial was written by
Smoochy October 2004.
Tutorial is all from her
own imagination and psp
experience. Any
resemblance to this tutorial
with other tutorials is purely
coincidental.