|
 |
| This tutorial was prepared using PSP 9: Filter Needed: Alf�s Border Fx, Fade II. Supplies Needed: An Image, Mask 179 (attached) and a Tube that preferably has something to do with the image and can be inset. |
 |
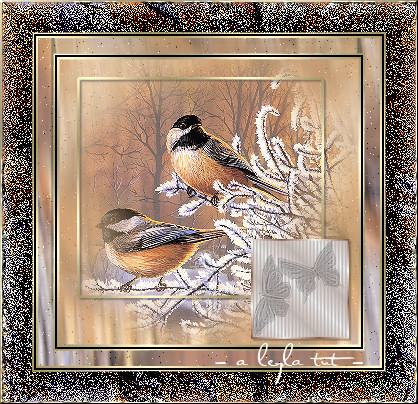 |
| Open your image, promote background to raster layer, resize to 300 pixels wide, resize all layers CHECKED, and make 2 duplicates (SHIFT D). Minimize the original for later use. Minimize one of the duplicates. Open your tube and minimize. On the image in your workspace, LAYERS > Load/Save Mask > Load Mask from Disk; locate mask 179, fit to canvas, source luminance, show all mask all checked, invert transparency UNCHECKED. Load. |
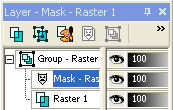 |
| In your LAYER PALETTE, right click on Mask, click delete and answer �yes� to question about merging two layers. Right click again > Merge > Merge Group. Minimize this finished image and restore your other minimized image as your working copy (see below). |
| EFFECTS > Image Effects > Seamless Tiling; default setting. ADJUST > Blur > Motion Blur; angle 354, strength 100. ADJUST > Add/Remove Noise > Add Noise; random, 2, monochrome CHECKED. Reduce opacity of this layer to 50%. NEW RASTER LAYER and rename background. Move this new background layer to the bottom. Using your DROPPER TOOL, pick a colour from your image and FLOOD FILL the bottom (background) layer. Restore your masked image and Copy/Paste as new layer into your working image. Look at LAYER PALETTE and move this layer to top if not there already. ADJUST > Sharpness > Sharpen. Repeat only if necessary, it will depend on your image. NEW RASTER LAYER. Click on your selection tool; rectangle, add (shift), feather 0. Draw a rectangle around your main subject material. KEEP SELECTED. In your Foreground Materials Palette, select a gold coloured gradient; angle 45, repeats 2. SELECTIONS > Modify > Select Selection Borders; Outside 2. Click on your FLOOD FILL TOOL and fill border selection with gradient. SELECTIONS > Select None. Apply Drop Shadow: V2, H2, Opacity 45, Blur 2, Colour #404040. Restore tube, Resize tube, NEW RASTER LAYER and send to bottom, Flood Fill with gradient. Add Blinds effect, W2, Opacity 95, horizontal UNCHECKED. Add a two pixel border, flood with gradient. Copy and paste image in one of your corners. |
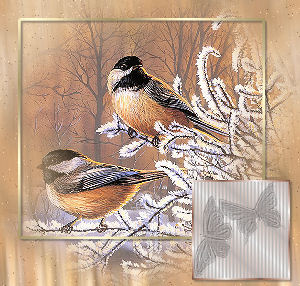 |
| IMAGE > Add Borders > 2 pixels Symmetric white. Select with MAGIC WAND tool and fill with gold gradient. SELECTIONS > Select None. IMAGE > Add Borders, 2 px. Black, then 2 px. Gold gradient, again. SELECTIONS > Select None. Set Background in Materials Palette to Patterns and click on the pattern of the image in your workspace. IMAGE > Add Borders, 15 px white. Click with MAGIC WAND and fill with your background pattern. ADJUST> Blur > Motion Blur; angle 354, strength 100. ADJUST > Add/Remove Noise > Add Noise; random 2, monochrome. SELECTIONS > Select None. IMAGE > Add Borders > 2 pixels Symmetric white. Select with MAGIC WAND tool and fill with gold gradient. SELECTIONS > IMAGE > Add Borders, 30 px. White. Select with MAGIC WAND and flood fill with pattern. EFFECTS > Alf�s Border Fx, Fade II with default settings. EFFECTS > Edge Effects > Enhance. SELECTIONS > Select None. Add a final 2 pixel gold border with the Metallic Inner Bevel setting. Embed your watermark, resize to your liking and save as a .jpg. Hope you enjoyed this tutorial. |
 |
| Mask 179 |
 |