|
 |
 |
 |
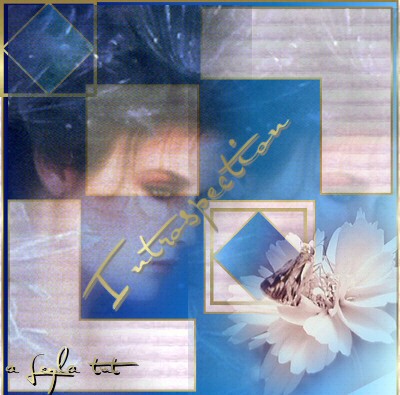
| Let's Begin! 1. Open both your tubes in PSP, make copies of your tubes (Shift+D), then minimize them, keeping them handy on your workspace; put your gradient into your gradients folder, the gold pattern in your patterns folder. I installed my fonts, but that is up to you. 2. Open a new image transparent, 500w x 500h (allowing room to work). 3. Set your foreground to your gold pattern and your background to a gradient, using the duotone dark blue gradient supplied or picking a color from your tube; angle 100, repeats 0, Linear. 4. Layers/New Raster Layer. Click on your text tool. When the settings menu becomes available, set at "floating"; font Floor Tiles Pattern; Size 300; Stroke 2.0; Anti-alias; Sharp. Type a small "f" (lower case) in the bottom left corner of your canvas. Your result should show a gold border with your pattern filled in various box places with your gradient color. Selections/Select None. This is what you should have so far; at this point, you might want to save your template for future use. Remember to save often. |
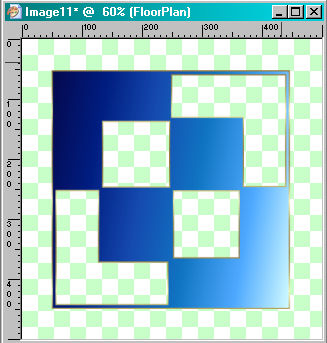 |
| 5. Layers/New Raster Layer. Click on your text tool again (A). The font is the same, but reduce the size to 72. Click on your image and type a lower case "k". Click apply, then Selections/Select None. Change to your mover tool and move the diamond to the top left corner of your image. Make sure the gold border of your diamond covers the gold border on the corner of your image outline. 6. Layers/Duplicate. Image/Mirror. Image/Flip. Grab your mover tool and move the diamond up and to the left and center in the empty box in the bottom right corner. NOTE: We are going to do some cropping before we are finished, so don't worry if we have some overhang in some places. |
| 7. Restore the Misted Lady tube and resize to 120%. Edit/Copy; minimize tube on your workspace. Make the image with your patterns active and Edit/Paste/Paste As New Layer. Change to your mover tool and move your tube to the far right, covering the empty right hand side, just below the gold border. Lower the opacity on this layer to 50%. 8. Once again, restore the Misted Lady tube and Edit/Copy. You can close this tube now. Make the image with your patterns active and Edit/Paste/Paste As New Layer. Change to your mover tool and move your tube to the far left, covering the left hand side, just below the gold border. (I then went back to my first Misted Lady layer [should be Raster Layer 3] and lowered the opacity to 40; but this is a matter of personal preference.) 9. Restore your flower tube; Edit/Copy. You can close this tube. Make your image with the patterns the active image and go to Edit/Paste/Paste As New Layer. Grab your mover tool and position your flower tube in the bottom right hand corner according to your own personal preference. Don't worry if you have a little overhang on the bottom. |