The Chamise,
a little history,
plus an on line pattern.
 What to wear has been the war cry of every woman in every century. On this page we will examine the items that were basic to all women's wear. On additional pages we will go into the spacifics of style in time frame and geographical locations. To save uploading time I have thumbnailed the examples, full views are available by clicking on the thumbnail.
In my 6 years of research I have come to the conclusion that 85% of the women in the known world wore an under dress called the chamise. This dress was used as day gown, night shirt, and covered from shoulder to hip or longer. The first chamises and those belonging to the lower classes were very simple in construction. All research has stated that a woman would actively use three chamises until they fell apart, before bringing another one into use. From the Pensylvania Duetch Clothing book I believe that a bride would have several in her hope chest along with 35 or so petticoats. These were stocked so that her time could be spent making clothing for her husband and children.
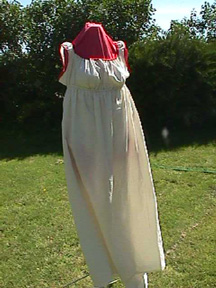
There are a few differances to the Chamise through this time period. During the 1790's to 1820's women wore an empire style gown with short sleeves. The chamise was altered by removing the sleeves dropping the neckline, and adding a drawstring just below the breast. With the lightweight and guase fabric used the chamise had to be natural to white. It wasn't uncommon for the chamise to be 4 to 6 inches off the ground so that it did not peek out from under the gown.
Chamises were made of muslin, osnaburg, linen, or plain cotton. The first had a simple drawstring neckline, usually not embelished with lace unless you were a woman of means and time to do such fancy work.

In Russia the chamise took on another name, they called it the Rukava. The thumbnail in this instance sends you to my russian folkwear pages for more information.

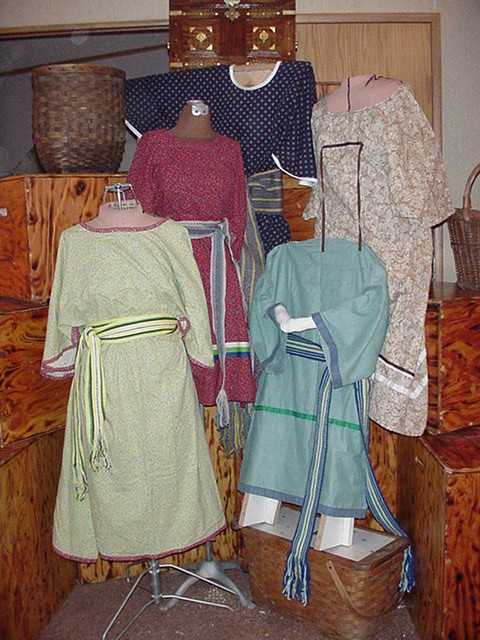
All ages and sizes wore the chamise. Here I took the left-overs from different projects and made the baby chamises.

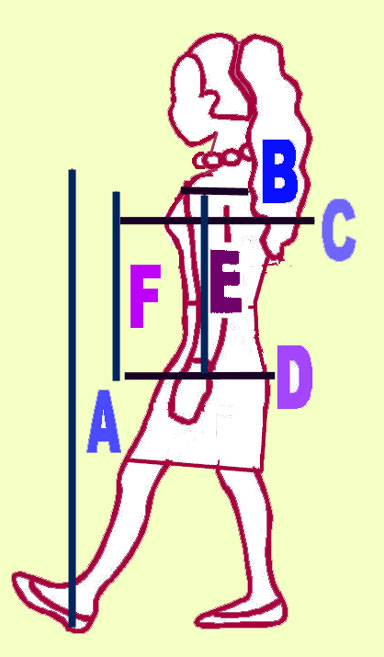
To make one without a pattern, measure the length first.(A) Start the tape measure at your shoulder, and proceed down until you come to where you would like the chamise to stop. Record that measurement.
Then measure from one shoulder to the other.(B) Record that measurement.
Measure around the fullest part of your breast.(C) Yes record that measurement.
Measure the fullest part of your hip.(D) Record it.
Measure from the top of your shoulder to your wrist, or where you desire the sleeve to stop.(E) Measure from your shoulder to your hip.(F) This is your last measurement.

To convert your measurements into reality take the length measurement and add 2 inches for a final hem. This total needs to to doubled. Lets say that you want a chamise 28 inches long, add 2 inches for hem that makes it 30 inches, double it so that you have a front and a back to your gown now makes it 60 inches of cloth needed. When purchasing cloth for this chamise I would suggest 2.5 yards. It is importatnt to note at this point that you should prewash your cloth before starting on this chamise project since the cloth is cotton or linen it will hold it's shape better.
![]() Putting the chamise together.
Putting the chamise together.![]() Lay out the cloth on a table or the floor folded in half the long way. The fold should be at the "top" and this is best used for your shoulders. Verify that you have the length (in our example= 30 inches) correct. Now fold the cloth in half length wise.
Lay out the cloth on a table or the floor folded in half the long way. The fold should be at the "top" and this is best used for your shoulders. Verify that you have the length (in our example= 30 inches) correct. Now fold the cloth in half length wise.
![]() Your cloth will have two fold edges and one salvage and one cut side.
Your cloth will have two fold edges and one salvage and one cut side.
![]() The next measurement you need is the shoulder measurement. Divide this measurement in half. From the corner of the two folded sides measure toward the salvage edge this measurement. Add 3.5 inches for your shoulder strap. Place a pin or chalk mark at the inner and outer measurement.
The next measurement you need is the shoulder measurement. Divide this measurement in half. From the corner of the two folded sides measure toward the salvage edge this measurement. Add 3.5 inches for your shoulder strap. Place a pin or chalk mark at the inner and outer measurement.
![]() Next you will need the measurement of the largest part of your breast. Divide this number by 4. Starting at the corner of the two folded sides measure down 12 inches, place a pin, go to the salvage edge measure down 12 inches, place a pin. Starting at the folded edge going toward the salvage edge place a pin at the divided number from your breast measurement.
Next you will need the measurement of the largest part of your breast. Divide this number by 4. Starting at the corner of the two folded sides measure down 12 inches, place a pin, go to the salvage edge measure down 12 inches, place a pin. Starting at the folded edge going toward the salvage edge place a pin at the divided number from your breast measurement.
![]() The next measurement will set your skirt section of the chamise. I use a long straight edge, like a yard stick, I also use a chalk pencil and draw right on the cloth a diagional line from the breast measurement to the outside corner (where the salvage meets the cut edge.)
The next measurement will set your skirt section of the chamise. I use a long straight edge, like a yard stick, I also use a chalk pencil and draw right on the cloth a diagional line from the breast measurement to the outside corner (where the salvage meets the cut edge.)
![]() Now is the time to connect the rest of the pins and draw a chalk line from the shoulder outer pin to the breast pin. Do not cut at this point, you need to do a little bit more.
Now is the time to connect the rest of the pins and draw a chalk line from the shoulder outer pin to the breast pin. Do not cut at this point, you need to do a little bit more.
![]() The hip measurement that you took is now important. Divide this number by 4, take another measurement, this time how far is it from you shoulder to your hip?(F)and how wide is your hip?(D) As before divide the hip measurement by 4 and verify that you have at least that much material in the hip area by measuring down from the fold the measurement at F and going from the fold to the salvage edge the measurement at D divided by 4. Nothing feels worse than a tight chamise, it tends to irratate your skin, and with most of us rendezvousing in the summer you want to beable to stay cool and comfortable.
The hip measurement that you took is now important. Divide this number by 4, take another measurement, this time how far is it from you shoulder to your hip?(F)and how wide is your hip?(D) As before divide the hip measurement by 4 and verify that you have at least that much material in the hip area by measuring down from the fold the measurement at F and going from the fold to the salvage edge the measurement at D divided by 4. Nothing feels worse than a tight chamise, it tends to irratate your skin, and with most of us rendezvousing in the summer you want to beable to stay cool and comfortable.
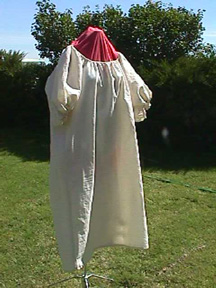
![]() The chamise can be used as shown here. The skirt is semi to full depending on the width of material that you used.
The chamise can be used as shown here. The skirt is semi to full depending on the width of material that you used.
![]() If you made it out of 35 inch muslin the cut away piece pictured in the thumbnail is needed so that you do not stress the side seams when running or bending down next to the fire. This thumbnail shows you how to attach the cut-away piece to the chamise for the fuller skirt.
If you made it out of 35 inch muslin the cut away piece pictured in the thumbnail is needed so that you do not stress the side seams when running or bending down next to the fire. This thumbnail shows you how to attach the cut-away piece to the chamise for the fuller skirt.
![]() Now for the sleeves. From the extra fabric cut two squares 18" by 18". These are your sleeves. To attach them to the chamise, match the center of the sleeve edge to the center of the shoulder. I like a 15 inch arm opening, it seems to fit well in my corset and in my jackets, therefore, I gather the extra inches at the top of the sleeve. Play with the amount of gathers and find what suits you best. After sewing the sleeve to the shoulder, and the insert onto the skirt matching up angled sides, it is time to sew from the cuff to the hem.
Now for the sleeves. From the extra fabric cut two squares 18" by 18". These are your sleeves. To attach them to the chamise, match the center of the sleeve edge to the center of the shoulder. I like a 15 inch arm opening, it seems to fit well in my corset and in my jackets, therefore, I gather the extra inches at the top of the sleeve. Play with the amount of gathers and find what suits you best. After sewing the sleeve to the shoulder, and the insert onto the skirt matching up angled sides, it is time to sew from the cuff to the hem.
![]() I know that you cannot try on your dress yet, it is time to cut the neck opening. I labored with this for weeks when I made my first one, but I found a great way to do it. Go to your picknick basket and take out an 8 to 12 inch plate. I prefer the larger paper plate for a pattern, fold the plate in half, then in half again giving you a quarter pie piece. Place the chamise on the cutting area with the garment folded along the origional two folds, place the plate in the corner with the two folds, cut around the plate giving you a circular neckline. Caution this does give you a neckline that is as deep in the front as it is in the back. Most of our modern clothing is higher in the back than in the front. It is easy to sun burn your skin, or to show a strap from your foundation garments. If you wear a corset you are ahead of the game.
I know that you cannot try on your dress yet, it is time to cut the neck opening. I labored with this for weeks when I made my first one, but I found a great way to do it. Go to your picknick basket and take out an 8 to 12 inch plate. I prefer the larger paper plate for a pattern, fold the plate in half, then in half again giving you a quarter pie piece. Place the chamise on the cutting area with the garment folded along the origional two folds, place the plate in the corner with the two folds, cut around the plate giving you a circular neckline. Caution this does give you a neckline that is as deep in the front as it is in the back. Most of our modern clothing is higher in the back than in the front. It is easy to sun burn your skin, or to show a strap from your foundation garments. If you wear a corset you are ahead of the game.
![]() I like to purchase seam binding, double folded and use it to finish off the raw edge of the neckline, and run a small cord through the "tube" for my draw string. This type of finish is also reccommended for the end of the sleeve. To finish off the hem, just do it again with the seam binding. I takes several packages but I like the feel, and the little bit of color that I can add to my gown.
I like to purchase seam binding, double folded and use it to finish off the raw edge of the neckline, and run a small cord through the "tube" for my draw string. This type of finish is also reccommended for the end of the sleeve. To finish off the hem, just do it again with the seam binding. I takes several packages but I like the feel, and the little bit of color that I can add to my gown.

In the bookThe History of Costumeseveral variations of the pantaloons are given. English and French women are not alone in the wearing of such clothing. If you look at the leggins of the Native American Women they are straight versions of the pantaloons, some of leather, later of calico to compliment the T style dresses of the reservations.![]() Pantaloons, the under pants for women. One little note when a name ends in a plural it ment that the origional garment was in more than one part. We call the arm coverings sleeves, and the head covering a hat. There are two sleeves on a shirt but usually one hat on a head. Pantaloons were two generous cylendrical tubes connected by a drawstring at the waiste. Usually worn under the chamise, occationally over the chamise to keep the gown out of the mud and wet or to hold heat next to the body.
Pantaloons, the under pants for women. One little note when a name ends in a plural it ment that the origional garment was in more than one part. We call the arm coverings sleeves, and the head covering a hat. There are two sleeves on a shirt but usually one hat on a head. Pantaloons were two generous cylendrical tubes connected by a drawstring at the waiste. Usually worn under the chamise, occationally over the chamise to keep the gown out of the mud and wet or to hold heat next to the body.

 |
| 
|
© January '01 Created By Sans Peur Creations