This page will help you to lower your 96-98 Civic. It's really not a hard task at all. It will take a good bit longer if you are using hand tools. I highly recommend using air tools if you have access to them. Some of the bolts are pretty long. Well, let's get started...
Time: 4-7 hours
Tools needed:
--Metric sockets (14mm, 17mm, 10mm)
--Allen key (??mm)
--Jack & stands
--Spring compressors (I rented mine from AutoZone w/ 100% refundable deposit)
--Torque wrench (ft. lbs.)
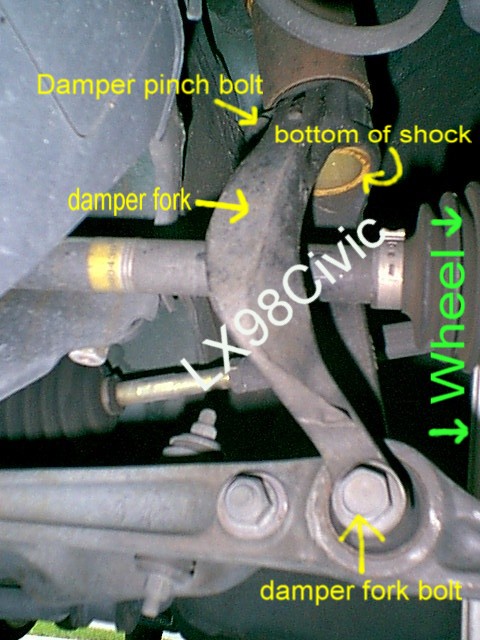
| First thing is to get both wheels off the front of the car by using jack stands for support on both sides. Remove the damper pinch bolt (??mm) from the top of the damper fork. Remove the damper fork bolt and self-locking nut from the bottom of the damper fork, then remove the damper fork which are all shown in the picture. | |
| Now pop the hood and remove the two nuts that hold the top of the shock. These 2 nuts are shown in the picture. | 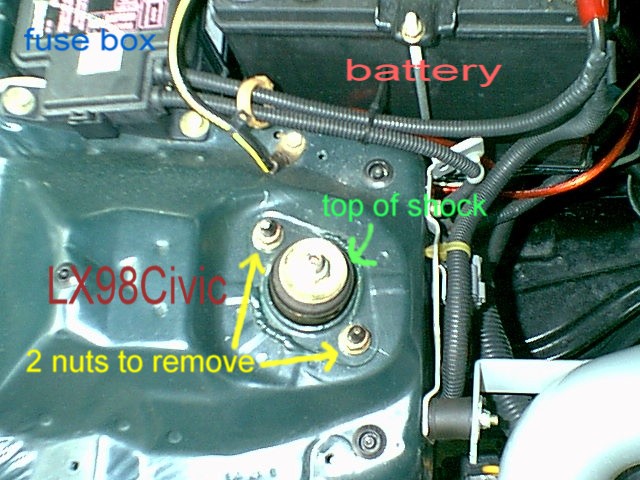 |
Let's take these bad boys apart!!
Take the spring compressors and one to each side of the spring. Tighten the compressors with the proper socket. Once you have compressed the spring, place the allen key in the center of the nut at the top of the shock. With the allen key in place take a (??mm)wrench and loosen the nut as you hold / turn the allen key. Once you loosen the nut and the nut gets to the point where there are not many threads left holding the nut, you want to make sure there is not any tension on the nut. The way to tell is that you should be able to remove the nut with your fingers. If you can not, then tighten the compressors down more to relieve the tension off the nut. If you don't the springs may fly off once the nut is removed and injure yourself or something.
Now you are ready to take the assembly apart. Making sure you don't drop the pieces on top, pull the black rubber top (a.k.a Damper Mounting Collar) off the shock. Pull the stock bumpstop off the shock and cut the necessary amount off if applicable. Depending on what springs you are using and what kind of drop you are going with you may need to trim the bumpstop and /or the dust boot cover.
| I installed Ground Control coilovers with Bilstein HD shocks, which came with all new hardware. The only stock pieces you'll need is the damper mounting collar and the washers that you removed with that part. Bilstein does not recommend you modify the shocks in anyway, but sorry you have to with this combo. You'll have to trim the bumpstop down along with the dust cover as I did in the picture. |
| With Bilstein HD's or Koni yellow shocks, Bilstein requires special O-ring adapters (supplied by Ground Control for an additional $40. $10 an o-ring) that go inside the bottom of the threaded part of the sleeve. You will notice that there are 4 notches on both the o-ring and the GC sleeve. They are all circled in the picture and let you know what way to install the o-ring. It is not necessary to line all the notches up. | 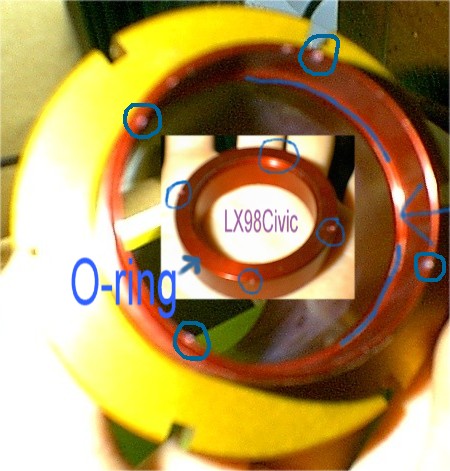 |
| Once you place the O-ring inside the coilover base, slide the coilover over the shock. The O-ring will sit on the shock lip that is located about 4 inches from the bottom of the shock. Put the washers, bumpstop, and dust boot cover on at this time. Now, place the GC spring on the adjustable perch and finally the black rubber top (a.k.a Damper Mounting Collar) in place. Bilstein supplies new nuts for the top of the assembly. Install the nut (22 ft. lbs.) at this time with the allen key and wrench used before. You may have to wait until the assembly is installed on the car before tightening down completely. It can be tough holding the assembly and trying to tighten at the same time. The completed assembly should look something like the one in the picture. Depending on where the adjustable perch is located you may notice the spring does NOT reach the top of the shock assembly. This is not a big deal as the weight of the car will compress the shock and fix this. | 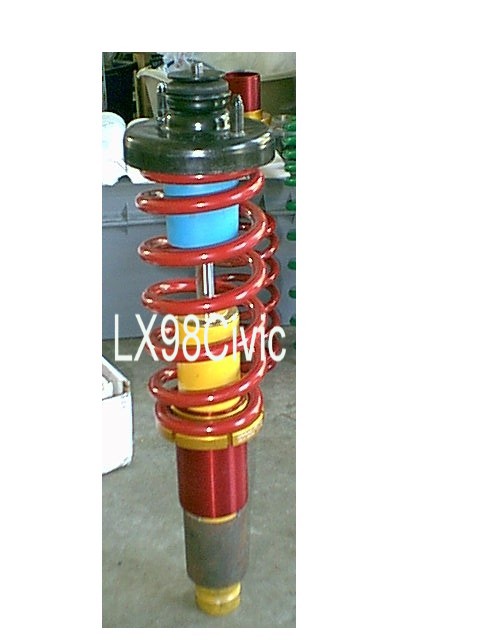 |
Reinstallation:
--Place the shock / spring assembly back into place with the 2 nuts loosely up top. At the same time making sure the aligning tab located towards the bottom of the shock is facing inward of the car.
--Now install the damper fork which should line up with the aligning tab that is located on the shock.
--Loosely install the damper pinch bolt on the top of the damper fork.
--Loosely install the damper fork bolt and the self-locking nut on the bottom of the damper fork.
--Tighten the damper pinch bolt. (32 ft. lbs.)
--Tighten the damper fork bolt and self-locking nut. (47 ft. lbs.)
--Tighten the two nuts that secure the shock under the hood. (36 ft. lbs.)
--Install the wheel.
