 |
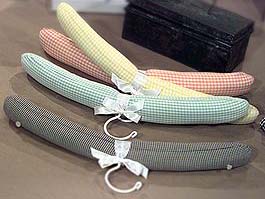
Padded Hangers
Padded hangers are excellent for maintaining the shape of delicate garments. Though
store-bought versions are readily available, durable ones can be difficult to find,
and the choices of fabrics and colors are limited. Use good-quality wooden hangers as
a base; look for ones with moveable, sturdy hooks.
|
|
Materials:
- Cotton-poly batting or thin foam rubber
- Scissors
- Wooden hangers
- Soft tape measure
- Awl, optional
- Staple gun and staples
- Pins
- Needle and thread
- Pencil
- Thin cardboard or paper (for template)
- Round object (for tracing curve on template)
- Fabric (see note below)
- Pinking shears
- 5/8-inch ribbon
- Small buttons with shank, optional
|
Instructions:
- Cut batting into 3 1/2-inch-wide strips. Fold each strip in half, then in half
again, to achieve a four-layer thickness. For each hanger, measure a strip of
folded batting that's twice the length of the hanger.
- Find the center of the folded batting; using an awl or the point of a pair of
scissors, make a small hole at this point through all the layers of batting.
Insert the hanger hook through the hole. Pull batting across the length of the
hanger's top, then wrap it around the bottom. Secure the ends of the batting with
a staple at the hanger's bottom center. Trim any excess so that the ends of the
batting meet neatly. Fold the batting, top over bottom, along the sides of the
hanger. Use pins to hold batting in place. Hand-baste all the way around the
hanger with large stitches; tuck end corners under as if you were wrapping a
package.
- Make a template for the fabric sleeves that will cover the batting: Using a soft
tape measure, measure the circumference of the hanger (with the batting in place);
this will be the finished width of each tube. (Note: Do not pull tape measure
tightly, or you will end up with tubes that are too tight for your hanger.) Divide
this measurement in half, and add 1 inch for seam allowance. Then measure the
hanger from end to center, adding 1 inch for seam allowance. Using these
measurements, draw a pattern on a piece of thin cardboard or paper. Draw a curve
at one end of the rectangle, using a round object as a guide, if necessary. Trace
the template onto fabric, and cut it out. You will need to cut four pieces of
fabric for each hanger.
- Pin together 2 fabric pieces, right sides together. Stitch 3 sides using a
1/2-inch seam allowance and leaving the short, flat end open. Using pinking
shears, trim the seam allowance. Turn the sleeve right side out. Repeat this step
for remaining sleeves.
- Pull a sleeve onto each side of the hanger, taking care not to tear the batting.
Align the seams along the sides of the hanger. At the center of the hanger, fold
the raw edges of the fabric under so that the sides just meet (the fit should be
taut). Hand-stitch the sleeves together all the way around, matching up the
seams.
- Place a length of 5/8-inch ribbon around the hook to the front of the hanger,
slightly overlapping, as if you were dressing it with a scarf. Pull both ends of
the ribbon under the hanger, and back over the front on either side of the hook,
and tie into a bow in front of hook.
- If desired, sew a small button with a shank near each end of the hanger; this will
keep delicate garments with straps from slipping.
Note: 1 yard of 45-inch fabric will make approximately 8 hangers.
MarthaStewart.com - Padded Hangers. www.marthastewart.com.
Viewed on April 23, 2001.
|
|