BCU - Water
Build a Snowfort
Contact B.Howe
Things to do in the winter.
Build a Snow Fort in S.Ontario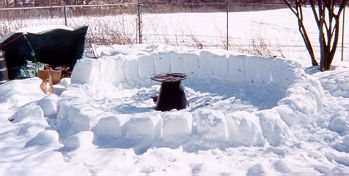 This is my first attempt at making an igloo. I ran out of snow. But I still managed to make a ring, 15' wide and just over 2' at its highest, around the firepit for people to sit on. I watched a lunar eclipse sitting in here with a fire going. The kids enjoyed climbing on and over it for almost the entire winter.
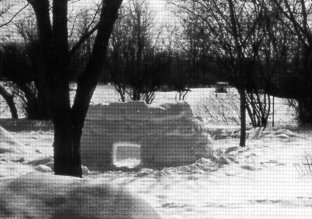 My Second Igloo turned snowfort: As it is, this igloo stood 4.5 feet high, and about 10 feet in diameter. It was the most solid snow structure I had ever built. The kids carved steps into the outside of the wall and were able to run around the open top after it had been flattened a bit. Unfortunately, I did not make enough snowsnakes to finish the job again that year (closer though). An interesting note though, the walls stood for over a month near full strength before finally giving in all at once under the onslaught of sun, wind, and kids.
This is fun and easy, but it requires preparation (and snow). Lightly packed snow blocks, just don't work - trust me I've tried, and after I dug myself out of the pile I decided a different approach was required :-) I live in Southern Ontario, Canada. We get a fair bit of snow during the winter, but it doesn't stick around long. It'll blow off, evaporate, melt, etc. so that we maintain less than 1' of snow on the ground on any given day. This isn't enough snow to get the job done. You'll probably have to shovel your lawn.
I know that sounds like a really dumb thing to do, but the kids and the neighbours will get a laugh out of it. What you want to do is shovel the snow from your lawn into a long snake about 2'-4' wide and 3' high. Make it as long as you can, or make many sections. It may look like a lot, but once you start cutting into it it will disappear fast. After you've shovelled as much as your back and wrists can take, find a piece of plywood, an old shelf, or something as long as your snow snake is wide, and wide enough to get both your feet on (at least, wider preferably). Drop this board on top of the snowsnake, pack it down a little, then jump on up their to give it a really good packing. You'll need to do this along the entire snake.
If you've gotten this far without turning away from the snowsnake and calling it a day I commend you. It took me three attempts to get to this point. As a reward you get the next day or two to rest. The snowsnake has to sit and re-freeze at least overnight, although I wait until the next snowfall. After the first night the snake will be hard enough to walk on and barely leave footprints. The kids will have a blast running along it while your busting your back cutting and moving the blocks.
When the snake is hard, grab a saw (I use a normal carpenter's cross-cut saw) and start cutting out the blocks. They will cut and feel almost like styrofoam, only a thousand times heavier. Stack the blocks as though they were bricks, overlapping the joints. Keep the wall at least 1 foot thick at the base and taper slightly to no less than 6" thick at the top. This reduces the chances of the wall toppling over in the first 10 minutes of hard play.
For this fort, I don't suggest installing a roof. I have young kids and am fairly certain that a good lump of snow falling on their heads on an unseasonably warm day just may have some ill effects. In another article I will describe the process of making an igloo from the same style blocks. That will give you a stronger roof, that can easily be checked for weakness. You will get hot, sweaty, and tired, but the joyful sound of youngsters trying valiantly to pulverize in minutes, the fort which took you days to make, is more than enough to remind you why you bothered in the first place. Remember to check the fort often and knock down any weakening areas - this is when you get to have fun.
Enjoy,
Brett