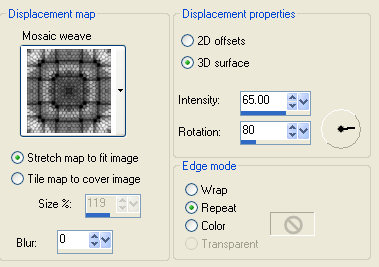
6. Go to Image/Add Borders and add 5 pixels, using the magic wand select the border and fill with the Gold_Fill pattern you have minimised, then Effects/3D Effects/Inner Bevel apply the Angled preset using the default settings. Selections/select none.
7. Go to Image/Add Borders and add 3 pixels, for the color i chose #6f1800 click ok.
8. Repeat step 6 and 7 again.
9. For this step you need your ruler on, to enable it go to View/Rulers, Looking at the screenshot below and using the rectangle selection tool Select a corner I went 4 lines accross and down.
10. Now go to Effects/Geometric Effects/Circle, keep selected.
12. Make sure Promoted Selection layer is highlighted, right click on this layer and select Duplicate. Then go to Image/Mirror.
13. Go to the Layer palette and click on the eye next to the background layer you will see a red x. Now click on promoted selection layer right click and merge/merge visible.
14. Right click on the Merged layer, and go to duplicate, then Image/Flip. Click on the eye next to the background layer to make it active again, right click Merge/merge flatten.
15. Go to Image/Add Borders add 10 Pixels, highlight border with your magic wand, then fill with the frame fill you made, you should be able to find it at the top in your patterns.
16. Go to Image/Add Borders and add 5 pixels, using the magic wand select the border and fill with the Gold_Fill pattern you have minimised, then Effects/3D Effects/Inner Bevel apply the Angled preset using the default settings. Selections/select none.
Next page
