Distortion Control of Sheets
Joining plates or other items along a straight seam not only creates problems with transverse shrinkage but also longtitudinal shrinkage. The two main tactics are skip welding and back stepping.
Skip welding reduces the effect of distortion simply by reducing the total amount of heat put into the work. Often there is no need for continuous weld beads particularly if the item welded on is acting as a stiffener.
Back stepping reduces distortion by locking up the joint ahead of where the main part of the weld will occur thereby preventing movement of the joint as the heat builds up in the weldment.
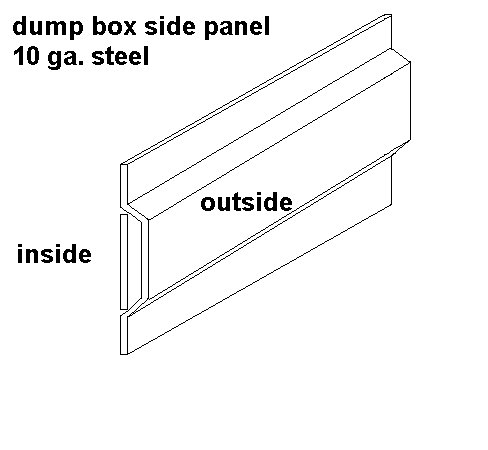
Prepositioning of large plates can help in some situations. An example is the longtitudinal welds on the side of a truck dump box. Below is drawn a single side with an insert strip that creates the inside of the box.
Left and right sides are placed against each other with a spacer block in the center and clamps on the ends creating a bow on each piece. When the weld is completed and cooled the clamps are released and the sidewalls spring back to a flat shape.
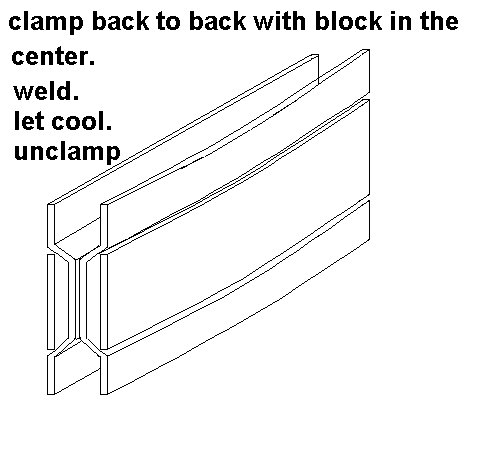
In the previous example skip welding and then welding in the remaining sections or a backstepping procedure would still be prudent.
When trying to control distortion one must use all available tactics in combination for maximum effect.
Splicing plates together can result in unwanted buckling. When initial fitting the plates there are several approaches. It is wise to lay the edges together and see how they meet. Often for some reason the edges are not exactly straight. This can be used to the advantage of the fitter or can create future problems both for the fitter and for the welder.
Generally when butting two plates together edge to edge there will be shrinkage as the edges are tack welded together. The point that closest contact is made is often the best location for the first tack weld.
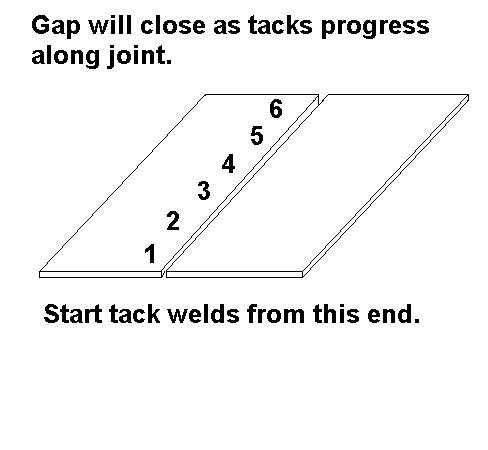
If the edges are absolutely true then it is wise to set the plates almost touching at one end and having a gap at the other end of the joint. The first tack is placed at the point of contact and successive tack welds will pull the plates together as the joint is lined up and tacked. If the joint is closing up too rapidly then the tacks sould be made in a backstepping direction and kept small in size. It the gap needs to be closed then the tacks should be larger and made in the direction of the successive tacks.
One can place a finger across the weld joint ahead of where the tack is being made. As the tack weld is made one can feel the initial spreading of the joint and then the closing of the gap as the cooling tack weld shrinks. The movement is so slight that the eye often will not detect it.
These principles are universal and don't really change whether one is joining half inch thick steel plate or autobody sheetmetal. Big job or small, the mistakes in the fitting are just as embarrassing. In addition to paying attention to the gap along the joint the thicknesses of the two plates must be aligned as the tacks are made.
The following situations show the approach to take when panels are not cut absolutely straight. The sequence of tack welds are indicated. Similarly the sequence of weld should follow a similar sequence. The welder, if he takes a few moments, can reduce problems of buckling by monitoring plate movement and changing the placement and direction of his welding weld bead as he notices problems.
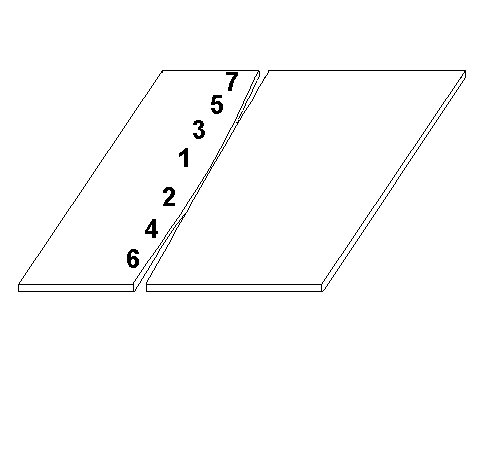
The example below is more realisitic. In this case one will have to start the tack welding sequence at the center of the seam line. Note that tacks are alternated to prevent the plates from hinging and opening more at one end than the other.
The welding would follow a similar sequence however the welder would decide if he need to pull the joint together more with his welding or not. If the joint is closing up too much he would back step.
If no problems are indicated the proper backstepping procedure would be: 2 to 1 then 3 to 1 then 4 to 2 then 5 to 3 then 6 to 4 then 7 to 5 and finally edge to 7 and edge to 6.
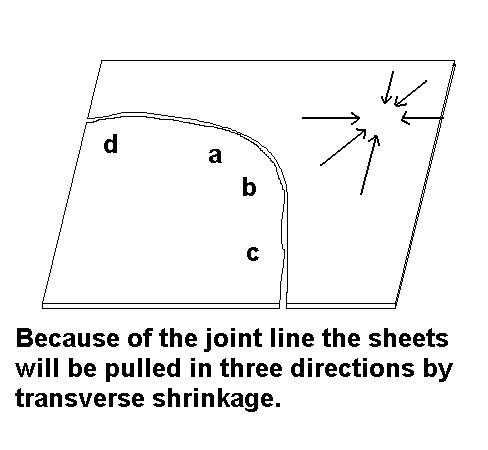
A true insert is always a problem because one cannot simply "chase" the shrinkage out to the edges of the plate. In the diagram below one can see that the transverse shrinkage will pull the plate in several directions. The likely result is buckling at the turn of the seam. This oil can effect on the plate can be reduced by strongbacking across the seam before welding . In addition it would be wise to follow a sequence. The fit at "b" and "c" is closed and will pull the sheet to the right. The area at "d" should not open up so can be left as the last location to tack weld.
The welding will also have to follow a similar sequence. Likely b-a , c-b, a-d, edge to c and finally edge to d would offer the least distortion. The sequence might vary as the welder notes the nature of the shrinkage after each weld.
Usually the curve of the seam will control or minimize the longtitudinal shrinkage. The transverse shrinkage now becomes the concern.
Buckling or oil canning is a problem with this type of insert.
return to index