Action window,
chat window, and the play window.
These three also consists of several subcategories. The chat window and
the play window can be closed, so you can concentrate on the action window.
This is done with two arrow-buttons on the status bar at the bottom of
the screen.
Status Bar
The status bar is always at the bottom of the screen, and contains some
of the most important functions. The functions are from left to right:
Chat and command input (press Enter to enable input)
Compass. It shows your bearing, 0° is north and 90° is east.
WorldMap View open/close.
Open / close skill view (S) Not sure if S still does this. "U" definitely does, though--LP
Open / close inventory (INV) Also done by pressing 'i' on the keyboard.
Vicinity chat Also done by pressing F5. Only those close to you can
hear you.· Now you need to select 'vicinity' in your friends list. Or precede your message with /say. --LP
Com chat Also done by pressing F6. Only the person selected in your
Friends View can hear you.
Team chat Also done by pressing F7. Only those in your team can hear
you.
Open / close the chat window (arrow down / up)
Open / close the collapsible views (arrow right / left)
Your credits (CRED x)
Current time (T xx:xx) Time in AO runs 15 times faster than real time.
The Rubi-Ka day starts at 00:00 (midnight), and has 27 hours.
Toggle play / options panels in the collapsible view (OPT)
The pipe key ("|") can also be used to rotate opening and closing the
chat and collapsible views.
Action Window
The action window is where the interaction with the world and the visual
interaction with other characters take place. The action window contains
a complete 3D-environment centered on the player character. You can view
the world either through 1st person view (through your character's eyes)
or 3rd person view (from a viewpoint also referred to as 'the camera').
To switch between view modes, press F8.
Health and nano bars
There are two bars connected to the action window, the side bar and the
top bar. The side bar contains information about your health and nano
energy, while the top bar contains information about your selected target.
Your health bar is red, and the nano energy bar is blue.
The target's health is visible on the top bar, close to your own health
bar, and will have different colors depending on the health. The colors
are not absolute, as there are shades between them:
Green - the target is considerably weaker than you.
Yellow - the target is about as strong as you.
Red - the target is stronger than you.
White - there is no reliable information about the health status of the
character.
Pointer
The default mouse pointer changes as you move it to point at certain objects
to illustrate what you can do with them.
Whenever the pointer is different from the default you can hold 'shift'
and left click to get up an info window about the object you're pointing
at. You can also hold 'alt' and left click to get a reference of it.
When pointing at a character, NPC or other creature, the pointer turns
into a red aim symbol. Left click to make it a target. Right click or
double left click to interact with the target.
When pointing at large objects like vending machines, doors, corpses
and more, the pointer turns into a blue turn-wheel. Left click to target
the object, or right click or double left click to operate it, if possible.
When pointing at an item on the ground, the pointer turns into a grabbing
hand. Left click to target the item, right click or double left click
to pick it up and place it into your inventory.
If you point at objects you can't interact with, such as yourself, the
pointer will turn into a green selection pointer. Left click targets the
object.
Picking up an item from your inventory, wear view, or a container, will
make the item appear next to your pointer. Left click will put the item
where you click, if possible. When clicking an item in a container or
a corpse, it will usually drop automatically into your inventory. Right
click while pointing at something when the pointer appears different from
default will attempt to use the item with the object you point at.
Information about your target
When you have selected a target (left click on a character, NPC or creature),
you get some information about the object. If you have a player character
as a target, you will get the name and health (relative to yours) of the
target. The name or description will show directly above the target. If
the target is a character you are currently ignoring, you will see an
icon above the head of the target.
Floating numbers
When there is fighting or healing going on, you will see numbers floating
over targets and yourself. These numbers are color-coded:
Dark red - damage given to others by you.
Bright red - damage given to you.
Yellow - damage given to others by others.
Blue - healing given to you.
Viewpoint
You can choose between first person and third person view by pressing
F8. In first person view, the viewpoint follows your movement, but you
can use the + and - keys on the numeric pad to zoom. In third person view,
you can change the viewpoint with the arrows on the numeric pad, and of
course zoom in and out with the + and - keys. You can also change the
viewing direction with the mouse, by right clicking and holding to the
desired position. The pointer must be in the action window to do this.
In first person view, your character will turn to face the direction where
you release the mouse button. Also, Control+F8 can lock the camera. Shift+F8 can switch between static Views. '5' on the NumPad *might* also lock it. This is VERY handy. --LP
Much of this has changed. Use the friends window to manage your chat groups.--LP
The chat window is underneath the action window. This is where all the
messages are displayed, including your own and other players' messages
and emotes, system information and requested information. The chat window
is transparent, with different colors on the text depending on what type
of text it is.
- Pale yellow is vicinity chat
- Bright purple is conference chat
- Pale purple is team chat
- Pink is shouting
- Pale blue is whispering
- Green is emotes
- Bright red is damage done to you
- Dark red is damage dealt to others by you (different shades of red for
damage done with melee and damage done with nano power).
- Dark yellow is damage dealt to others by anyone but yourself
- Blue is health regained by you by nano programs or medical equipment
(Natural healing is not - - displayed in the chat window)
- Bright yellow is XP gained by you, /list info (see below) and NPC talk.
White are all other messages, mostly system messages.
To enter text, press Enter, and the bottom line will be ready for input.
The input line can also be used to give action commands, in addition to
messages.
Normal chat
First press Enter to open the input line at the bottom bar. Then you can
type the text, and when you press Enter again, the text will be sent out.
The text will be visible to those in the vicinity. While typing text input,
you can use the Home and End buttons, as well as Shift together with the
arrow buttons (Left, Right) to move back and forth in the line. To retrieve
the 10 previous messages, hold Shift and use the Up and Down arrow buttons.
When pressing Esc while the input line is open, you can operate the action
window without losing the text in the input line. Hit Enter to go back
to the input line.
Conference chat
You can use conference chat to communicate with players who are not necessarily
in the vicinity. You can be in a conference with just one, or up to 10
players. To activate a conference, double left click on the small, red
box to the left of a friend's name in the Friends View. The friend will
get a message saying he or she is invited to a conference, and can accept
by double left clicking the red box next to your name in the Friends View.
The conference chat does not have shout or whisper mode.
Team chat
The team chat is for team communication. The chat can only be received
by the members in the team and will be automatically initialized for each
new member in a team. The team chat works like the conference chat.
Shouting, whispering and emotes
Turn on the shout mode in a vicinity chat by typing /shout or just /s
at the beginning of the message. The shout increases the range of a character's
message six times, but it will not be heard all over the playfield. The
shout button will toggle off after one message and has to be re-toggled
to be used again.
The whisper mode is initiated with adding /whisper or just /w at the
beginning of the message. This reduces the distance from which the message
may be heard. The whisper button must be toggled off to end whisper mode.
Emotes are made by typing /me at the beginning of the message. Your character's
name will then come first, and the rest of the text follows. Emotes are
considered vicinity chat, with the same reach as a normal message.
Social moves
These are pre-rendered actions, like a dance or a greeting. When you enter
the command, your character will perform the action you want. Type /help
for a list of available social moves. If you type /laugh-b, your character
will break out in a laugh in the action window.
Player listing
To get a list of characters in the same playfield as you, type /list players.
The list will include name, level and coordinates.
Logging the chat
You can log all that appears in your chat window by typing /log. The chat
will be logged to the file LogFile.txt in your character's directory.
You can turn the logging off again by typing /log once more.
Scripts
You can call up a predefined script by typing /script followed by the
script's filename. The file must be placed in a directory named scripts
under the Anarchy Online directory.
Only chat commands and /delay can be used in scripts. The delay command
is given in milliseconds, so /delay 2000 is a pause of 2 seconds. No action
is stopped by a delay command, but all actions further down the list are
postponed.
This is an example of a dancing script. Save it as "dance" (with no file
extension) in the scripts directory (create the directory if it doesn't
exist). Type "/script dance" in the chat input to activate it.
/me starts dancing.
1...2...3...4...
/rocky
/delay 3000
and jump!
/backflip
/delay 2500
C'mon now everybody!
/ymca
/delay 3000
Yeah baby!
/disco
/delay 7000
/strong1
Your turn.
/me smiles.
The play window consists of ten collapsible views, each one being specialized
for a type of interaction in the game. In addition to the ten collapsible
views, there is a trade view that appears only when you are trading. Some
of these views you will use often, others will be used rarely. At the
top of the play window, there are ten corresponding control buttons that
can be used to switch on and off each of the views. To open a view, left
click on the name bar. To close the view, left click again. You can change
the order of the views, by holding the left mouse button down on the collapse
bar and drag-and-dropping it up or down to a new position. You can also
scroll up and down in case the views take more space than the height of
the screen. This is done by left clicking and holding a space in any view
where there is no function assigned, and moving the mouse up and down.
If you have a scrolling wheel on the mouse, you can use that.
The Information window
This is one of the most used panels. It will follow the player around
when needed close to the other views. For instance when a player wants
information about an item in the wear view. The info view will shift position
from wherever it is in the view list and position itself one position
over the wear view and open. This way the player can see the wear view
and the info view at the same time. Holding shift and left clicking any
object will give you some information about it. The information you get
depends on what kind of object you are getting info about.
You can scroll the contents of the information window if you left-click
and hold inside the window and move the mouse. To move the window, left-click
and hold on the top bar. The window will fade away if you don't touch
it with the pointer for a while, and you can close it yourself by clicking
the X in the upper right corner.
The info panel contains some general parts and some context-sensitive
parts. The common elements in the info view are the icon, the header information,
description and notes. The icon represents the element in question. The
header information displays the most crucial information about the element.
E.g. Character: Name, Race, and gender, possibly title. The description
will consist of a verbal description of the character based on what he/she
is wearing, stats, and health without displaying values and levels.
E.g: "Thor is a sturdy built Atrox wearing what appears to be a metallic
armor. He is armed with a large caliber handgun. He appears to be in excellent
health." As a second part of the description the player can type in a
custom description about physical appearance, special markings etc.
Inventory
and Wear view
The Inventory starts off with nine item slots. If you place an item in
the bottom slots, three more will be added to give space for more items.
A scrollbar is shown on the right if you have an inventory of more than
nine slots.
You can move the Inventory view around by left-click and holding the
top of the view. The feature does not have any snap-to function, however.
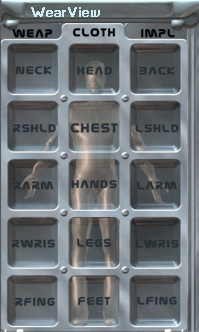
There are three kinds of Wear panels: Weapons, Clothes/Armor and Implants.
Each of these can be chosen by clicking on its tag.
Pick up or insert an item in your inventory by left clicking it. If you
put down an item in an occupied slot it will either be stacked with the
occupying item (if they are of the same type and stackable), or switch
place with it.
Insert an item in the first available slot by right clicking anywhere
in the inventory while holding the item.
Pick up a single item from a stack by holding 'ctrl' while left clicking
the stack.
Get information on an item by holding Shift and left clicking it, or
by right-click and hold, and choosing the info icon.
Create a reference of an item by holding Alt and left clicking it.
Use or activate an item by right clicking it, or by right-click and hold,
and choosing the use icon. Examples of this is uploading a nano crystal
to memory (learning a nano program), and using a first aid kit on your
target.
Use an item with another object that is not in your inventory by right
clicking the object while holding the item. An example is taking a key
from your inventory and right clicking it on a door to open it.
Assemble two items by holding Shift and right clicking one item while
holding another.
Split an item (disassemble it) by holding Shift and right clicking it.
Put an item on the ground by left clicking on the ground close to you
while holding the item.
Destroy an item by right-click and hold and choosing the delete icon.
Wear or wield an item by picking it up and clicking in the right slot
in the Wear view. Most items will know which place to go and thus can
be just left clicked anywhere in the Wear view to be worn or wielded.
An item will return to the inventory if it can't be worn or wielded, and
a message explaining why will appear in the chat window.
Items in the Wear view can't be manipulated in the same way as items
in Inventory. You will normally have to pick up items from the Wear view
(left clicking them) and put them back in your Inventory first. You can't
split a weapon while wearing it.
Trading
You initiate trade by right clicking or double left clicking a merchant,
a vendor machine (shop), or another character. The trade window will appear
at the bottom of your play panel (which will immediately show if you have
it hidden).
This trade window is what you get when you trade with a merchant or a
shop. The three upper slots are the selection of items for sale, and the
supply of each of these items is limitless. Each slot displays an item
and its cost.
The next three slots are what you have selected for buying. To move an
item to these slots, left click them in the selection slots. Stackable
items will stack automatically in these slots. Left click an item to remove
it (or deduct one item from a stack).
Below these slots is a credit display. This shows the total cost for
the items you have selected. Next to the credit display is an X button,
which allows you to cancel the trade and move all items back to their
original place.
The bottom six slots are the items you are to sell. Simply pick up an
item from your inventory and drop it here. Left click any item here to
move it back to inventory.
Finally you have a credit display showing the effect this trade has on
your cash total. I.e. this is the credits listed above minus the value
of what you are selling. Next to this is an OK button to accept the trade.
Upon completing the trade all items you buy will be put into your inventory.
If any of the slot groups have enough items, extra slots will be inserted
and a scrollbar will appear.
Trading with another character is much the same, as shown in this picture.
The upper slots and credit display now show what the other character
is offering you. The red light next to the credit display shows that the
other characters has not accepted the trade yet. It turns green if the
trade is accepted.
The lower slots and credit display shows what you are offering. Left
click the credit display to enter a cash amount. You have to press enter
or return after typing it.
Any side of the trade can cancel it at any time, bringing all items back
to their owner's Inventory. When both have accepted the trade (pressed
the OK button), the cash and items switch owner.
Important: Once one side has accepted the trade, nothing can be done
with the items or cash put into the trade. The other side can only accept
or cancel the trade.
Control view
The control view consists of buttons for different actions, such as attacking,
using special attacks, and sitting or standing. All actions shown here
can be activated by other means, most with the keyboard.
Actions show up only if available. Thus if you carry a weapon with burst
ability you will get a burst button here.
Map View
The map works only outdoors, and shows a piece of the playfield you're
currently in (185,0 x 185,0 positions). Your character is represented
with a red marker, while other player characters are shown as blue dots.
NPCs are also displayed as blue dots. All other creatures are shown as
yellow markers. Holding the pointer over a position on the map will show
the coordinates of that position.
Left click and hold on the map to move it around and show different parts
of the playfield. However, the map doesn't always show objects like buildings
and trees. Also, creatures outside your visual range are not represented
on the map.
Stats
View
This view you will probably have up most of the time. It contains a lot
of info you should have available at all times.
On top you have your character's name, level and attack rating with the
currently wielded weapon. This rating is not the same as your skill, though
your skill has great influence on it. The next info is your armor ratings.
IPAC is your rating against impact and projectile attacks, EWAC is against
energy attacks, and MPAC is against melee / martial arts attacks.
Then there are three bars, where the first shows your health, the second
shows your nano energy, and the third one shows how much experience points
you need to advance to the next level. The numbers on the bars can be
toggled on and off by left clicking any bar.
Next comes an aggression slider. To adjust it, left click and hold on
the pin, sliding it right or left. High aggression will make your attack
faster, and possibly with better to hit score, but makes you more vulnerable
to enemy hits.
Finally you have the nano formula information, with effect info and several
nano icons. The nano icons (and icon slots) are not shown unless you actually
have an active program on your character, and the effect info shows your
number of NCUs (Nano Containment Units). Each active program take up some
NCUs, so they limit how many programs you can have running at any time.
Left click on any nano icon will show its name, level and remaining time
in the effect info, while right click will deactivate the program. Left
click in the effect info will return it to showing NCU status.
Knowledge View
The knowledge view is an icon-based description of the character's 'memory'.
These memories are references to different things the character `remember'
through reading books, `watching news' and hearing in a chat or otherwise
acquired. When left clicking on a reference, the player will get information
about the referenced element or a note. All items, characters, flags,
spells and notes can be referenced. References can be dragged and dropped
into the chat window to tell others about the same reference or into the
map view to add a new flag.
References can be deleted. New references can also be created by Alt
+ left click on some items and creatures. Right click and hold will bring
up two icons, one for deleting the reference and one for viewing it. You
can also view a reference by holding Shift and left clicking it.
If you need to insert a reference somewhere, e.g. in mission creation,
simply left click it to pick it up. Left click it where you want it, and
the icon will be inserted. It will not disappear from the knowledge view.
Friends View
To add a character to the friends view you need a reference of the character.
Pick up the reference from the knowledge view and drop it onto your friends
view. Characters will also show up here if they invite you to a conference.
The red box next to each name is a conference icon. Double left clicking
this will invite the character to a conference chat, while anyone inviting
you to one will show up with a chat symbol in the box. Double left click
the box to accept an invitation, and later to leave a conference.
You can right click and hold a name to get two icons; one for removing
the name from your friends view, and one for making a reference of the
character.
Group selection list:
Groups can be selected by clicking on the group name in the list or on
the "from address" in the chat window. Users can be invited to your private
group by double clicking on the user in the friend list or with the "/invite
When a group is selected all "normal" messages (not /tell, /say, /shout,
etc etc) will go to that group. It is also possible to send a message
to an unselected group with the "/group
When a Team or Clan is created a chat group will be created and all members
of the team/clan will also be member of the chat group.
Friends list:
Users can be added to the friends list by dragging a reference to the
character from the knowledge view into the friends list. User will also
be added automatically as "unknown" if you receive a /tell message or
a group invitation from a user not already in the list. You can make an
"unknown" user "known" by dragging a reference to the character from the
knowledge view into the friends list. There are 3 "sections" in the friends
view separated by 3 bars. The users under the top-bar is online and have
a highlighted icon. The users under the second bar is offline and have
a dimmed icon. Users under the third bar is "unknown" and their online
status is shown with the icon alone (highlight=online, dim=offline). If
you are invited to a private chat group, the user sending the invitation
will have a blinking icon. You can accept the invitation by double clicking
on that user. User can be selected by clicking in the friends list or
on the users name in the "from address" in the chat window. When a user
is selected, all "normal" messages will go to that user.
Chat commands:
/tell msg - Send private message.
/group /g msg - Talk to group.
/me - Character action.
/say - Normal visinity message.
/shout /s - Shout a message.
/whisper /w - Whisper a message.
/invite - Invite a user to private chat group.
/kick - Kick a user from private chat group.
Team
View
A team can hold a total of six members. The team view is dedicated to
team handling functions and information. By drag-and-drop of a character-reference
into this window, that player will get the option of joining your team.
There are three options in the dialog: accept, decline and ignore. The
ignore option prevents the person from asking again and puts him/her on
your ignore list.
When added, the team member will appear by name in the team view followed
by a health and nano bar. A ToolTip will appear over the bar showing health
and max health in numeric values.
Right-clicking on a team member will bring up several options. The person
creating the team is the leader until he assigns more leaders. The leader
has a star next to the name, and will have more options in the option
menu.
Accept or decline a team invitation by pressing the yes or no buttons
that appear in team view when you get an invite.
Target a team member by left clicking the member's name.
Get info on a team member by right click and hold while selecting the
info icon.
Auto-follow a team member by right click and hold while selecting the
follow icon.
Kick a member from the team by right click and hold while selecting the
kick icon. You have to be team leader to do this.
Make another team member team leader by right click and hold while selecting
the make leader icon. You have to be team leader to do this.
Leave the team by clicking the leave button.
The collapse bar will contain the name of the team and the level. The
level will change as the collective team conciseness increase with experience.
This will add bonuses in combat etc. Right clicking on the collapse bar
and choosing change name opens an edit box dialog for changing the name.
All leaders can change the team name.
Programs View
The programs view show all nano programs you have uploaded (learned) and
can use. They are sorted into categories when you upload them, but you
are free to move them around as you please.
Execute a nano program by right clicking the program's icon. If it won't
activate, a message telling you why will appear in the chat window.
Get info about a program by holding Shift and left clicking the icon.
Move a program's icon by left clicking it to pick it up, then left click
again on the slot you want to insert it to. You can click on another category
while holding the icon.
It is not possible to unlearn a nano program.
Missions View
There are two ways to get a mission; from a mission booth or from another
character. How to create a mission is explained further down this page.
First we take a look at the missions view.
The missions view has two slot groups. The upper group is named 'assumed
missions' and contain all missions you have gotten directly from a mission
booth. The second group is named 'made missions' and includes all missions
you have created yourself, or gotten from other characters.
Missions given by a booth to one character, then handed to another is
considered a 'made mission'. Get a mission from a mission booth by right
clicking or double left clicking the booth. The booth will offer you missions
in a floating view, which you can accept by picking up and dropping in
your mission view.
Delete a mission by right click and hold while choosing the delete icon.
Get information about a mission by right click and hold while choosing
the info icon.
Give a mission to someone else by picking up the mission icon (left click)
and left click on another character while holding.
Mission Creation View
Making a mission is done in the mission creation view. You will have to
play with this yourself to become familiar with it.
First choose the target by taking a reference of it, here another character,
and dropping it in the ref1 slot as shown. Then select mission type by
pressing the first menu button (arrow down) and selecting 'kill character'.
Then press the first 'add' button to add the task to the mission description.
Next, make a condition for the mission. Activate the second menu and
choose 'before', then click the 'days' slot and type 2. Press the second
'add' button to add the conditions (that the mission must be completed
within two days).
Note: When typing into the slots you have to press enter or return after
typing. Just clicking outside the slot will not do.
Now for mission description and reward, go to the second page of the
view by choosing it at the top of the view.
Now give the mission a name and description by selecting the fields that
are named so and typing whatever you want. Both of these needs to be at
least 8 characters long. You can also use the arrow buttons next to the
mission icon view to select an appropriate icon.
Now select the reward you are willing to give for this mission. Pick
up an item from your inventory and drop it into a reward slot. Then select
the 'EXP' slot and type in the experience points you will give away, and
the 'CRED' slot to type the cash reward.
Note that you keep the reward until the mission is completed. Also, XP
deducted will never bring you down a level. Instead it becomes negative
XP, which you must earn in addition to the normal amount for next level.
Finally, choose 'team share' just in case you hand this mission over
to a team, and press 'create mission' to complete the creation process.
The mission now shows up in your missions view and you can pick it up
and give it away as described above.
 Inventory
and Wear view
Inventory
and Wear view Trading
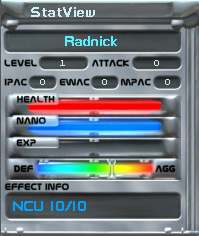 Stats
View
Stats
View 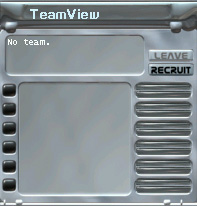 Team
View
Team
View