Making Webquests
Longina Burroughs [email protected]
| Step One: Getting Started |
Step
Two:
Standards |
Step Three: Text |
Step Four: Email Link |
| Step Five: Linking within Page |
Step Six: Linking Websites |
Step Seven: Adding Images |
Step Eight: Changing Font and Color |
Getting
Started
1. Go to the following website to get background information about what webquests are.
Webquest Introduction
2. Next you need to get a template to use for the student page. Click on Template below.
Template

3. Select Edit from the top menu bar.
Select "Select All"
Select Edit from the top menu bar.
Select "Copy"
4. Double click on Microsoft Word

Select Edit from the top menu bar.
Select "Paste"
Your template should be displayed. If it is not repeat step 3.
5. Repeat steps 3 and 4 for the teacher page template.
6. You should have two windows open in Microsoft Word.
Standards
1. Go to the california state standards website.
2. Choose a standard you would like to focus on for your grade level.
3. On the teacher page you will want to include the standard.
Text
1. You will now want to enter your text for student page and teacher page.
2. Follow the descriptions of each section given in the template.
3. for examples and more explanation, go to the following website. Building Blocks
4. You will want to delete any text that you don't want to appear.
5. Under credits and references, add the following statement.
We all benefit by being generous with our work. Permission is hereby granted for other educators to copy this WebQuest, update or otherwise modify it, and post it elsewhere provided that the original author's name is retained along with a link back to the original URL of this WebQuest. On the line after the original author's name, you may add Modified by (your name) on (date). If you do modify it, please let me know and provide the new URL.
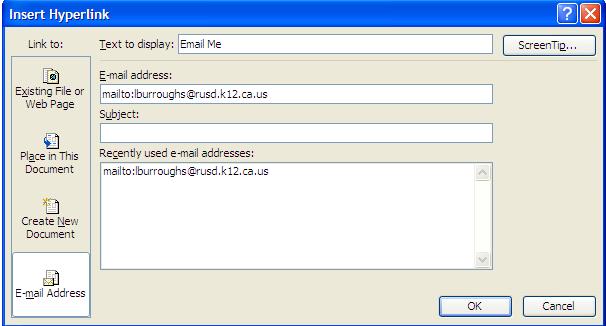
Email Link
1. Select Insert from the top menu bar.
2. Select "Hyperlink".
3. Select Email Address from the side menu bar.
4. Type "Email me" in the text to display box.
5. Type your email address in the email address window.
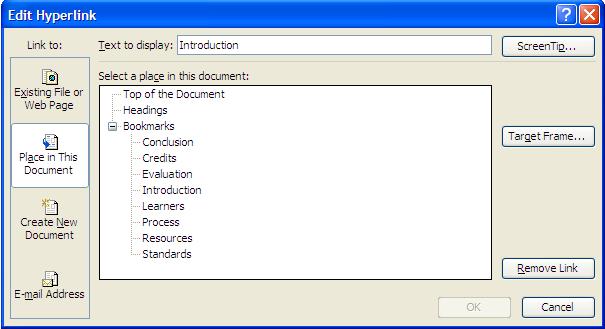
Linking Within Page
1. You will want to create links for the blue titles: Introduction, task, process, etc.
2. Highlight Introduction.
3. Select Insert from the top menu bar.
4. Select "Hyperlink" .
5. Select Place in This Document.
6. Type Introduction in the text to display box.
7. Select Introduction from select a page in this document.
8. Repeat steps 2-7 to create links for the rest of the titles.
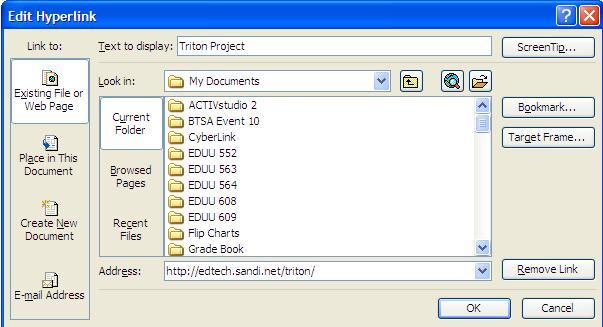
Linking Websites
1. You will want to create links for any websites you used.
2. Highlight the website address. (Example: www.google.com)
3. Select Insert from the top menu bar.
4. Select "Hyperlink" .
5. Select Existing File or Web Page.
6. Type the name of the website in the text to display box.
7. Type the web address in the Address section.
8. Repeat steps 2-7 to create links for the rest of the web addresses.
Adding Images
1. Put the cursor where you would like to add a graphic.
2. Select Insert from the top bar menu.
3. Select "Picture"
4. Select Clip art
5. Choose a picture you would like to add.

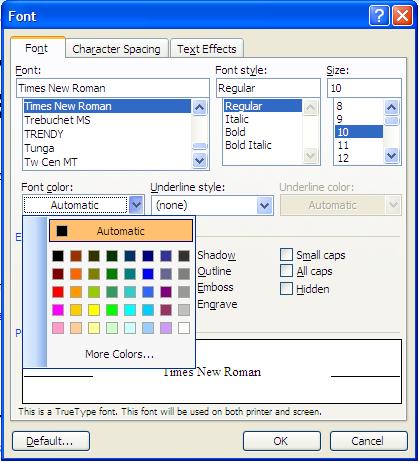
Changing Font and Color
1. Highlight the text you would like to change.
2. Select Format from the top menu bar.
3. Select "Font".
4. You can select font, size, and color.
To change background
1. Select Insert from the top menu bar.
2. Select "Background"
3. Choose a color.
1. Go to the following website to get background information about what webquests are.
Webquest Introduction
2. Next you need to get a template to use for the student page. Click on Template below.
Template
3. Select Edit from the top menu bar.
Select "Select All"
Select Edit from the top menu bar.
Select "Copy"
4. Double click on Microsoft Word
Select Edit from the top menu bar.
Select "Paste"
Your template should be displayed. If it is not repeat step 3.
5. Repeat steps 3 and 4 for the teacher page template.
6. You should have two windows open in Microsoft Word.
Standards
1. Go to the california state standards website.
2. Choose a standard you would like to focus on for your grade level.
3. On the teacher page you will want to include the standard.
Text
1. You will now want to enter your text for student page and teacher page.
2. Follow the descriptions of each section given in the template.
3. for examples and more explanation, go to the following website. Building Blocks
4. You will want to delete any text that you don't want to appear.
5. Under credits and references, add the following statement.
We all benefit by being generous with our work. Permission is hereby granted for other educators to copy this WebQuest, update or otherwise modify it, and post it elsewhere provided that the original author's name is retained along with a link back to the original URL of this WebQuest. On the line after the original author's name, you may add Modified by (your name) on (date). If you do modify it, please let me know and provide the new URL.
Email Link
1. Select Insert from the top menu bar.
2. Select "Hyperlink".
3. Select Email Address from the side menu bar.
4. Type "Email me" in the text to display box.
5. Type your email address in the email address window.
Linking Within Page
1. You will want to create links for the blue titles: Introduction, task, process, etc.
2. Highlight Introduction.
3. Select Insert from the top menu bar.
4. Select "Hyperlink" .
5. Select Place in This Document.
6. Type Introduction in the text to display box.
7. Select Introduction from select a page in this document.
8. Repeat steps 2-7 to create links for the rest of the titles.
Linking Websites
1. You will want to create links for any websites you used.
2. Highlight the website address. (Example: www.google.com)
3. Select Insert from the top menu bar.
4. Select "Hyperlink" .
5. Select Existing File or Web Page.
6. Type the name of the website in the text to display box.
7. Type the web address in the Address section.
8. Repeat steps 2-7 to create links for the rest of the web addresses.
Adding Images
1. Put the cursor where you would like to add a graphic.
2. Select Insert from the top bar menu.
3. Select "Picture"
4. Select Clip art
5. Choose a picture you would like to add.
Changing Font and Color
1. Highlight the text you would like to change.
2. Select Format from the top menu bar.
3. Select "Font".
4. You can select font, size, and color.
To change background
1. Select Insert from the top menu bar.
2. Select "Background"
3. Choose a color.