THE FOLLOWING INFORMATION IS WRITTEN BY A LAYMAN, FOR LAYMEN:
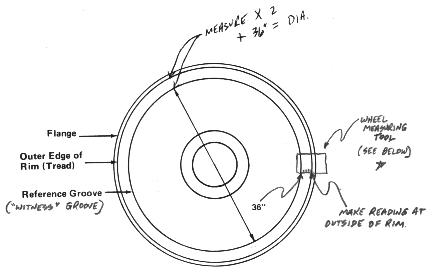
To properly measure the diameter of a locomotive wheel, measure the distance from the reference groove (sometimes called the "witness grove") to the outer edge of the rim. This groove, on most wheels except as noted below, represents 36 inches of diameter. Take the distance you measured as instructed above, multiply this by two (you actually only measured half the needed distance) and "add back" the 36 inches. The result will be the actual diameter of the wheel. If one refers to the following diagram, the above should become clearer. It is not as complicated as it sounds!
WHAT DOES ONE MEASURE THIS WITH?
One may measure this distance between the "reference groove" and the outer edge of the rim (to the tread) with any ruler, but to be useful, the ruler should be marked in tenths of an inch rather than eighths, otherwise a rough guess will have to be made. My biggest problem was finding a ruler marked in tenths, or fifths. I made the following illustrated "measuring tool" from scratch as I could not find a suitable ruler. I have tried to reproduce it accurately so that it may printed out from the web page and used, however differences in printer resolution, etc., may skewer the accuracy of this tool. My own experiment printed this ruler out in perfect scale so that it could be printed, clipped out, laminated (highly recommended) and used.
I have scanned the ruler at 300 DPI for the sharpest rendition when printing (most printers print at a maximum of 300 DPI), however the screen image was very, very large. I have attempted to scale down only the screen visual image size, but one should be able to "right click" and save the image for printing at the original size. If there are any problems with this process, please email me with what results you obtained. Also I would be interested in hearing from those who had successful results, if any.

WHICH WHEEL DO I MEASURE?
To determine which wheel to take the measurement from, look for the one, usually on the lead truck, that has an axle generator or mechanical drive unit (the latter is rare, even if they have been left attached like on BN units) attached to the bearing housing. On later, high tech locomotives that may not have axle generators for speed indicators, I generally start with the No. 2 axle on the lead truck. (added by RJM 08-21-06).
USING THE WHEEL MEASURING TOOL
The wheel measuring tool is designed to make the job of measuring wheel diameters quicker and easier. This method, and the simple method that opened this page, both make the measurement by measuring ½ of the needed distance. This is corrected by the first method by multiplying by "2". This tool does the same thing by changing the scale of the ruler to have 1/2" represent 1" of measurement.
Most wheels have the "reference groove" at 36 inches, which includes actual 40" wheels and wheels known as "Fat Forties" which are actually 42" wheels (that is why some 40 inch wheels you might measure will measure over 40 inches). Some larger wheels, like the 42" wheels on AT&SF and BNSF SD75Ms have the "reference groove" at 38"! I know of no easy way to tell the difference between a "Fat Forty" 42 inch wheel and an actual 42 inch wheel and have not been able to ascertain such information from any mechanical people I know. By sight, I think I have noticed that it appears the true 42 inch wheel is that the distance between the "reference groove" and the INSIDE of the rim seems to be a bit narrower than on the "Fat Forty".
To measure the wheel, place the measuring tool (or ruler) with "0" or the "36/38" inch indicator at the OUTSIDE edge of the "reference" or "witness" groove, making sure it isn't cocked. Then read the marking at the outside edge of the "rim", or at the tread of the wheel -- as the wheel is tapered, or may be worn at the outside edge, even allowing a bit extra won't hurt. Read the measurement at that point. With the measuring tool, you may read the actual measurement. With a plain ruler you must calculate as outlined at the beginning of this page. If you actually have a forty-two inch wheel with the witness groove located at 38 inches, you will have to add an additional two inches to the resulting measurement.
The resulting measurement is applied this way: If you measured, as an example, the wheel at 41.2 inches, then use the TWO THUMBWHEELS behind the small door on the back of PULSE brand Head End Devices to set or calibrate the wheel diameter. These thumbwheels are set by DROPPING THE FIRST NUMBER OF THE MEASUREMENT (41.2 becomes "12") and dialing in "12". 40.0 would become "00" and so forth. Pressing and holding the TEST button on the face of the device will show the wheel diameter set by the thumbwheels.
With BROCKSOPP or BACH-SIMPSON type speed indicators that will not allow the calibration feature to work and instead just show the wheel diameter set for, the speed indicator must be removed to be calibrated using button on REAR and the calibrate button on the front of the face simultaneously.
Generally speaking, for informational purposes, a locomotive that has both the counter and speed indicator receiving its input from the same source, if the footage for a miles reads LONGER than what it should, then its speed indicator will read FASTER than what it should -- if that is the case, the wheel diameter is set too large. For example, if the footage for a mile read 5500 feet rather than 5280 feet, then it might read 55 MPH when you are actually only going 51 MPH. In the case I sited here, the wheel diameter was set at 43.8" when it should've been set at 42.8". Conversely, if the footage reads SHORT, then the speed indicator will probably read SLOWER than the actual speed traveling. (Paragraph added by RJM 08-21-06).
Locomotives with computer screens have to have wheel diameter set from within the computer using maintenance codes to access the feature. (RJM 06-26-98)
USE YOUR BROWSER'S "BACK" BUTTON TO NAVIGATE BACK TO PREVIOUS PAGE!