NEWS FLASH: 2/03 -- Updated to v2.0 with some improvements.
Skip to Eyes/Whiskers/Claws
If you're fortunate enough to have never been here before,
here's the skinny: you see a picture of a hot girl and you think she would
absolutely "0wnz0rz" as a catgirl...never gonna happen, right? Well, that may be
true, but until it does become possible, this tutorial is intended to take you
as close as you'll get.
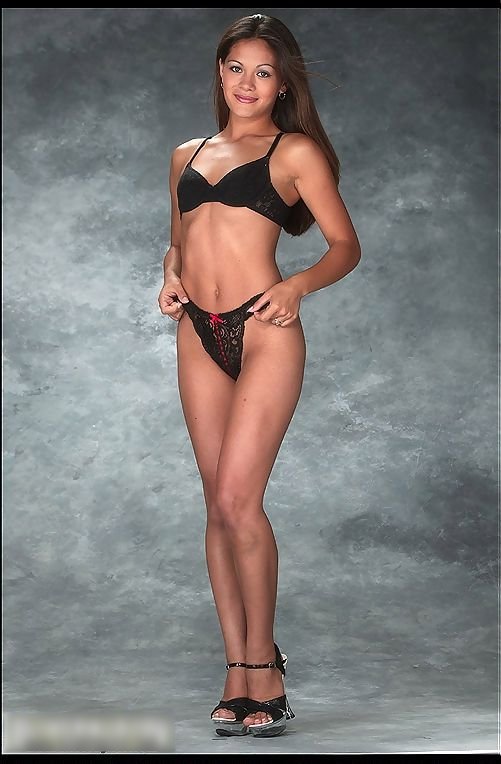
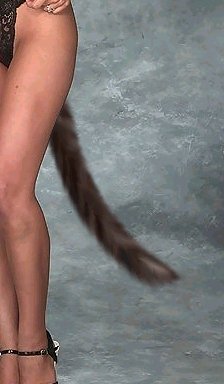
I was net-surfing as usual when I found this lovely lady
(alas, I didn't quite get her name). I can only pray that she isn't reading this
now, or at least that she doesn't know where I live.
Before we begin there are a few things to which I would
like to draw your attention:
- This tutorial assumes you are on Jasc Software’s Paint
Shop Pro 7. If you aren’t, because you
can’t or would rather not, I hope you know your preferred paint program well enough to
make the appropriate conversions. A good free paint program, Pixia, can be found at
http://www.ab.wakwak.com/~knight/
- When you Select ANYTHING, I recommend the Lasso tool’s
Point-to-Point selection unless otherwise specified. Smart Edge may work if
you're lazy, but you risk a really jagged selection.
- When changing to a new tool (except the Draw tool), there are three variables
needing to be set: Brush Size (S), Hardness (H), Opacity (O). When one needs
to be changed, the format is thus: [S, H, or O] [=, >, or <] [value], e.g.
S>15 means set Brush Size to 15 or higher. The others, Step and Density,
should always always always be at 0 and 100 respectively. Your brush shape
should always be round, too.
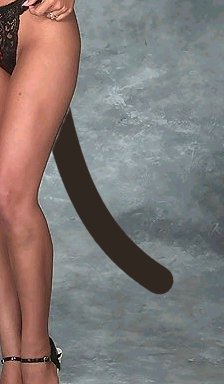
We will start off with the traditional mark of the catgirl:
the TAIL.
- Select the hips/thighs/ass, depending on whether it’s a
front, side, or back view. What you see here is a more or less front view, so
we'll select the thighs, because you’ll be drawing the tail going
straight down. The tail won’t look natural if it appears at a right angle with
the body from ANY viewpoint.)
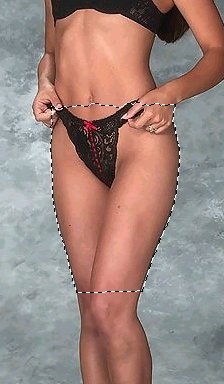
- Select anything else that the tail would go behind
(don't forget to hold down Shift as you do). Luckily we needn't worry about
that in this pic.
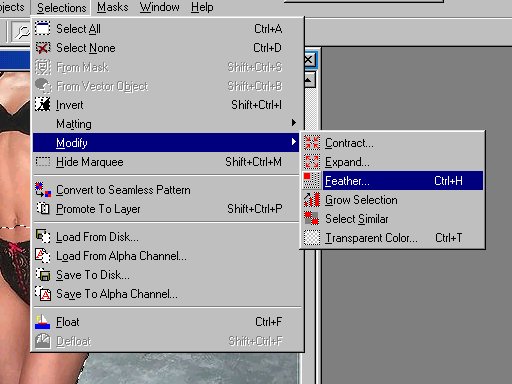
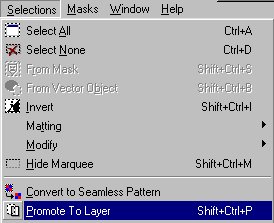
- Feather, Promote, then Select None. All can be reached via the Selections menu.
(I used to Promote, Invert, and Feather, but no more.)

- Choose a fur color. If you’re unsure, hair color always
works; just use the eyedropper on her hair.

- Switch to the Draw tool (Type = Bezier Curve; Width = half the size of one
breast; Antialias = on; Create as Vector = on; Close Path = off). I used to
use the Paintbrush tool, but my mouse hand is bullcrap, so this way turns out
better. (You can try using the Paintbrush, if you're cocky; just remember to
first create a new raster layer between the Promoted Selection and the
Background.)

- Change the active layer to "Background", then draw a
straight line from behind her thighs, or between her ass cheeks, or wherever, to where
the tip of the tail will be. The next two clicks will determine how the tail
bends. Keep Undoing and trying over again until you're satisfied.
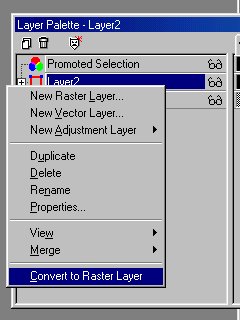
- You will notice in the Layer Palette that the new tail
has a vector layer all its own, most likely dubbed "Layer2". Right-click on
"Layer2" and select Convert to Raster Layer.
- If it’s really jagged where the tail and some other
object meet, smooth it out with either the Smudge, Soften, or Eraser brush (S = about
10; H = 0). Don't forget to change to the appropriate layer.
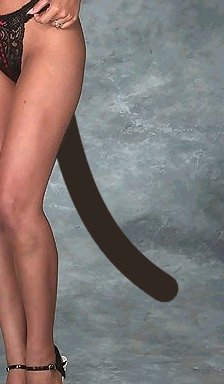
- Use the Retouch tool to Lighten and Darken RGB for depth
(S = half the current width of the Draw tool; H = 0; O = 10). My suggestion:
gently Lighten the tail all over, then Darken it around the edges.
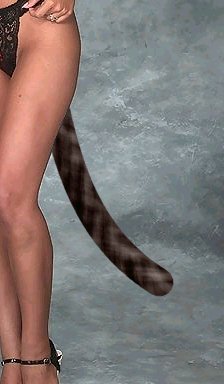
- Smudge the edges to make fur (H = 100). There is no hard
and fast way to do this; again, keep trying and undoing and trying again until
you like what you see.
11. In realistic photos like this, you may want to try
Effects | Edge | Enhance to make the tail a bit more solid. If it just doesn't
work, try applying a Gaussian Blur, or just Undo and forget about it.
Don't close up now; that was just half the
battle. It’s time for the EARS.
- Select the front part of the top of her head.

- Feather 2 pixels, Promote, and Select None, just like last time.
- Choose another color, if for some reason you don’t want
to keep the one you used for the tail.
- Select the Paintbrush (S = half the size of one eye).
- Draw the ears.

- Use Lighten/Darken RGB (S = half the current size of the
Brush tool; H = 0; O = 10) to add depth. I Darkened the ear all over, then
Lightened the edges, like this.

- Lightly Smudge the edges for fur (H = 100).


The result? "Shake it, baby!" --Duke Nukem
Next part:
Eyes, Whiskers, and Claws