It is now time to install the landing gear mounts. arefully install these parts following the outline as given on the plans
It is now time to install the bellcrank, leadouts and flap pushrod. Make sure at this point that the bellcrank does not rub aginst any of the ribs.
The leading edge sheeting comes next. Again, make sure that you have straight edges on the sheeting. Use a straight edge and square them up if necessary. I like to do the top of the wing first.
Put an edge of the sheeting up aginst the leading edge T-Bar and run a bead of instant glue along the joint. Take a #11 blade and cut the T-Bar so that it is even with the top of the sheeting. I like to take windex and spray a light amout on the top of the sheeting at this point. It makes the sheeting much easies to work with while we glue it onto the ribs. With the leading edge sheet damp run a bead of Medium glue along the top of the spar, and starting in the front of the middle of the sheeting carefully roll the sheet back to the spar making sure to put enough pressure on the sheetilng to keep it pushed down aginst the top of the ribs. After you have both sides of the top of the wing done I turn the jig over so that I can now work on the bottom of the wing. I take instant glue and run a bead along each rib where it lies aginst the sheeting. Apply the sheeting on the bottom of the wing at this point. After you have the sheeting glued in place turn the jig so that you can place a few drops of instant glue between the top and bottom spar. Put two or three drops at each rib openning and let the glue run down the ribs.
Apply all the cap strips on the ribs at this time. Put the center planking on the center section and at the end of the wing. Install the weight box.
Now is the time to sand the trailing edge to shape. Be careful not to apply to much presure so that you don't break ribs. Use a long sanding block and sand the leading edge to shape. You can also sand the leading and trailing edge sheeting at the cap strip joint to get them flush with one another.
At this time you can remove the wing from the jig and put the jig away. Put the planking on the bottom of the center section. Install the wingtips
and tip riblets. Sand everything to the desires smoothness. Apply a coat of clear dope and set aside. As you start to build other parts you will want to come back to the wing and apply another 3 or 4 coats of dope.
On to the Fuselage.
I like to build the engine cruch first. Once the engine is in place and the dampers have been glued in I put the F-1 & F-2 in the proper place. Depending on which engine I chose to use,
I rolled out the full size plans which are done by Robin Sizemore. They are up to his very profenional strandards. They are very detailed and will make the construction of this beautiful Classic Leagal airplane very easy to build by a novie or expert builder. I would not recomend it for a beginner since there is not a direction booklet supplyed with the kit.
I started punching out the parts and stacking them in their appropriate piles. I neatly organized the piles into stacks and put them on a small table. By doing this I find it easier than placing the parts back in the box and then needing to search for each part when I need it.
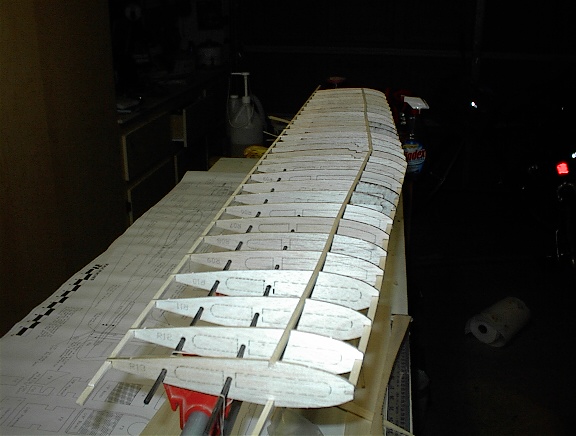
I like to start with the wing first when building. The first thing is to glue the ply doubles that will suport the landing gear to ribs 4&5. I then carefully space the arms on the aAjusto Jig that is used for building wings. I then slide the jig rods through the holes of the ribs that were already laser cut. Having the allignment holes already cut by the manupacture make this process very easy and accurate. Once the ribs are in place I place the 1/4th inch spar in the notches across the top of the wing
Next the 1/8 inch square strip goes in the trailing edge followed by the lower 1/4 inch spar in the notch on the bottom of the ribs. At this time I make sure that all parts fit fluch with the edge of the ribs. If I need to make an adjustment by cutting a small piece of wood from the lower notch of the rib or to raise the spar to fit even with the rib surface this is the time to do so. I eyeball down the trail edge and leading edge of the wing to make sure that it is straight. When I am satisfied that everything is properly fit and straight I place a drop of instant drying glue at each joint.
Next comes the sheeting on the trailing edge of the wing. Make sure that you have a straight edge on both trailing edge sheets. I found that I needed to use a straighe edge to cut a straight edge on both the upper and lower sheets. Carefully glue the trailing edge sheeting on the bottom of the wing making use to keep the allignment straight along the trailing edge. I use instant glue here, starting at the center of the strip and working out to the ends. After you have all sheeting on the bottom you can put the sheeting on the top. I like to use mediun glue here. I place the glue on all the ribs that a single sheet will cover and then place the sheet on the ribs again making sure to keep the straight edge even along the rear of the ribs. I now place the 3/8th square trailing edge in place. I do not recomend sanding it to shape at this time.